This tutorial teaches how to internationalize (i18n) your WordPress themes and plugins; translate the texts quickly and efficiently; and store the translations in the right place for WordPress. We cover texts in the PHP code, plain JavaScript and React.
On This Page:
- What is Internationalization in WordPress?
- Get Started: Understanding Gettext, Text Domains, and Domain Paths
- Using Gettext Functions in PHP
- Internationalizing JavaScript with Gettext Functions
- Generating Portable Object Template (POT) Files
- Translating PO Files
- Converting the PO Files to JED and MO Files
- Loading The Translation Files to WordPress
What is Internationalization in WordPress?
Internationalization (i18n) is the process of preparing and designing the elements in your code for translation.
This process includes:
- Wrapping the texts in gettext functions
- Extracting all the texts into a translatable “resource file”
- Translating all texts
- Saving the translations in the right way, so that WordPress can load them
Understanding Gettext and Text Domains
It’s easiest to learn how to internationalize your themes and plugins by starting with an example.
Without any translation features, this code could have simply been:
<h2>Comments</h2>
But people will use this theme on sites running different languages, so this H2 needs to say the word “Comment” translated. So, instead of simply having the code above, the TwentyTwentyFour theme includes the following:
<h2><?php esc_html_e( 'Comments', 'twentytwentyfour' ); ?></h2>
Let’s look deeper, understand each part and learn from it how to write your own translation-ready code.
The theme uses the esc_html_e function to:
- “Escape” any HTML entities in the text (not needed in this example, but a good practice to follow).
- Set the Text Domain as “twentytwentyfour” (we’ll talk about Text Domains in a minute).
- Echo either the translation, if it exists, or the original text via GetText.
And, it’s running inside a PHP block, so that the whole thing executes when the theme runs.
Text Domains
A text domain is a unique identifier for your plugin that helps WordPress fetch translations. It should match the plugin’s slug. For example, __(‘Hello, world!’, ‘my-plugin-name’); where ‘my-plugin-name‘ is the text domain.
Here is how you declare the text domain that the theme uses:
/*
Plugin Name: My Plugin Name
Plugin URI: http://plugin-uri.com/
Text Domain: my-plugin-name
Domain Path: /languages
*/
Using Gettext Functions in PHP
On the server-side, you need to start by wrapping any text you want to translate within the appropriate internationalization helper functions. This enables WordPress to parse and later replace these texts with their translations.
Wrapping Basic Strings
Basic strings refer to simple, static text within your application that doesn’t change based on variables or context. These are most often hard coded messages or interface labels that remain constant.
There are different functions you can use:
- The __() function returns the strings
__('Hello, world!', 'your-text-domain');
- The _e() function echoes a translatable string
_e('Hello, world!', 'your-text-domain');
Wrapping Variables
Variables are dynamic values that need to be inserted into translated strings. For example, if you have a greeting message that includes a person’s name, you would use a variable to represent the name.
Let’s say you have a string like the following:
echo 'Welcome $name.'
In this case, $name is the variable and you shouldn’t include it in the translation. Instead, you should use a placeholder in place of the variable. Then, you can use the printf() or sprintf() function to output the translated string with the variable value inserted.
printf(
    /* translators: %s: Name of a person */
    __( 'Welcome %s.', 'your-text-domain' ),
    $name
);
Now, the translator can translate “Welcome %s” as an entire phrase. The PHP printf() function inserts the name of the person back into the string.
Wrapping Plurals
Different languages have different rules for plurals. GetText helps ensure that these rules are appropriately followed for all languages.
For plurals, you can use the _n() function, which takes four parameters:
- The singular form of the string
- The plural form of the string
- The number that determines the plural form
- The text domain
Below, you can find an example of how to handle this in WordPress.
printf(
	_n(
		'%s comment',
		'%s comments',
		get_comments_number(),
		'my-plugin'
	),
	number_format_i18n( get_comments_number() )
);
Internationalizing JavaScript with Gettext Functions
Since WordPress 5.0, you can internationalize JavaScript files using almost the same set of i18n functions as used in PHP.
To utilize i18n functions in your JavaScript code, you need to make sure your JS file declares ‘wp-i18n‘ as a dependency.
wp_register_script(
‘sample-script',
plugins_url( ‘app.js', __FILE__ ),
array( 'wp-i18n' )
);
Once you add the dependency, you can use the i18n functions in your JavaScript file. Here’s an example of how to use the __() function to translate a string:
const { __ } = wp.i18n;
alert( __( 'This is a translatable sentence', 'your-text-domain' ) );
Generating Portable Object Template (POT) Files
After you wrap all the strings in your theme or plugin with gettext calls and define the text domain, you need to generate a translation template, otherwise known as a Portable Object Template (POT) file. This template file serves as a starting point for creating translations in different languages.
To generate the translation template file (POT), you can use the WP-CLI command wp i18n make-pot:
wp i18n make-pot ./ languages/my-plugin-domain.pot
Advanced Tip: Setting up Webpack for JavaScript Translations
If you’re working with a more complex setup, you may want to use the babel-makepot-loader npm package. This package helps you create a POT file directly within your webpack process and customize how you handle translations. For instance, you can have separate files for each script handle.
Generating PO Files for Each Language
Your POT file is only a template file that contains the original strings for translation. For each language you want to translate the strings into, you need to create a PO file. Each PO file includes strings and their translation to a single language.
You can easily generate PO files with WP-CLI using this command:
> cd languages
> cp my-plugin-domain.pot my-plugin-domain-eo.po
> cp my-plugin-domain.pot my-plugin-domain-pt_BR.po
This command creates the PO files, which are not only copies of your POT file, but also serve a crucial role in WordPress localization. Your PO files will be used to hold both the original strings and their translations.
Translating PO Files
Once you have your PO files, it’s time to translate them. There are different ways you can do this. For example, you can manually translate the string in each PO file by yourself, and then use a program like Poedit to convert your translated PO files to MO files. You can also send the PO files to professional translators, who return the translated PO file to you along with the MO (Machine Object) file.
Or, you can use the Free resource files translation tool from PTC (Private Translation Cloud). This tool is specifically designed for developers who are building custom PHP and JavaScript functionality.
Free resource files translation comes with a number of benefits:
- It is completely free now and will remain free forever.
- It produces instant, high-quality automatic translations.
- It sends back the translations in different file types, including .po files, .mo files, and .json files.
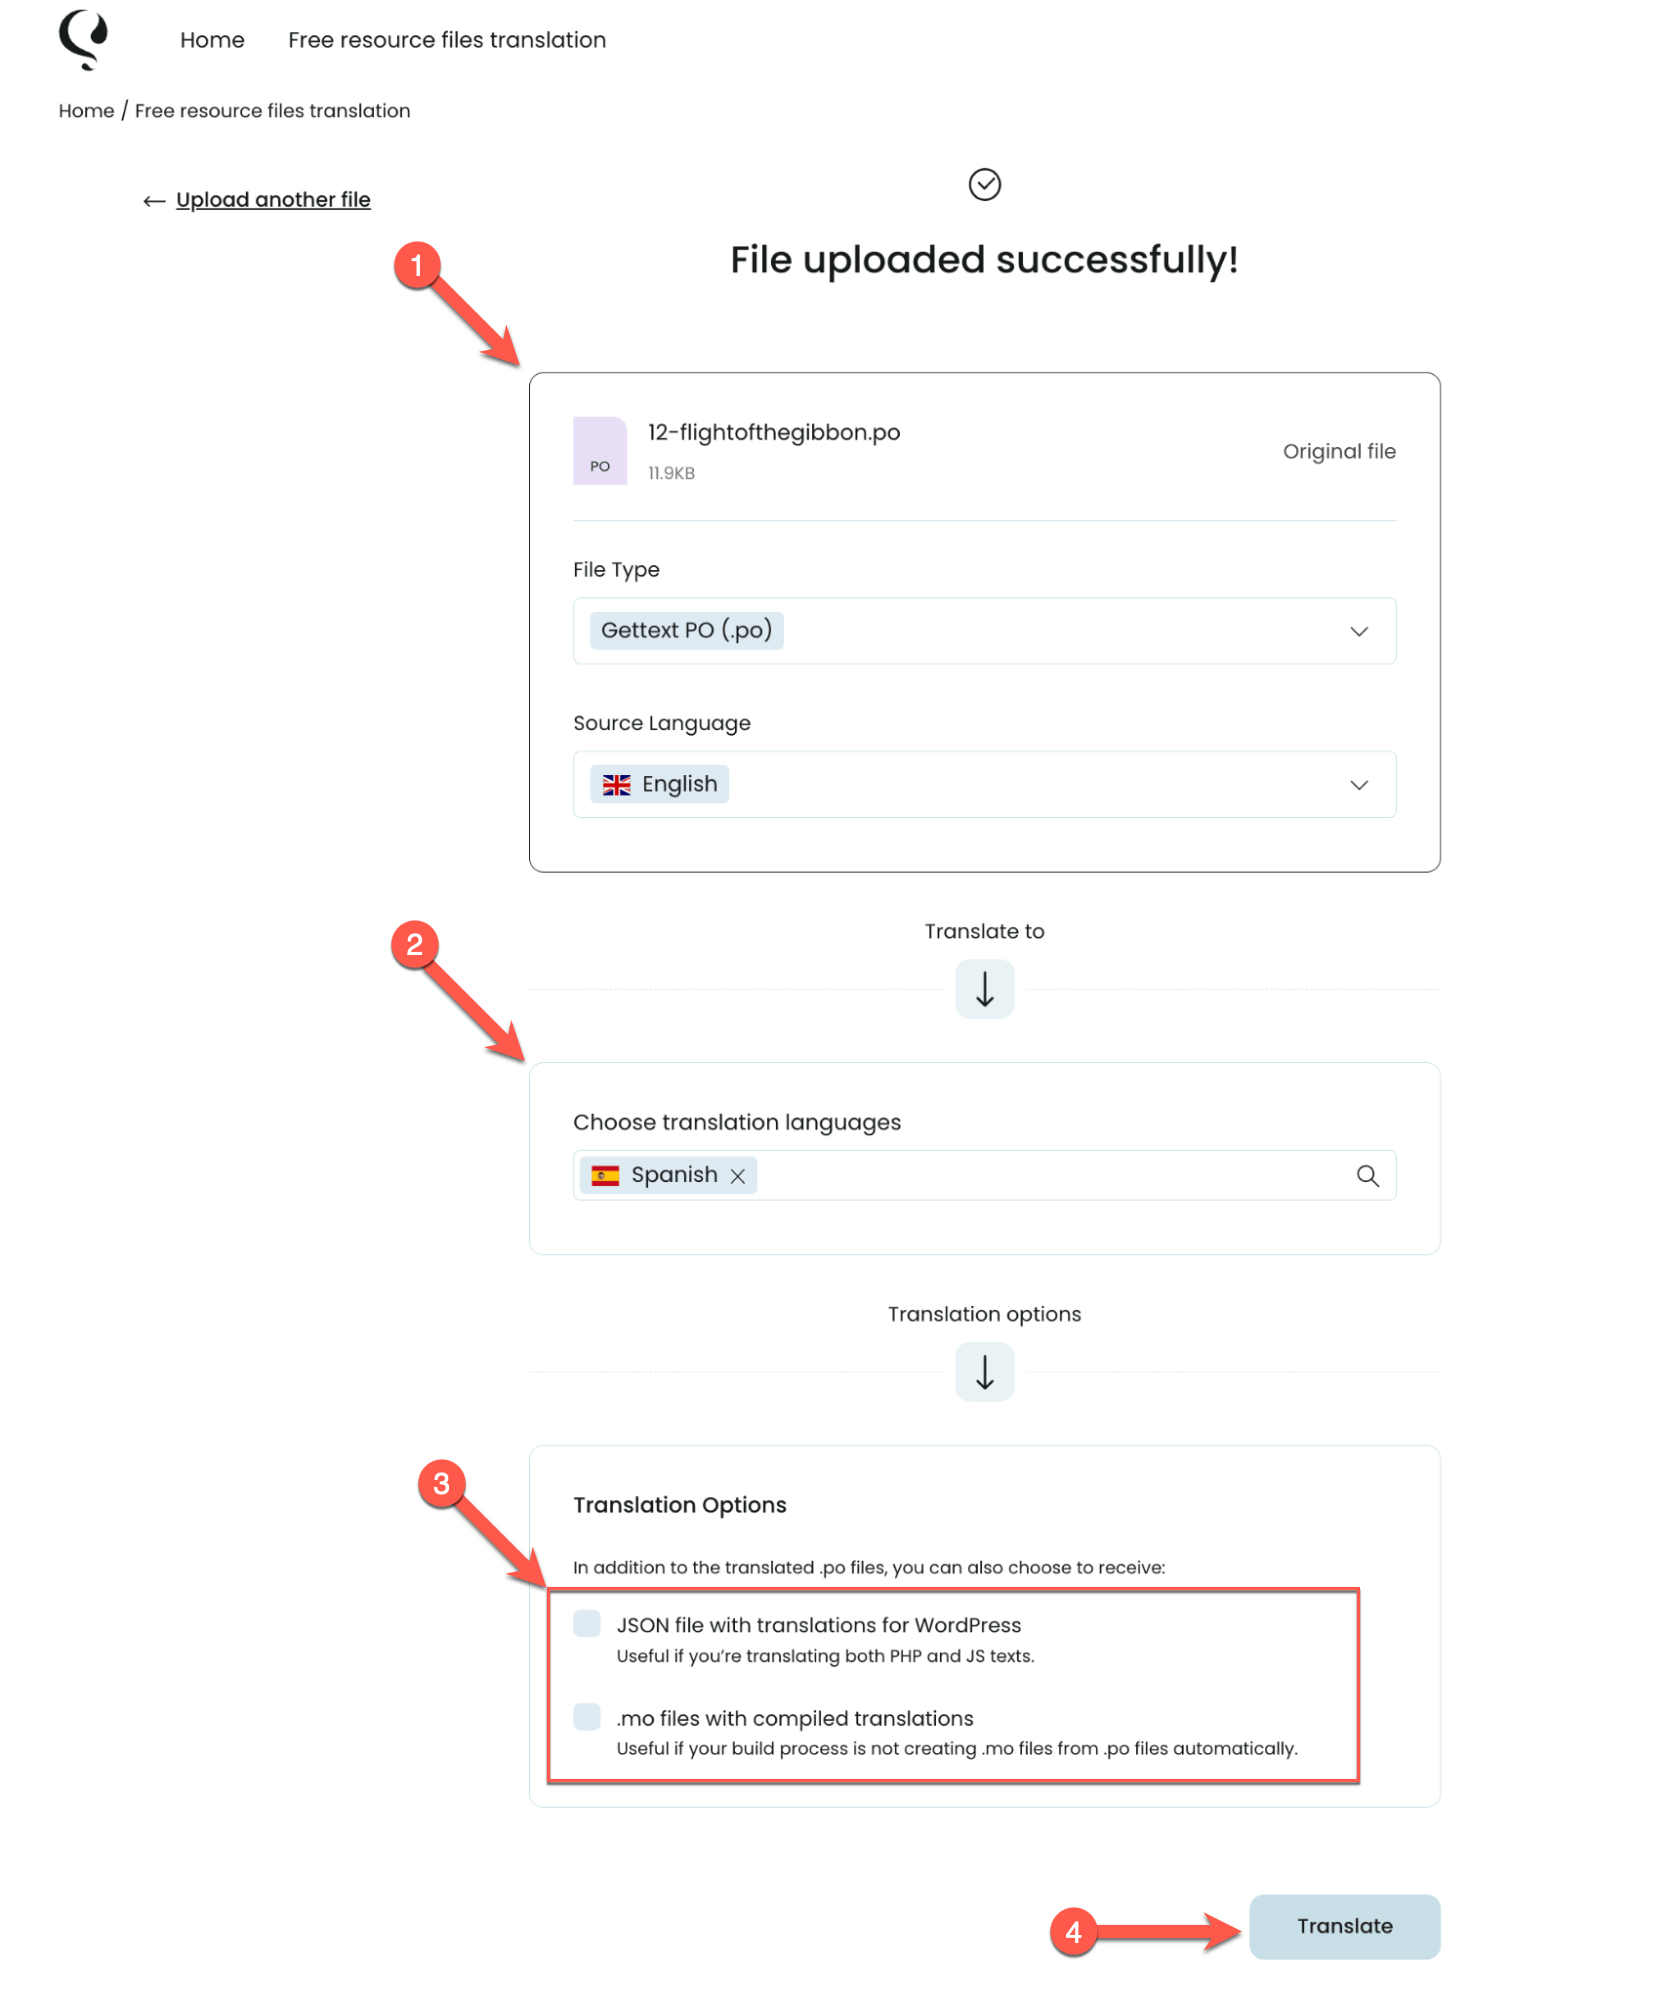
To translate your software’s resource files with the Free resource files translation tool, you only need to follow a few simple steps:
- From the Free resource files translation page, upload or drag and drop a .po file.
- Select the source language and the language you want to translate the .po file into.
- Select the file types you would like to receive back. Besides the standard PO file, you can choose to receive a JSON file (required for WordPress) or MO files with compiled translations.
- Hit the Translate button.
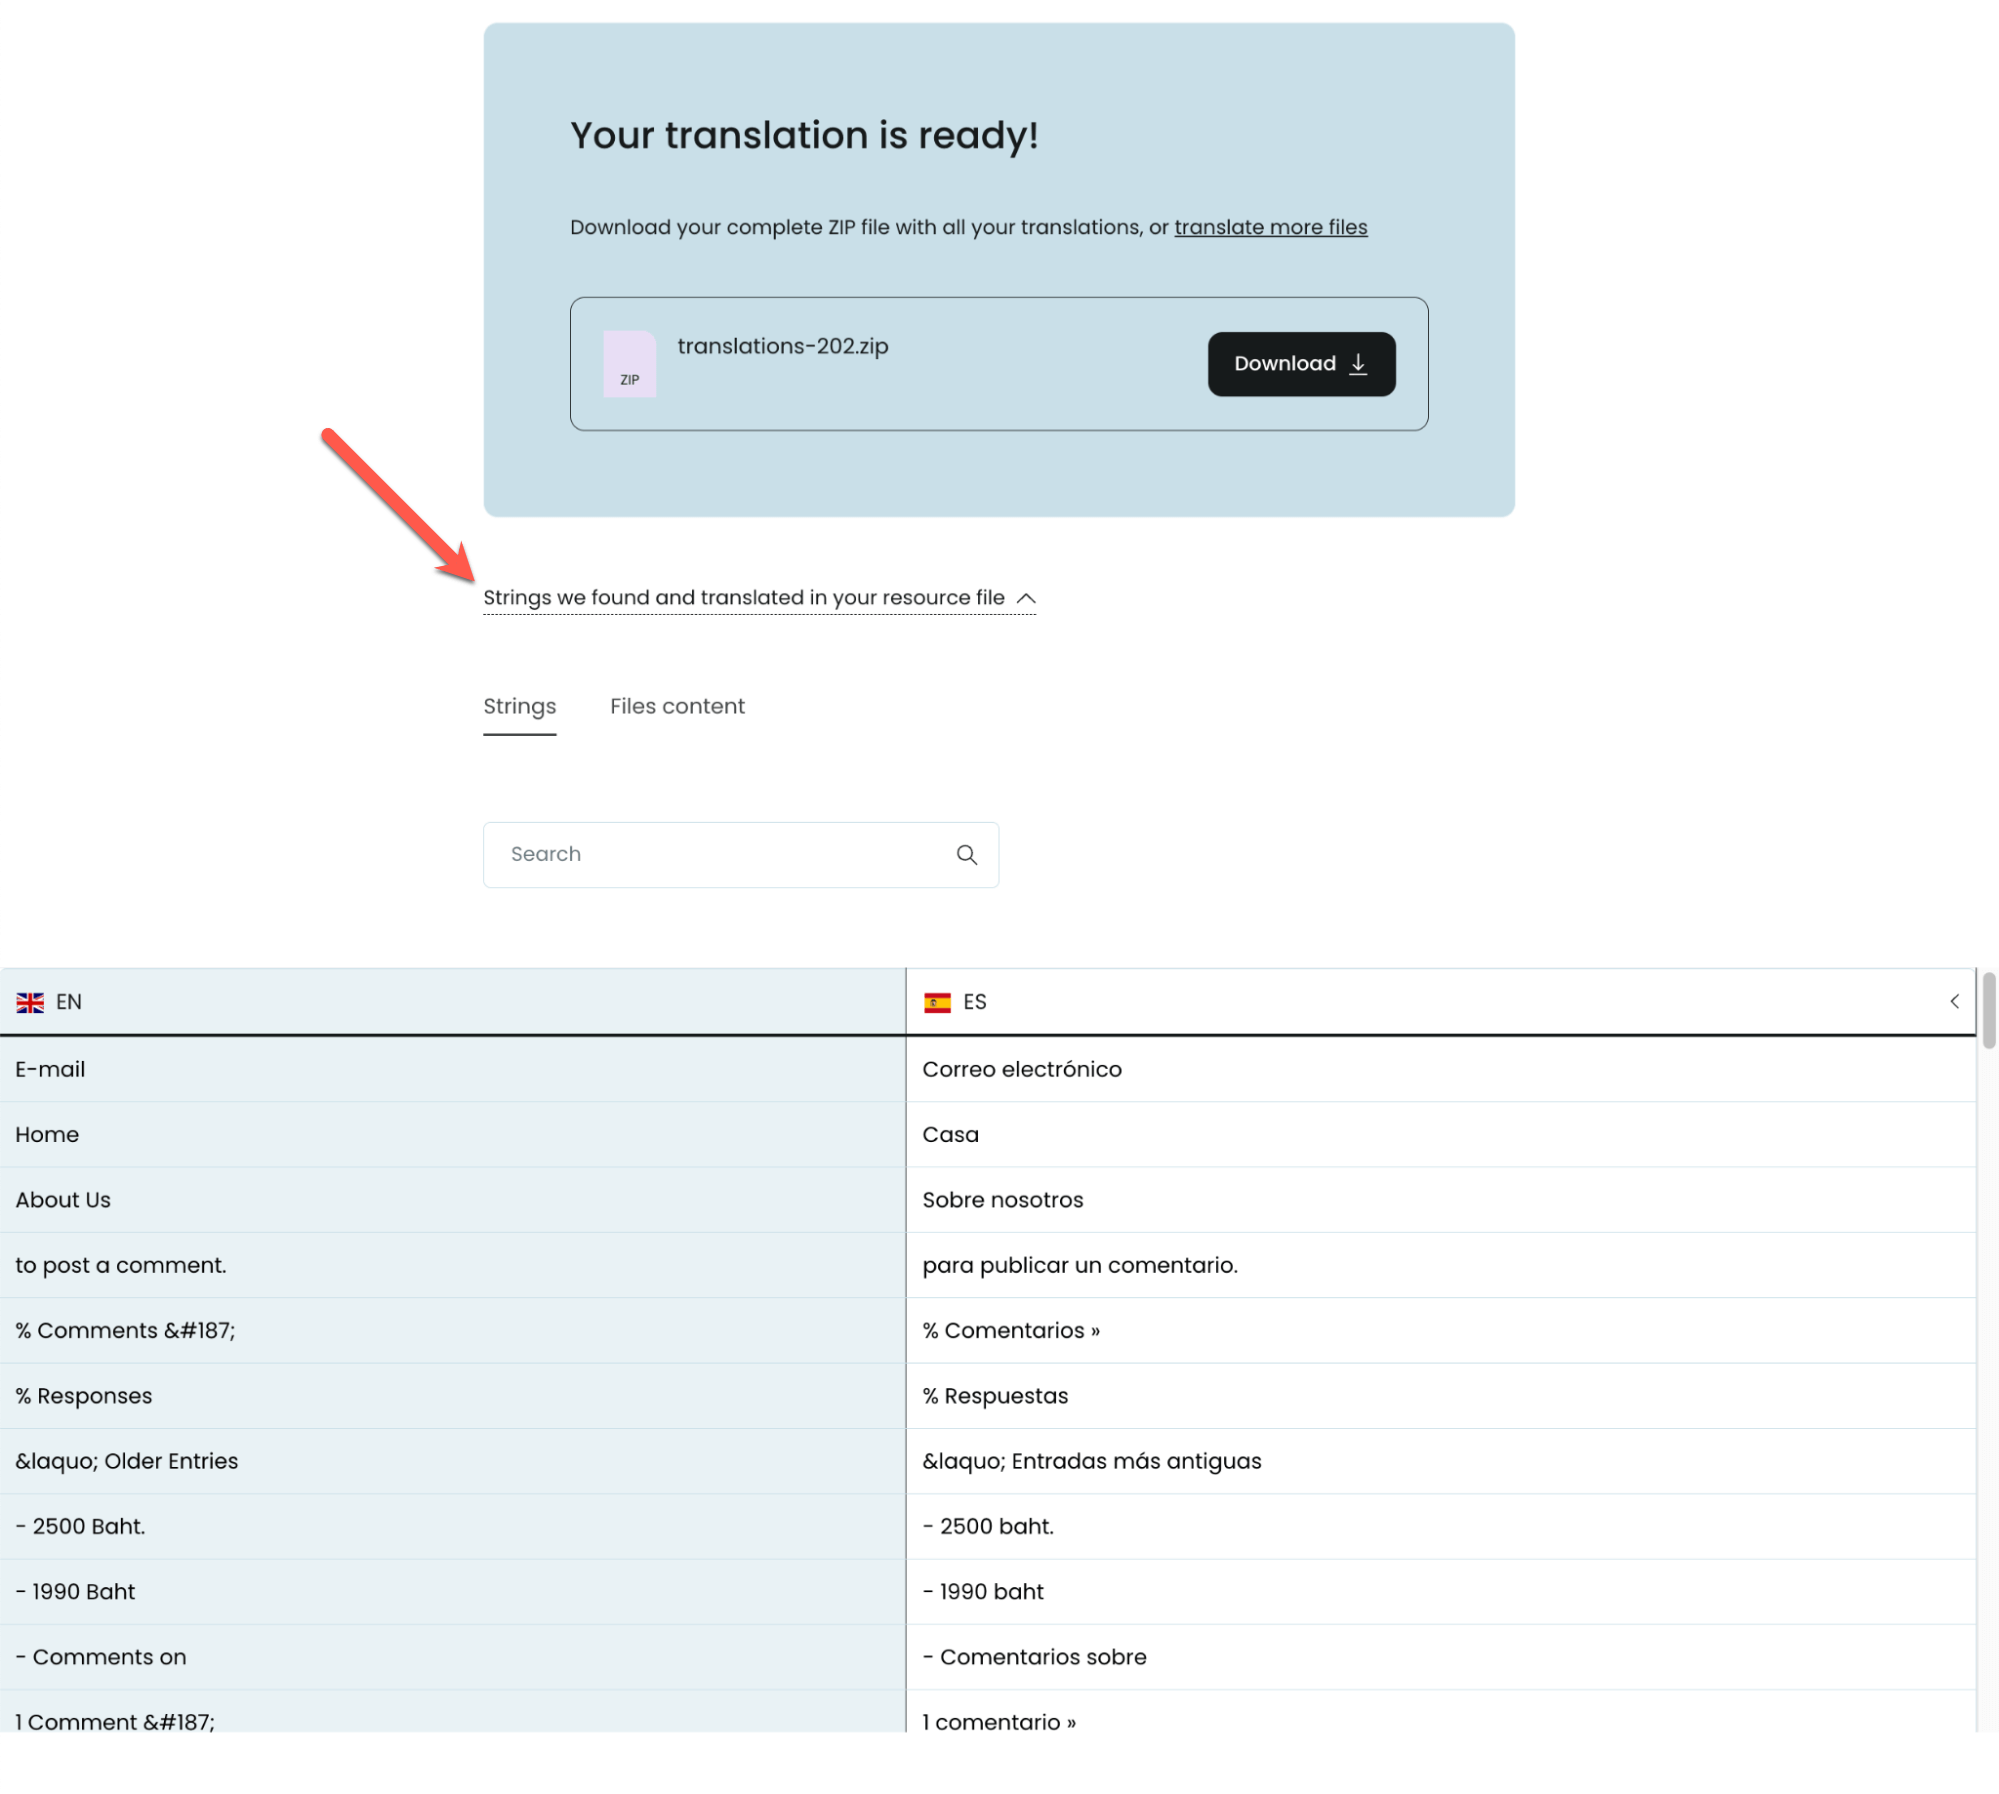
Now, the Free resource files translation tool begins processing your translation and informs you when your ZIP file with the translations is ready to download. You can also expand the Strings we found and translated in your resource file section to see all the strings in the original language and their translations.
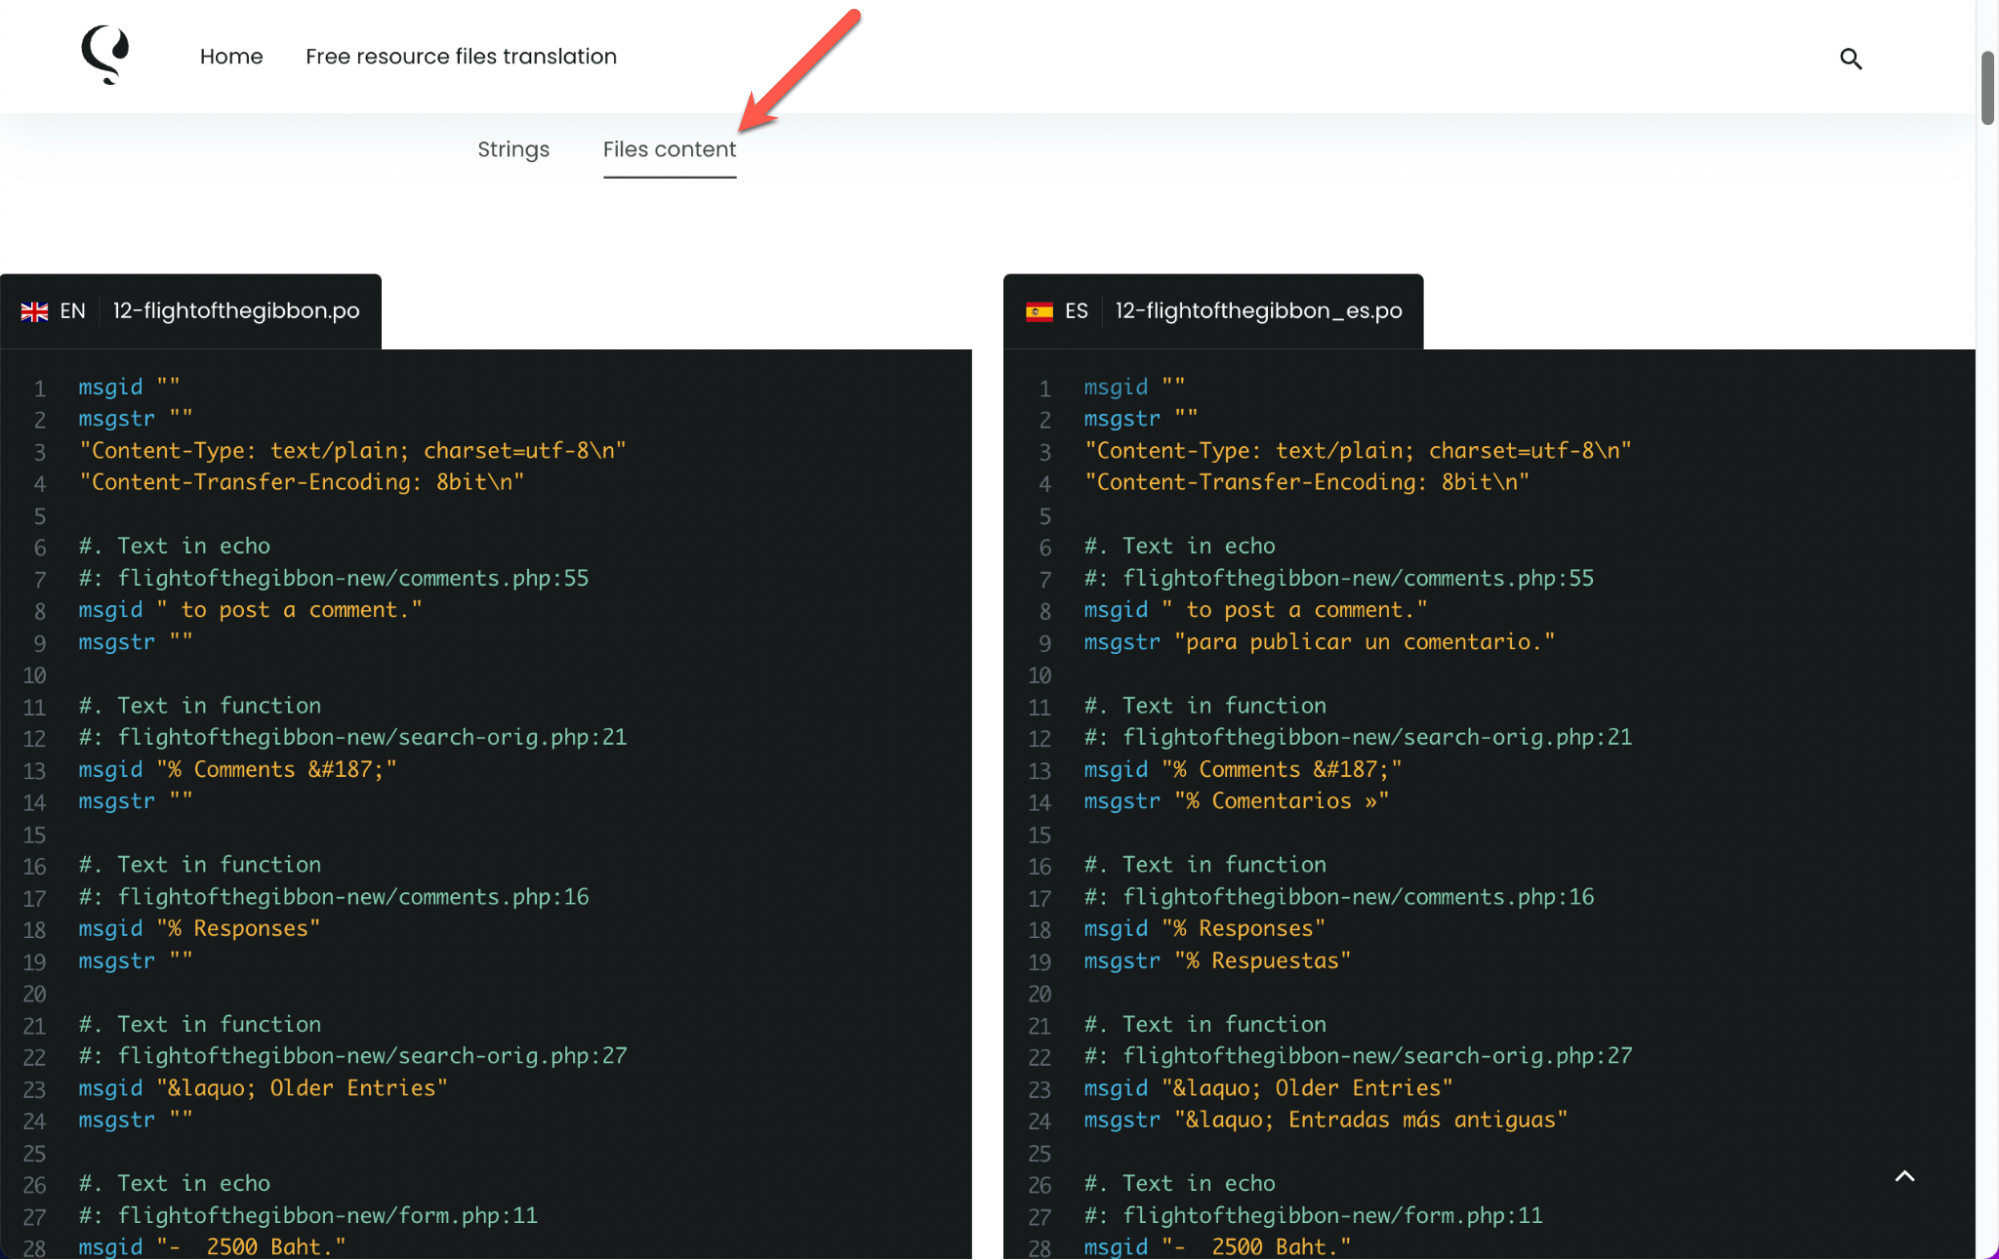
If you prefer a side-by-side view of the default and secondary language code, you can switch to the Files content tab.

Once you download the translation files, it’s very important that you give them a name that indicates which language they correspond to. For this, it’s worth seeing the locale names used by WordPress in the Translating WordPress project.
In PHP, you can choose any name you like, but we strongly suggest you follow the standard locale naming convention of language_COUNTRY, where every term should have two letters.
For example, for translations in German for Germany, you would name it de_DE.mo. For French from France, it would be fr_FR.mo.
If you’re working with JavaScript and JSON files, WordPress has a specific way of finding those translation files. It automatically searches in your ‘languages’ folder for a file named: ‘my-plugin-domain-{LOCALE}-my-script-handle.json‘.
To help WordPress locate the right JavaScript translation files, you need to rename them to match this pattern.
Converting the PO Files to JED and MO Files
Using the Free resource files translation tool from PTC?
You don’t need to run the commands below to convert PO files to JED or MO files. Just choose to additionally receive your translations in JSON files or MO files.
Once you have your translated PO files, you need to convert them into different formats that can be used by different parts of your software. The two formats we are focusing on are JED, which is used in JavaScript, and MO, which is used by PHP.
Converting PO to MO
Machine Object (MO) files are the binary format of PO files. These are more efficient for software to read, but they are not human-readable. In WordPress, you typically use MO files in your themes and plugins for PHP translations.
You can use the following commands:
> wp i18n make-mo my-plugin-domain-eo.po my-plugin-domain-eo.mo
> wp i18n make-mo my-plugin-domain-pt_BR.po my-plugin-domain-pt_BR.mo
Converting PO to JED
JED files are a specific format of JSON. Since JavaScript cannot directly use PO files, you need to convert your PO files to JED files.
Here is a basic example of the command line:
> wp i18n make-json my-plugin-domain-eo.po .
> wp i18n make-json my-plugin-domain-pt_BR.po .
Loading the Translation Files to WordPress
The last and final part is for you to tell WordPress where it can find the translation files. This allows WordPress to load the translations and associate them correctly with your theme or plugin’s text domain.
How you do this depends on whether your translation files are used in PHP or JavaScript contexts.
PHP
If your code is written in PHP, you need to use the load_theme_textdomain() function for themes or the load_plugin_textdomain() function for plugins.
> load_plugin_textdomain( “my-plugin”, false, plugin_basename( dirname( __FILE__ ) ) . '/languages/' );
Javascript / React
To load the translation files in Javascript, you need to use the wp_set_script_translations() function.
function myplugin_set_script_translations() {
wp_set_script_translations( ‘my-script-handle’, 'my-plugin-domain’, plugin_dir_path( __FILE__ ) . 'languages' );
}
add_action( 'init', 'myplugin_set_script_translations' );


