Introduction
If you are new to WordPress, you might wonder why you should create a child theme. Well, there are a couple of reasons why you would want to do that; the most important one being that if you applied modifications to the theme files directly and the theme is updated, you will lose these modifications.
Creating a child theme is not rocket science. All you need to do is create a child theme directory inside the theme’s folder, add the style.css and functions.php files to it, and add the language configuration file. In this tutorial we will explain in details how to create a multilingual child theme for Genesis theme as an example. The same steps can be followed to create a child theme for other themes.
Steps
- Create a child theme directory, which will be placed in wp-content/themes. A couple of things to note:
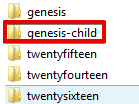
- It is recommended that the name of your child theme directory is appended with “-child”.
- Do not insert spaces when naming your child theme directory as it might create errors. See the following illustration.
- Create a stylesheet for the child theme (style.css file); this file will be placed inside the child theme folder that you created. The stylesheet must begin with the stylesheet header, which contains information such as child theme name, child theme URL, Description, and Template, etc…).
Note that for Genesis theme it is not recommended to import the style.css file from the Genesis Framework since they change the design from time to time. instead you can download Genesis Sample child theme available for from your account and at https://github.com/copyblogger/genesis-sample
It looks just like Genesis, but can be used without importing the parent stylesheet since it includes one. For other themes you can follow the provided steps to add the stylesheet to your child theme. See the following example.
/*
Theme Name: Genesis Child
Description: Child Theme for Genesis
Author: XYZ
Template: genesis
Text Domain: genesis
*/
Replace the example text with details relevant to your theme. A couple of things to mention here:
- The template line corresponds to the directory name of the parent theme.
- It is a good practice to add your theme text domain, which is used to denote all text belonging to the theme.
- Now, it is time to inherit the styles from the parent theme. This can be done by creating the functions.php file inside the child theme directory; then, copy and paste the code below.
<?php

function custom_enqueue_child_theme_style() {
wp_enqueue_style( 'parent-theme-css', get_template_directory_uri() . 'https://cdn.wpml.org/style.css' );
}
add_action( 'wp_enqueue_scripts', 'custom_enqueue_child_theme_style' );
- At this point, you can activate your child theme by navigating to WordPress dashboard >> Appearance >> Themes.
- Add a language configuration file to your child theme, you can download a sample language configuration file from here and place it in the child theme directory. The language configuration file is used to denote what needs to be translated in the theme. Read about language configuration file. Note that you will need to delete the language configuration file for you parent theme and keep the one for the child theme because keeping both files would create errors. Now, your child theme directory should look something like this.
Conclusion
Child themes allow you to apply modifications to your theme without altering the parent theme, which will keep your code organized and prevent theme updates from changing your modifications. By following the instructions in this tutorial, you can create a child theme in just a few minutes.


