Introduction
The Content Aware Sidebars plugin lets you create an infinite number of custom sidebars and assign them to widgets based on the language of the contents on the page.
The integration of Content Aware Sidebars with WPML allows you to set different sidebars for content in different languages.
After collaborating with the author of Content Aware Sidebars, we managed to translate all the strings coming from the plugin.
What you will need:
- A recent version of WPML along with String Translation and Translation Management add-ons.
- Content Aware Sidebars (version 3.1.1 or above).
- WPML Widgets
Essential resources:
- WPML’s Getting Started Guide will guide you on how to easily setup WPML; you may also want to refer to the WPML Widgets documentation.
- Content Aware Sidebars FAQs will help you with the setup.
Creating different custom sidebars for different languages with Content Aware Sidebars and WPML
Before going into details, a summary of the 7 steps to be followed to translate the Content Aware Sidebar plugin outputs is as follows:
- Set WPML to register custom posts obtained from the Content Aware Sidebars for translation.
- Add a new sidebar to the default language.
- Add the custom posts to the translation basket.
- Choose whether the custom posts are to be translated by a local translator or a professional translation service.
- Translate the custom posts (by a local translator).
- Add a new sidebar for the secondary language.
- Assign widgets to the sidebars created based on the language of the page on which the sidebars are to be displayed.
Let us start translating the Content Aware Sidebar plugin output by following the detailed steps shown below:
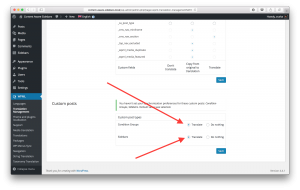
- Go to WPML > Translation management > Multilingual Content Setup, scroll down to the Custom posts section, and select the “translate” option for “Condition Groups” and “Sidebars.”
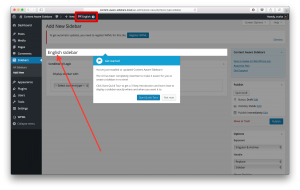
- Go to Sidebars > Add new
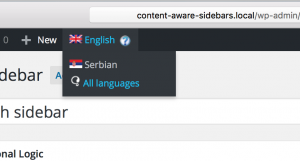
- Add the sidebar for your primary language, which will be English in this case; note that you can check if your primary language selected from your WordPress admin bar.
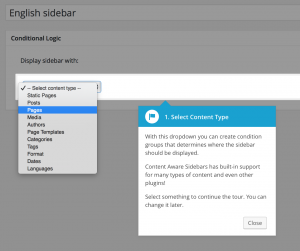
- Chose conditional logic that suits your needs from the drop down menu and click on “Save “changes” and “Publish.”
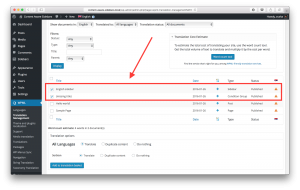
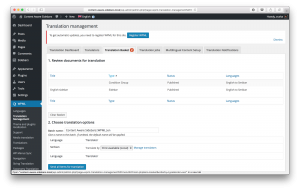
- Go to WPML > Translation management
- Select Sidebar and Conditional Group.
- Click on the “Add to translation basket” button.
- Go to WPML > Translation management > Translation basket tab.
- Go to the “Choose translation options” section and choose an option from the drop down menu.
- Select admin (local) if you are going to do the translation yourself or learn more about setting up a professional translation service; then, click on Send all items for translation.
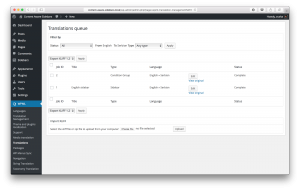
- Go to WPML > Translations
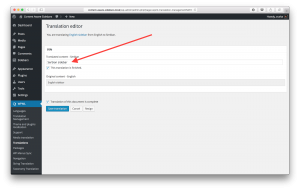
- Add translations for the Condition Group and Sidebar by clicking on the “Edit” button
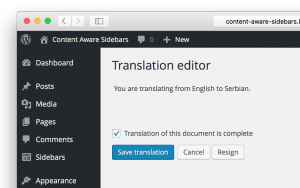
- Fill the title field with the translation of the secondary language and select “This translation is finished” and repeat the same steps for the body field. Scroll down and select “Translation of this document is complete”
- Click on the “Save translation” button.
- Go back to Sidebars
- Click on the previously created English sidebar.
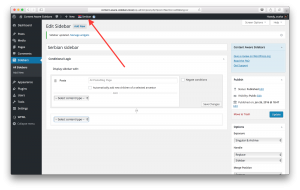
- Use the language switcher at the top to change the language to the desired language (secondary language); now you are on the sidebar translation page.
- Setup your sidebar translation and conditional logic similar to that shown in step 2.
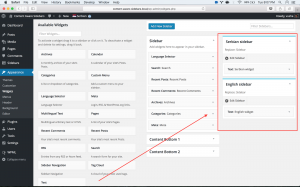
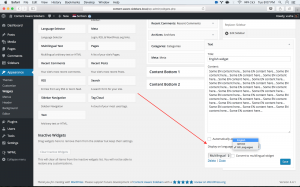
- Go to Appearance > Widgets and you should be able to see the newly created sidebars. Add desired widgets to the sidebars and make sure you select the language of appearance in each widget you choose. This option is available through the WPML Widgets plugin.
Conclusion:
WPML, Content Aware Sidebars, and WPML Widgets will give you the option to have different sidebar instances for each language. This is done by setting custom posts for translation and then adding a sidebar in the default language, afterwards translating the custom posts and adding the sidebar in the secondary language. Through this, we can assign widgets to the sidebars created based on the language of the page on which the sidebars are to be displayed.

