Since WPML turned commercial, wpml.org is dealing with much more traffic. Two weeks ago, our server was running on 95% load and response time was over 10 seconds. With W3TC, our load is back to 5% and response time is around 300ms.
If you’re not familiar with it, W3TC is a site-performance plugin. It includes page cache but that’s just the beginning. Beyond the basic page caching, it also minifies JS and CSS files, compresses everything and runs a CDN (content delivery network). Put together, these functions can speed up a site by a huge factor, allowing complex WordPress sites to cope with high-volume traffic.
Why it’s so important for WordPress sites?
A picture is worth a thousand words. This is how our site loads without any caching (generated by Pingdom Tools):
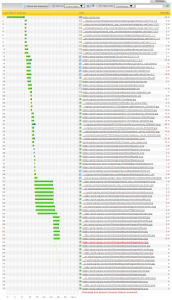
If you think that this is scary, keep in mind that in reality is was worse. This loading time chart was taken when our server is actually running on 5% load. When it really ran without a cache, the server was cooking at 95% load and processing time was much longer. The first byte took 5 seconds to come out and not 1/2 second like you see in this chart.
To fully display our home-page, our server had to send 77 files. Even this chart, running at 5% server load, ends with a timeout at 30 seconds (see the red lines).
Is it because of sloppy programming and bad design practices? No.
The power of WordPress comes from the modularity. You can choose any theme you like, with any combination of plugins. It means that each of these is developed independently and runs with its own resources. Most plugins that you enable include several CSS and Javascript files and contribute to the PHP and MySQL processing efforts. You could optimize it manually, but then you’d lose all this great modularity and we’re back to square zero.
Run your site through Pingdom’s tools, or other page-load time measurement (there’s a Firefox add-on for it). See which files load and their order. You’ll notice that CSS files load images and other CSS and that there are heaps of Javascript files loaded for each page.
To get your appetite going, here’s what we achieved using all the bells and whistles from W3TC:
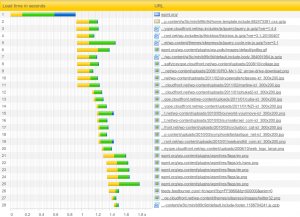
The numbers you’re seeing here are correct. A total of 28 files are fetched to display the page. 5 files come from wpml.org (our own server) and the rest come from the CDN (content delivery network). PHP barely needs to do anything to serve this page, except check that it’s in the cache and a few other tiny checks.
The entire page loads in less than 2 seconds and causes load that we can hardly measure on the server. We’re happy, visitors are happy and even Google is happy.
Step 1) Page Cache
The first and most basic thing you’d want to do is enable page caching. Go to Performance, enable W3TC and configure the Page Caching section.
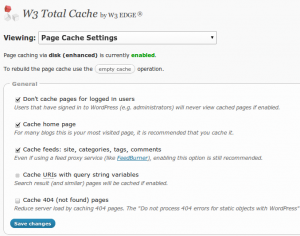
For page caching, we stayed with the basic settings. One thing that we added was to exclude the client account and download sections from the page cache, so that W3TC doesn’t interfere with WPML client accounts and WPML downloads.
If you’re using an opcode cache, W3TC will take advantage of this to further speed your site. We’re not using it, but it’s worthwhile if you’re running complex PHP processing that’s not cached.
Step 2) Minify – pack and compress CSS and Javascript
Remember all those CSS and JS files that the theme and plugins add? Now is the time to fix the load they’re causing.
Minify collects multiple resource files, packs them into a single file and compresses it. The result is one larger file instead of dozens of tiny ones.
Even though the total size may shrink by only 50%, the load that this saves is huge. Instead of the browser having to issue multiple HTTP requests and get many tiny files, it issues a single request and gets them all together. This change is probably the biggest contributor to improving your site’s responsiveness – especially to new visitors (who don’t have your CSS and JS cached already).
Click on the Help button at the top of the page. W3TC will run through your entire site and look for resource files. Then, it lets you choose which to combine. Normally, you can select all, but you need to pay some attention to what you’re doing, as this can change the loading order.
Once you’ve selected the CSS and JS files to minify, you need to make sure that their order is correct.
For CSS files, drag files up and down in the list.
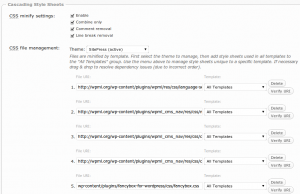
The order you see in this list should match the order in which CSS files are loaded without Minify. You can see that in your HTML page source.
Javascript files are a little trickier. Here, the loading order is even more critical as the wrong order will result in JS errors and broken functionality.
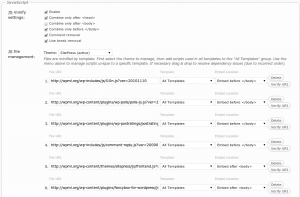
W3TC lets you choose which JS files go to the header section and which go to the body. For example, the Google Analytics scripts would go just before , which jQuery goes into the header, as it needs to run first (and outside of the minify list).
Step 3) Content Delivery Network (CDN)
For us, the icing on the cake comes in the form of a beautifully functional CDN.
Configuring and running a CDN is beyond the scope of this post, as it requires setting up and account in a 3rd party service.
For our own sites, we using Amazon S3 for storage and CloudFront for delivery. There are other fine options out there which you can explore and compare.
Once your CDN account is set up, W3TC sends your local files to the CDN and replaces links from your server to the files in the CDN. Then, your server only sends the HTML files and the CDN takes care of the rest.
While your server is a single machine, the CDN is actually a network of servers. It will send the files from the closest server to each visitor. CDNs can serve static files much faster than any single server can. By using a CDN, you improve your visitors’ experience and drastically reduce your server’s bandwidth and network utilization.
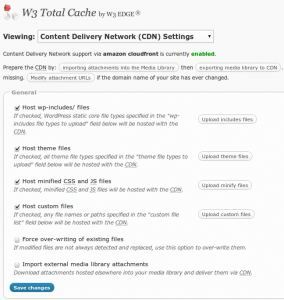
You should follow the CDN setup wizard in W3TC. It will help you transfer the media library, theme and plugin resources to the CDN.
Having fun with site performance optimization? Let us know by leaving a comment here!

Would you do a tutorial about how to setup the whole plugin? thankyou…
Perhaps for me the most important thing is to know that WPML will work well with W3TC and not get confused by this powerful caching system. Thanks for the tutorial, I’m testing W3TC now on some of my sites (I usually use WP Super Cache + WP Widget Cache, but in some cases I was getting “page not found” errors from WP Super Cache, so I’m glad to test out W3TC and see how it behaves… it seems to be quite faster than WP Super Cache, even without CDN, which is certainly amazing 🙂 ).
We use WPSC too on a different site. Both caching plugins work fine with WPML.
W3TC is more complete and more powerful. However, there’s more work to do. Every time we upgrade a plugin, we need to manually flush the Minify, remove old CSS + JS and add the new versions. Then, upload to the CDN and reset the cache.
WPSC doesn’t have these features, so there’s much less maintenance. We use it when traffic is lower, load is less of an issue and we don’t want to spend time on setup and maintenance.
I implemented GeoIP on my website to detect where the visitor comes from, and redirect him/her to the right wpml language according to that. I have implemented this in my header.php in my template. Watch out with this when you enable W3C. You must disable caching the front-page, otherwice the automatic redirect will not work.
It may be an ugly solution to this problem, so if anybody has another and better, please let me know.
Wait, w3tc (so yoast seo) isn’t totally compatible with wpml.
Please anybody answer the question of Anders – the multilingual front page with automatic language detection is a real problem for caches – but the frontpage definitely is something that you absolutely want to have cached, as “FAST!” should be the first impression of your site. An article about wpml and caching is not complete without addressing this, as it is the elephant in the room problem with wpml.
THANKS!
You’re right. We’re planning to move the browser language detection to run in Javascript. This will make it cache-friendly.
Is ‘WPML’ really working with ‘W3TC’ or ‘WP super cache’?
No success for me.
Yes. We use W3TC on all our sites. If you’re having trouble, use our forum. Our support folks will be happy to help.