Learn how to translate shortcodes from plugins, themes, and those you develop yourself with WPML.
With WPML, you can translate both text-based and ID-based shortcodes. Text-based shortcodes output text, like this one:
[goodmorning name="Dear client"]
On the other hand, ID-based shortcodes output an element using its ID number:
[myslider id="1"]
[myslider id="2"]
Here, each shortcode is outputting a different slider. For example, one may output a slider in English, and the other in Spanish.
To translate the shortcode, you would replace one slider’s ID with the other (1 → 2, e.g.)
Translate Shortcodes From Compatible Plugins and Themes
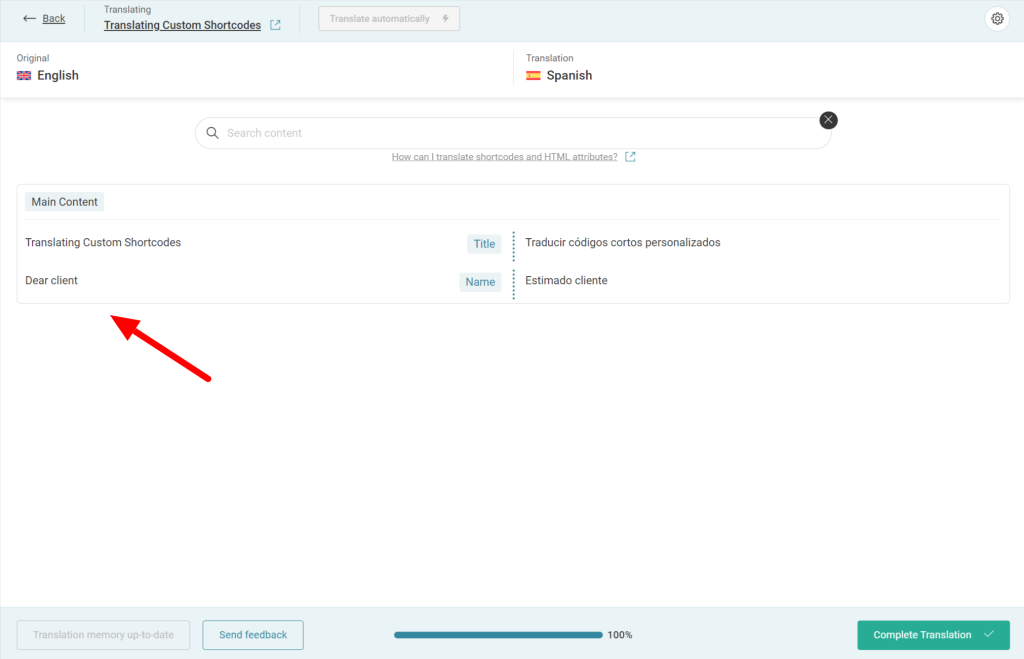
To translate shortcodes from compatible plugins and themes, go to WPML → Translation Dashboard and send the page containing your shortcode for translation. Your shortcode will appear in the Advanced Translation Editor among the rest of your page contents.
For example, here’s how the following shortcode appears in the editor:
[goodmorning name="Dear client"]

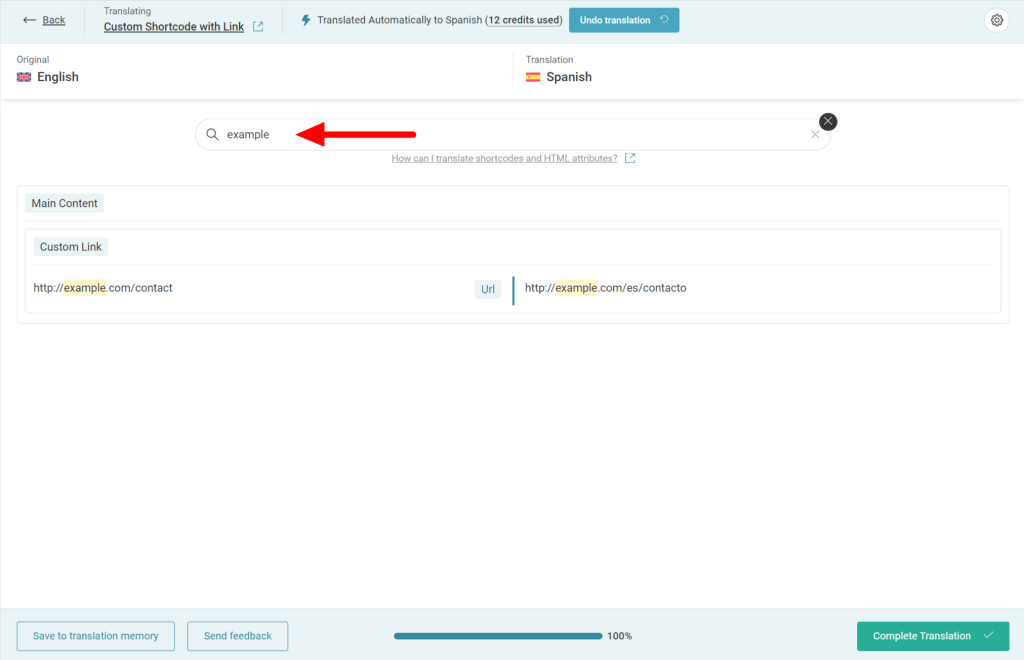
If your shortcode includes a link (URL) attribute, use the search bar to find it. WPML hides links in shortcodes by default.

Translate Shortcodes From Non-Compatible Plugins and Themes
To translate shortcodes from non-compatible plugins and themes, you first need to register them in WPML’s Custom XML Configuration file.
Consider this example with two shortcodes:
[fanpage link="https://example.com"]Some content[/fanpage]
[goodmorning name="dear client" type="official"]
To register these shortcodes in WPML, we’ll use the following configuration code:
<wpml-config>
  <shortcodes>
    <shortcode>
      <tag>goodmorning</tag>
      <attributes>
        <attribute>name</attribute>
        <attribute>type</attribute>
      </attributes>
    </shortcode>
    <shortcode>
      <tag label="Fanpage shortcode">fanpage</tag>
      <attributes>
        <attribute>link</attribute>
      </attributes>
    </shortcode>
  </shortcodes>
</wpml-config>
Here’s how configuration in WPML works:
- Place all shortcodes inside <shortcodes>
- Wrap individual shortcode settings inside <shortcode>
- Define shortcode names with <tag> and include custom labels as needed. These labels display next to the text in the Advanced Translation Editor.
- Define each attribute title with <attribute>
- Wrap all attributes with <attributes>
Once you register your shortcodes, you can translate them along with the rest of the page contents via WPML → Translation Dashboard.
Translate Custom Shortcodes
To translate custom shortcodes you develop by yourself, you first need to register them in WPML. Once done, you can translate them along with the rest of the page contents.
Translate Hardcoded Texts Inside Shortcodes
By default, hardcoded texts are not translatable in WPML. To make them translatable, you can use the Gettext framework. Consider this example, with “Good morning” as hardcoded text:
function goodmorning_att($atts) {
    $default = array(
        'name' => 'there',
    );
    $a = shortcode_atts($default, $atts);
    return 'Good morning, '.$a['name'];
}
add_shortcode('goodmorning', 'goodmorning_att');
To make “Good morning” translatable, you can adjust the code to use Gettext:
function goodmorning_att($atts) {
    $default = array(
        'name' => 'there',
    );
    $a = shortcode_atts($default, $atts);
    return __('Good morning, ', 'default').$a['name'];
}
add_shortcode('goodmorning', 'goodmorning_att');
This will make the “Good morning” text translatable, and populate it in String Translation.
Additional Resources
To learn more about the wpml-config.xml file, visit the Language Configuration Files guide. For configuring other elements in WPML, see our additional guides:
- Register Page Builder Content for Translation
- Register Custom Page Builder Widgets for Translation
- Set Translation Options for Custom Fields Using WPML Configuration File
- Register Custom Terms, Types & Taxonomies as Translatable
- Make Custom Gutenberg Blocks Translatable
- Translate Texts that Theme and Plugins Save in wp_options
- Customize WPML Language Switcher Using WPML Configuration File
