LnRiLWhlYWRpbmcuaGFzLWJhY2tncm91bmR7cGFkZGluZzowfQ==
LnRiLWltYWdle3Bvc2l0aW9uOnJlbGF0aXZlO3RyYW5zaXRpb246dHJhbnNmb3JtIDAuMjVzIGVhc2V9LndwLWJsb2NrLWltYWdlIC50Yi1pbWFnZS5hbGlnbmNlbnRlcnttYXJnaW4tbGVmdDphdXRvO21hcmdpbi1yaWdodDphdXRvfS50Yi1pbWFnZSBpbWd7bWF4LXdpZHRoOjEwMCU7aGVpZ2h0OmF1dG87d2lkdGg6YXV0bzt0cmFuc2l0aW9uOnRyYW5zZm9ybSAwLjI1cyBlYXNlfS50Yi1pbWFnZSAudGItaW1hZ2UtY2FwdGlvbi1maXQtdG8taW1hZ2V7ZGlzcGxheTp0YWJsZX0udGItaW1hZ2UgLnRiLWltYWdlLWNhcHRpb24tZml0LXRvLWltYWdlIC50Yi1pbWFnZS1jYXB0aW9ue2Rpc3BsYXk6dGFibGUtY2FwdGlvbjtjYXB0aW9uLXNpZGU6Ym90dG9tfSAudGItaW1hZ2VbZGF0YS10b29sc2V0LWJsb2Nrcy1pbWFnZT0iZWVhZTQ5ZWFiNGMwNDg3NmJlYTlkNTQwOWI3NmQ2Y2EiXSB7IG1heC13aWR0aDogMTAwJTsgfSAudGItaW1hZ2VbZGF0YS10b29sc2V0LWJsb2Nrcy1pbWFnZT0iZWVhZTQ5ZWFiNGMwNDg3NmJlYTlkNTQwOWI3NmQ2Y2EiXSBpbWcgeyBib3JkZXI6IDFweCBzb2xpZCByZ2JhKCAyMjIsIDIyMiwgMjIyLCAxICk7IH0gLnRiLWltYWdle3Bvc2l0aW9uOnJlbGF0aXZlO3RyYW5zaXRpb246dHJhbnNmb3JtIDAuMjVzIGVhc2V9LndwLWJsb2NrLWltYWdlIC50Yi1pbWFnZS5hbGlnbmNlbnRlcnttYXJnaW4tbGVmdDphdXRvO21hcmdpbi1yaWdodDphdXRvfS50Yi1pbWFnZSBpbWd7bWF4LXdpZHRoOjEwMCU7aGVpZ2h0OmF1dG87d2lkdGg6YXV0bzt0cmFuc2l0aW9uOnRyYW5zZm9ybSAwLjI1cyBlYXNlfS50Yi1pbWFnZSAudGItaW1hZ2UtY2FwdGlvbi1maXQtdG8taW1hZ2V7ZGlzcGxheTp0YWJsZX0udGItaW1hZ2UgLnRiLWltYWdlLWNhcHRpb24tZml0LXRvLWltYWdlIC50Yi1pbWFnZS1jYXB0aW9ue2Rpc3BsYXk6dGFibGUtY2FwdGlvbjtjYXB0aW9uLXNpZGU6Ym90dG9tfSAudGItaW1hZ2VbZGF0YS10b29sc2V0LWJsb2Nrcy1pbWFnZT0iNDhkMmI0NjEzODc4YmE4MjRlZmJhYTk3MDQ5ZjA3NDciXSB7IG1heC13aWR0aDogMTAwJTsgfSAudGItaW1hZ2VbZGF0YS10b29sc2V0LWJsb2Nrcy1pbWFnZT0iNDhkMmI0NjEzODc4YmE4MjRlZmJhYTk3MDQ5ZjA3NDciXSBpbWcgeyBib3JkZXI6IDFweCBzb2xpZCByZ2JhKCAyMjIsIDIyMiwgMjIyLCAxICk7IH0gLnRiLWdyaWQsLnRiLWdyaWQ+LmJsb2NrLWVkaXRvci1pbm5lci1ibG9ja3M+LmJsb2NrLWVkaXRvci1ibG9jay1saXN0X19sYXlvdXR7ZGlzcGxheTpncmlkO2dyaWQtcm93LWdhcDoyNXB4O2dyaWQtY29sdW1uLWdhcDoyNXB4fS50Yi1ncmlkLWl0ZW17YmFja2dyb3VuZDojZDM4YTAzO3BhZGRpbmc6MzBweH0udGItZ3JpZC1jb2x1bW57ZmxleC13cmFwOndyYXB9LnRiLWdyaWQtY29sdW1uPip7d2lkdGg6MTAwJX0udGItZ3JpZC1jb2x1bW4udGItZ3JpZC1hbGlnbi10b3B7d2lkdGg6MTAwJTtkaXNwbGF5OmZsZXg7YWxpZ24tY29udGVudDpmbGV4LXN0YXJ0fS50Yi1ncmlkLWNvbHVtbi50Yi1ncmlkLWFsaWduLWNlbnRlcnt3aWR0aDoxMDAlO2Rpc3BsYXk6ZmxleDthbGlnbi1jb250ZW50OmNlbnRlcn0udGItZ3JpZC1jb2x1bW4udGItZ3JpZC1hbGlnbi1ib3R0b217d2lkdGg6MTAwJTtkaXNwbGF5OmZsZXg7YWxpZ24tY29udGVudDpmbGV4LWVuZH0gLndwLWJsb2NrLXRvb2xzZXQtYmxvY2tzLWdyaWQudGItZ3JpZFtkYXRhLXRvb2xzZXQtYmxvY2tzLWdyaWQ9IjkwYWQ2Njk5MjA4YmUyOGMyMjU0YTUyYmViZTIxMDk0Il0geyBiYWNrZ3JvdW5kLWNvbG9yOiByZ2JhKCAyMzUsIDI0MywgMjQ1LCAxICk7Ym9yZGVyLXJhZGl1czogNXB4O3BhZGRpbmc6IDE2cHg7bWFyZ2luLXRvcDogMjRweDttYXJnaW4tYm90dG9tOiA0MHB4O2JvcmRlcjogMnB4IHNvbGlkIHJnYmEoIDIzNSwgMjQzLCAyNDUsIDEgKTtncmlkLXRlbXBsYXRlLWNvbHVtbnM6IG1pbm1heCgwLCAwLjE0ZnIpIG1pbm1heCgwLCAwLjg2ZnIpO2dyaWQtY29sdW1uLWdhcDogMjRweDtncmlkLWF1dG8tZmxvdzogcm93IH0gLndwLWJsb2NrLXRvb2xzZXQtYmxvY2tzLWdyaWQudGItZ3JpZFtkYXRhLXRvb2xzZXQtYmxvY2tzLWdyaWQ9IjkwYWQ2Njk5MjA4YmUyOGMyMjU0YTUyYmViZTIxMDk0Il0gPiAudGItZ3JpZC1jb2x1bW46bnRoLW9mLXR5cGUoMm4gKyAxKSB7IGdyaWQtY29sdW1uOiAxIH0gLndwLWJsb2NrLXRvb2xzZXQtYmxvY2tzLWdyaWQudGItZ3JpZFtkYXRhLXRvb2xzZXQtYmxvY2tzLWdyaWQ9IjkwYWQ2Njk5MjA4YmUyOGMyMjU0YTUyYmViZTIxMDk0Il0gPiAudGItZ3JpZC1jb2x1bW46bnRoLW9mLXR5cGUoMm4gKyAyKSB7IGdyaWQtY29sdW1uOiAyIH0gLnRiLWJ1dHRvbntjb2xvcjojZjFmMWYxfS50Yi1idXR0b24tLWxlZnR7dGV4dC1hbGlnbjpsZWZ0fS50Yi1idXR0b24tLWNlbnRlcnt0ZXh0LWFsaWduOmNlbnRlcn0udGItYnV0dG9uLS1yaWdodHt0ZXh0LWFsaWduOnJpZ2h0fS50Yi1idXR0b25fX2xpbmt7Y29sb3I6aW5oZXJpdDtjdXJzb3I6cG9pbnRlcjtkaXNwbGF5OmlubGluZS1ibG9jaztsaW5lLWhlaWdodDoxMDAlO3RleHQtZGVjb3JhdGlvbjpub25lICFpbXBvcnRhbnQ7dGV4dC1hbGlnbjpjZW50ZXI7dHJhbnNpdGlvbjphbGwgMC4zcyBlYXNlfS50Yi1idXR0b25fX2xpbms6aG92ZXIsLnRiLWJ1dHRvbl9fbGluazpmb2N1cywudGItYnV0dG9uX19saW5rOnZpc2l0ZWR7Y29sb3I6aW5oZXJpdH0udGItYnV0dG9uX19saW5rOmhvdmVyIC50Yi1idXR0b25fX2NvbnRlbnQsLnRiLWJ1dHRvbl9fbGluazpmb2N1cyAudGItYnV0dG9uX19jb250ZW50LC50Yi1idXR0b25fX2xpbms6dmlzaXRlZCAudGItYnV0dG9uX19jb250ZW50e2ZvbnQtZmFtaWx5OmluaGVyaXQ7Zm9udC1zdHlsZTppbmhlcml0O2ZvbnQtd2VpZ2h0OmluaGVyaXQ7bGV0dGVyLXNwYWNpbmc6aW5oZXJpdDt0ZXh0LWRlY29yYXRpb246aW5oZXJpdDt0ZXh0LXNoYWRvdzppbmhlcml0O3RleHQtdHJhbnNmb3JtOmluaGVyaXR9LnRiLWJ1dHRvbl9fY29udGVudHt2ZXJ0aWNhbC1hbGlnbjptaWRkbGU7dHJhbnNpdGlvbjphbGwgMC4zcyBlYXNlfS50Yi1idXR0b25fX2ljb257dHJhbnNpdGlvbjphbGwgMC4zcyBlYXNlO2Rpc3BsYXk6aW5saW5lLWJsb2NrO3ZlcnRpY2FsLWFsaWduOm1pZGRsZTtmb250LXN0eWxlOm5vcm1hbCAhaW1wb3J0YW50fS50Yi1idXR0b25fX2ljb246OmJlZm9yZXtjb250ZW50OmF0dHIoZGF0YS1mb250LWNvZGUpO2ZvbnQtd2VpZ2h0Om5vcm1hbCAhaW1wb3J0YW50fS50Yi1idXR0b25fX2xpbmt7YmFja2dyb3VuZC1jb2xvcjojNDQ0O2JvcmRlci1yYWRpdXM6MC4zZW07Zm9udC1zaXplOjEuM2VtO21hcmdpbi1ib3R0b206MC43NmVtO3BhZGRpbmc6MC41NWVtIDEuNWVtIDAuNTVlbX0gLnRiLWJ1dHRvbltkYXRhLXRvb2xzZXQtYmxvY2tzLWJ1dHRvbj0iM2M0ZmE4ZmEzMDJjYjlmODMzODA5ZGNkODI1MjAzNTQiXSB7IHRleHQtYWxpZ246IGxlZnQ7IH0gLnRiLWJ1dHRvbltkYXRhLXRvb2xzZXQtYmxvY2tzLWJ1dHRvbj0iM2M0ZmE4ZmEzMDJjYjlmODMzODA5ZGNkODI1MjAzNTQiXSAudGItYnV0dG9uX19saW5rIHsgYmFja2dyb3VuZC1jb2xvcjogcmdiYSggMjU1LCAyNTUsIDI1NSwgMCApO2NvbG9yOiByZ2JhKCA1NSwgNTUsIDU1LCAxICk7cGFkZGluZzogMHB4O2ZvbnQtc2l6ZTogMTRweDtjb2xvcjogcmdiYSggNTUsIDU1LCA1NSwgMSApOyB9IC50Yi1idXR0b25bZGF0YS10b29sc2V0LWJsb2Nrcy1idXR0b249IjNjNGZhOGZhMzAyY2I5ZjgzMzgwOWRjZDgyNTIwMzU0Il0gLnRiLWJ1dHRvbl9fbGluazpob3ZlciB7IGJhY2tncm91bmQtY29sb3I6IHJnYmEoIDI1NSwgMjU1LCAyNTUsIDAgKTtjb2xvcjogcmdiYSggNTEsIDEzNSwgMTU4LCAxICk7Y29sb3I6IHJnYmEoIDUxLCAxMzUsIDE1OCwgMSApOyB9IC50Yi1idXR0b25bZGF0YS10b29sc2V0LWJsb2Nrcy1idXR0b249IjNjNGZhOGZhMzAyY2I5ZjgzMzgwOWRjZDgyNTIwMzU0Il0gLnRiLWJ1dHRvbl9faWNvbiB7IGZvbnQtZmFtaWx5OiBkYXNoaWNvbnM7bWFyZ2luLWxlZnQ6IDEwcHg7IH0gLnRiLWJ1dHRvbltkYXRhLXRvb2xzZXQtYmxvY2tzLWJ1dHRvbj0iM2M0ZmE4ZmEzMDJjYjlmODMzODA5ZGNkODI1MjAzNTQiXSAudGItYnV0dG9uX19pY29uOjpiZWZvcmUgeyBjb250ZW50OiAnXGYzNDYnOyB9IC50Yi1maWVsZHMtYW5kLXRleHRbZGF0YS10b29sc2V0LWJsb2Nrcy1maWVsZHMtYW5kLXRleHQ9ImNmNTMxMGZhMDRlNGE5OTVlNWZhNGE0YTU3ZmM5ZmIzIl0geyBwYWRkaW5nLXRvcDogNHB4O3BhZGRpbmctYm90dG9tOiA0cHg7Ym9yZGVyLXJhZGl1czogNXB4OyB9IC50Yi1ncmlkLC50Yi1ncmlkPi5ibG9jay1lZGl0b3ItaW5uZXItYmxvY2tzPi5ibG9jay1lZGl0b3ItYmxvY2stbGlzdF9fbGF5b3V0e2Rpc3BsYXk6Z3JpZDtncmlkLXJvdy1nYXA6MjVweDtncmlkLWNvbHVtbi1nYXA6MjVweH0udGItZ3JpZC1pdGVte2JhY2tncm91bmQ6I2QzOGEwMztwYWRkaW5nOjMwcHh9LnRiLWdyaWQtY29sdW1ue2ZsZXgtd3JhcDp3cmFwfS50Yi1ncmlkLWNvbHVtbj4qe3dpZHRoOjEwMCV9LnRiLWdyaWQtY29sdW1uLnRiLWdyaWQtYWxpZ24tdG9we3dpZHRoOjEwMCU7ZGlzcGxheTpmbGV4O2FsaWduLWNvbnRlbnQ6ZmxleC1zdGFydH0udGItZ3JpZC1jb2x1bW4udGItZ3JpZC1hbGlnbi1jZW50ZXJ7d2lkdGg6MTAwJTtkaXNwbGF5OmZsZXg7YWxpZ24tY29udGVudDpjZW50ZXJ9LnRiLWdyaWQtY29sdW1uLnRiLWdyaWQtYWxpZ24tYm90dG9te3dpZHRoOjEwMCU7ZGlzcGxheTpmbGV4O2FsaWduLWNvbnRlbnQ6ZmxleC1lbmR9IC53cC1ibG9jay10b29sc2V0LWJsb2Nrcy1ncmlkLnRiLWdyaWRbZGF0YS10b29sc2V0LWJsb2Nrcy1ncmlkPSIxN2JmMTEzOWU4ZjIxOThlODg2OGZhZDc1ZTRlNWY2ZiJdIHsgYmFja2dyb3VuZC1jb2xvcjogcmdiYSggMjM1LCAyNDMsIDI0NSwgMSApO2JvcmRlci1yYWRpdXM6IDVweDtwYWRkaW5nOiAxNnB4O2JvcmRlcjogMnB4IHNvbGlkIHJnYmEoIDIzNSwgMjQzLCAyNDUsIDEgKTtncmlkLXRlbXBsYXRlLWNvbHVtbnM6IG1pbm1heCgwLCAwLjE0ZnIpIG1pbm1heCgwLCAwLjg2ZnIpO2dyaWQtY29sdW1uLWdhcDogMjRweDtncmlkLWF1dG8tZmxvdzogcm93IH0gLndwLWJsb2NrLXRvb2xzZXQtYmxvY2tzLWdyaWQudGItZ3JpZFtkYXRhLXRvb2xzZXQtYmxvY2tzLWdyaWQ9IjE3YmYxMTM5ZThmMjE5OGU4ODY4ZmFkNzVlNGU1ZjZmIl0gPiAudGItZ3JpZC1jb2x1bW46bnRoLW9mLXR5cGUoMm4gKyAxKSB7IGdyaWQtY29sdW1uOiAxIH0gLndwLWJsb2NrLXRvb2xzZXQtYmxvY2tzLWdyaWQudGItZ3JpZFtkYXRhLXRvb2xzZXQtYmxvY2tzLWdyaWQ9IjE3YmYxMTM5ZThmMjE5OGU4ODY4ZmFkNzVlNGU1ZjZmIl0gPiAudGItZ3JpZC1jb2x1bW46bnRoLW9mLXR5cGUoMm4gKyAyKSB7IGdyaWQtY29sdW1uOiAyIH0gLndwLWJsb2NrLXRvb2xzZXQtYmxvY2tzLWdyaWQtY29sdW1uLnRiLWdyaWQtY29sdW1uW2RhdGEtdG9vbHNldC1ibG9ja3MtZ3JpZC1jb2x1bW49ImY1ODZmZjdiZmUxZDczMTdjNjMxNjJlYzdiNzAzOWVkIl0geyBkaXNwbGF5OiBmbGV4OyB9IC50Yi1idXR0b257Y29sb3I6I2YxZjFmMX0udGItYnV0dG9uLS1sZWZ0e3RleHQtYWxpZ246bGVmdH0udGItYnV0dG9uLS1jZW50ZXJ7dGV4dC1hbGlnbjpjZW50ZXJ9LnRiLWJ1dHRvbi0tcmlnaHR7dGV4dC1hbGlnbjpyaWdodH0udGItYnV0dG9uX19saW5re2NvbG9yOmluaGVyaXQ7Y3Vyc29yOnBvaW50ZXI7ZGlzcGxheTppbmxpbmUtYmxvY2s7bGluZS1oZWlnaHQ6MTAwJTt0ZXh0LWRlY29yYXRpb246bm9uZSAhaW1wb3J0YW50O3RleHQtYWxpZ246Y2VudGVyO3RyYW5zaXRpb246YWxsIDAuM3MgZWFzZX0udGItYnV0dG9uX19saW5rOmhvdmVyLC50Yi1idXR0b25fX2xpbms6Zm9jdXMsLnRiLWJ1dHRvbl9fbGluazp2aXNpdGVke2NvbG9yOmluaGVyaXR9LnRiLWJ1dHRvbl9fbGluazpob3ZlciAudGItYnV0dG9uX19jb250ZW50LC50Yi1idXR0b25fX2xpbms6Zm9jdXMgLnRiLWJ1dHRvbl9fY29udGVudCwudGItYnV0dG9uX19saW5rOnZpc2l0ZWQgLnRiLWJ1dHRvbl9fY29udGVudHtmb250LWZhbWlseTppbmhlcml0O2ZvbnQtc3R5bGU6aW5oZXJpdDtmb250LXdlaWdodDppbmhlcml0O2xldHRlci1zcGFjaW5nOmluaGVyaXQ7dGV4dC1kZWNvcmF0aW9uOmluaGVyaXQ7dGV4dC1zaGFkb3c6aW5oZXJpdDt0ZXh0LXRyYW5zZm9ybTppbmhlcml0fS50Yi1idXR0b25fX2NvbnRlbnR7dmVydGljYWwtYWxpZ246bWlkZGxlO3RyYW5zaXRpb246YWxsIDAuM3MgZWFzZX0udGItYnV0dG9uX19pY29ue3RyYW5zaXRpb246YWxsIDAuM3MgZWFzZTtkaXNwbGF5OmlubGluZS1ibG9jazt2ZXJ0aWNhbC1hbGlnbjptaWRkbGU7Zm9udC1zdHlsZTpub3JtYWwgIWltcG9ydGFudH0udGItYnV0dG9uX19pY29uOjpiZWZvcmV7Y29udGVudDphdHRyKGRhdGEtZm9udC1jb2RlKTtmb250LXdlaWdodDpub3JtYWwgIWltcG9ydGFudH0udGItYnV0dG9uX19saW5re2JhY2tncm91bmQtY29sb3I6IzQ0NDtib3JkZXItcmFkaXVzOjAuM2VtO2ZvbnQtc2l6ZToxLjNlbTttYXJnaW4tYm90dG9tOjAuNzZlbTtwYWRkaW5nOjAuNTVlbSAxLjVlbSAwLjU1ZW19IC50Yi1idXR0b25bZGF0YS10b29sc2V0LWJsb2Nrcy1idXR0b249Ijc4ZGU1YTNkYzViY2QyYmQ3NTAwN2Y5N2FiMjIyOTRiIl0geyB0ZXh0LWFsaWduOiBsZWZ0OyB9IC50Yi1idXR0b25bZGF0YS10b29sc2V0LWJsb2Nrcy1idXR0b249Ijc4ZGU1YTNkYzViY2QyYmQ3NTAwN2Y5N2FiMjIyOTRiIl0gLnRiLWJ1dHRvbl9fbGluayB7IGJhY2tncm91bmQtY29sb3I6IHJnYmEoIDI1NSwgMjU1LCAyNTUsIDAgKTtjb2xvcjogcmdiYSggNTUsIDU1LCA1NSwgMSApO3BhZGRpbmc6IDBweDtmb250LXNpemU6IDE0cHg7Y29sb3I6IHJnYmEoIDU1LCA1NSwgNTUsIDEgKTsgfSAudGItYnV0dG9uW2RhdGEtdG9vbHNldC1ibG9ja3MtYnV0dG9uPSI3OGRlNWEzZGM1YmNkMmJkNzUwMDdmOTdhYjIyMjk0YiJdIC50Yi1idXR0b25fX2xpbms6aG92ZXIgeyBiYWNrZ3JvdW5kLWNvbG9yOiByZ2JhKCAyNTUsIDI1NSwgMjU1LCAwICk7Y29sb3I6IHJnYmEoIDUxLCAxMzUsIDE1OCwgMSApO2NvbG9yOiByZ2JhKCA1MSwgMTM1LCAxNTgsIDEgKTsgfSAudGItYnV0dG9uW2RhdGEtdG9vbHNldC1ibG9ja3MtYnV0dG9uPSI3OGRlNWEzZGM1YmNkMmJkNzUwMDdmOTdhYjIyMjk0YiJdIC50Yi1idXR0b25fX2ljb24geyBmb250LWZhbWlseTogZGFzaGljb25zO21hcmdpbi1sZWZ0OiAxMHB4OyB9IC50Yi1idXR0b25bZGF0YS10b29sc2V0LWJsb2Nrcy1idXR0b249Ijc4ZGU1YTNkYzViY2QyYmQ3NTAwN2Y5N2FiMjIyOTRiIl0gLnRiLWJ1dHRvbl9faWNvbjo6YmVmb3JlIHsgY29udGVudDogJ1xmMzQ2JzsgfSAud3AtYmxvY2stdG9vbHNldC1ibG9ja3MtZ3JpZC1jb2x1bW4udGItZ3JpZC1jb2x1bW5bZGF0YS10b29sc2V0LWJsb2Nrcy1ncmlkLWNvbHVtbj0iNmM1MjkxMzNlZDg1MzQ5NmY2ODMyZmY2MWVjNzRlNDAiXSB7IGJhY2tncm91bmQtY29sb3I6IHJnYmEoIDI1NSwgMjU1LCAyNTUsIDEgKTtkaXNwbGF5OiBmbGV4OyB9IC50Yi1maWVsZHMtYW5kLXRleHRbZGF0YS10b29sc2V0LWJsb2Nrcy1maWVsZHMtYW5kLXRleHQ9ImI5ZTI3MThkNGUxZWVjOTk0YjQxMzVhODdiMzk0MzcxIl0geyBwYWRkaW5nLXRvcDogMTJweDtwYWRkaW5nLWJvdHRvbTogMTJweDsgfSAudGItY29udGFpbmVyIC50Yi1jb250YWluZXItaW5uZXJ7d2lkdGg6MTAwJTttYXJnaW46MCBhdXRvfSAud3AtYmxvY2stdG9vbHNldC1ibG9ja3MtY29udGFpbmVyLnRiLWNvbnRhaW5lcltkYXRhLXRvb2xzZXQtYmxvY2tzLWNvbnRhaW5lcj0iYWMyNDc1NTc3YzEzNjg0MGRhZjQxMDFiOTM2YThmNGYiXSB7IGJvcmRlci1yYWRpdXM6IDVweDtwYWRkaW5nOiAzMnB4O21hcmdpbi10b3A6IDQwcHg7bWFyZ2luLWJvdHRvbTogNDBweDtib3JkZXI6IDFweCBzb2xpZCByZ2JhKCA1MSwgMTM1LCAxNTgsIDAuMiApOyB9IC50Yi1ncmlkLC50Yi1ncmlkPi5ibG9jay1lZGl0b3ItaW5uZXItYmxvY2tzPi5ibG9jay1lZGl0b3ItYmxvY2stbGlzdF9fbGF5b3V0e2Rpc3BsYXk6Z3JpZDtncmlkLXJvdy1nYXA6MjVweDtncmlkLWNvbHVtbi1nYXA6MjVweH0udGItZ3JpZC1pdGVte2JhY2tncm91bmQ6I2QzOGEwMztwYWRkaW5nOjMwcHh9LnRiLWdyaWQtY29sdW1ue2ZsZXgtd3JhcDp3cmFwfS50Yi1ncmlkLWNvbHVtbj4qe3dpZHRoOjEwMCV9LnRiLWdyaWQtY29sdW1uLnRiLWdyaWQtYWxpZ24tdG9we3dpZHRoOjEwMCU7ZGlzcGxheTpmbGV4O2FsaWduLWNvbnRlbnQ6ZmxleC1zdGFydH0udGItZ3JpZC1jb2x1bW4udGItZ3JpZC1hbGlnbi1jZW50ZXJ7d2lkdGg6MTAwJTtkaXNwbGF5OmZsZXg7YWxpZ24tY29udGVudDpjZW50ZXJ9LnRiLWdyaWQtY29sdW1uLnRiLWdyaWQtYWxpZ24tYm90dG9te3dpZHRoOjEwMCU7ZGlzcGxheTpmbGV4O2FsaWduLWNvbnRlbnQ6ZmxleC1lbmR9IC53cC1ibG9jay10b29sc2V0LWJsb2Nrcy1ncmlkLnRiLWdyaWRbZGF0YS10b29sc2V0LWJsb2Nrcy1ncmlkPSI3MTA0MGQ4ZTE3MGM0NWE0NGRkNTA0NzIxNTIwMGQ5YSJdIHsgZ3JpZC10ZW1wbGF0ZS1jb2x1bW5zOiBtaW5tYXgoMCwgMC40OTVmcikgbWlubWF4KDAsIDAuNTA1ZnIpO2dyaWQtY29sdW1uLWdhcDogMHB4O2dyaWQtYXV0by1mbG93OiByb3cgfSAud3AtYmxvY2stdG9vbHNldC1ibG9ja3MtZ3JpZC50Yi1ncmlkW2RhdGEtdG9vbHNldC1ibG9ja3MtZ3JpZD0iNzEwNDBkOGUxNzBjNDVhNDRkZDUwNDcyMTUyMDBkOWEiXSA+IC50Yi1ncmlkLWNvbHVtbjpudGgtb2YtdHlwZSgybiArIDEpIHsgZ3JpZC1jb2x1bW46IDEgfSAud3AtYmxvY2stdG9vbHNldC1ibG9ja3MtZ3JpZC50Yi1ncmlkW2RhdGEtdG9vbHNldC1ibG9ja3MtZ3JpZD0iNzEwNDBkOGUxNzBjNDVhNDRkZDUwNDcyMTUyMDBkOWEiXSA+IC50Yi1ncmlkLWNvbHVtbjpudGgtb2YtdHlwZSgybiArIDIpIHsgZ3JpZC1jb2x1bW46IDIgfSAud3AtYmxvY2stdG9vbHNldC1ibG9ja3MtZ3JpZC1jb2x1bW4udGItZ3JpZC1jb2x1bW5bZGF0YS10b29sc2V0LWJsb2Nrcy1ncmlkLWNvbHVtbj0iMjViM2ViZGM3Y2U4MjRmZjY3Y2EwMjBhYzY2MWU0NzQiXSB7IHBhZGRpbmctbGVmdDogMjBweDtkaXNwbGF5OiBmbGV4OyB9IC50Yi1ncmlkLC50Yi1ncmlkPi5ibG9jay1lZGl0b3ItaW5uZXItYmxvY2tzPi5ibG9jay1lZGl0b3ItYmxvY2stbGlzdF9fbGF5b3V0e2Rpc3BsYXk6Z3JpZDtncmlkLXJvdy1nYXA6MjVweDtncmlkLWNvbHVtbi1nYXA6MjVweH0udGItZ3JpZC1pdGVte2JhY2tncm91bmQ6I2QzOGEwMztwYWRkaW5nOjMwcHh9LnRiLWdyaWQtY29sdW1ue2ZsZXgtd3JhcDp3cmFwfS50Yi1ncmlkLWNvbHVtbj4qe3dpZHRoOjEwMCV9LnRiLWdyaWQtY29sdW1uLnRiLWdyaWQtYWxpZ24tdG9we3dpZHRoOjEwMCU7ZGlzcGxheTpmbGV4O2FsaWduLWNvbnRlbnQ6ZmxleC1zdGFydH0udGItZ3JpZC1jb2x1bW4udGItZ3JpZC1hbGlnbi1jZW50ZXJ7d2lkdGg6MTAwJTtkaXNwbGF5OmZsZXg7YWxpZ24tY29udGVudDpjZW50ZXJ9LnRiLWdyaWQtY29sdW1uLnRiLWdyaWQtYWxpZ24tYm90dG9te3dpZHRoOjEwMCU7ZGlzcGxheTpmbGV4O2FsaWduLWNvbnRlbnQ6ZmxleC1lbmR9IC53cC1ibG9jay10b29sc2V0LWJsb2Nrcy1ncmlkLnRiLWdyaWRbZGF0YS10b29sc2V0LWJsb2Nrcy1ncmlkPSJmNDdhYmUxYTZmZmUxNTc4ZmE1ZTQwMzYzMjc1M2MzMyJdIHsgbWFyZ2luLWJvdHRvbTogMjBweDtncmlkLXRlbXBsYXRlLWNvbHVtbnM6IG1pbm1heCgwLCAwLjA1NWZyKSBtaW5tYXgoMCwgMC45NDVmcik7Z3JpZC1jb2x1bW4tZ2FwOiAxMHB4O2dyaWQtYXV0by1mbG93OiByb3cgfSAud3AtYmxvY2stdG9vbHNldC1ibG9ja3MtZ3JpZC50Yi1ncmlkW2RhdGEtdG9vbHNldC1ibG9ja3MtZ3JpZD0iZjQ3YWJlMWE2ZmZlMTU3OGZhNWU0MDM2MzI3NTNjMzMiXSA+IC50Yi1ncmlkLWNvbHVtbjpudGgtb2YtdHlwZSgybiArIDEpIHsgZ3JpZC1jb2x1bW46IDEgfSAud3AtYmxvY2stdG9vbHNldC1ibG9ja3MtZ3JpZC50Yi1ncmlkW2RhdGEtdG9vbHNldC1ibG9ja3MtZ3JpZD0iZjQ3YWJlMWE2ZmZlMTU3OGZhNWU0MDM2MzI3NTNjMzMiXSA+IC50Yi1ncmlkLWNvbHVtbjpudGgtb2YtdHlwZSgybiArIDIpIHsgZ3JpZC1jb2x1bW46IDIgfSAud3AtYmxvY2stdG9vbHNldC1ibG9ja3MtZ3JpZC1jb2x1bW4udGItZ3JpZC1jb2x1bW5bZGF0YS10b29sc2V0LWJsb2Nrcy1ncmlkLWNvbHVtbj0iOTg1NzVmYzhkZjU5NmZlZjNhOTcxYzFjMWU3M2UwNjMiXSB7IHBhZGRpbmctcmlnaHQ6IDIwcHg7Ym9yZGVyLXJpZ2h0OiAxcHggc29saWQgcmdiYSggNTEsIDEzNSwgMTU4LCAwLjIgKTtkaXNwbGF5OiBmbGV4OyB9IC50Yi1ncmlkLC50Yi1ncmlkPi5ibG9jay1lZGl0b3ItaW5uZXItYmxvY2tzPi5ibG9jay1lZGl0b3ItYmxvY2stbGlzdF9fbGF5b3V0e2Rpc3BsYXk6Z3JpZDtncmlkLXJvdy1nYXA6MjVweDtncmlkLWNvbHVtbi1nYXA6MjVweH0udGItZ3JpZC1pdGVte2JhY2tncm91bmQ6I2QzOGEwMztwYWRkaW5nOjMwcHh9LnRiLWdyaWQtY29sdW1ue2ZsZXgtd3JhcDp3cmFwfS50Yi1ncmlkLWNvbHVtbj4qe3dpZHRoOjEwMCV9LnRiLWdyaWQtY29sdW1uLnRiLWdyaWQtYWxpZ24tdG9we3dpZHRoOjEwMCU7ZGlzcGxheTpmbGV4O2FsaWduLWNvbnRlbnQ6ZmxleC1zdGFydH0udGItZ3JpZC1jb2x1bW4udGItZ3JpZC1hbGlnbi1jZW50ZXJ7d2lkdGg6MTAwJTtkaXNwbGF5OmZsZXg7YWxpZ24tY29udGVudDpjZW50ZXJ9LnRiLWdyaWQtY29sdW1uLnRiLWdyaWQtYWxpZ24tYm90dG9te3dpZHRoOjEwMCU7ZGlzcGxheTpmbGV4O2FsaWduLWNvbnRlbnQ6ZmxleC1lbmR9IC53cC1ibG9jay10b29sc2V0LWJsb2Nrcy1ncmlkLnRiLWdyaWRbZGF0YS10b29sc2V0LWJsb2Nrcy1ncmlkPSI5OWNjM2E1YWI2MGRmNzk0YTU3YmI2YjhkMjVlYjcyYiJdIHsgZ3JpZC10ZW1wbGF0ZS1jb2x1bW5zOiBtaW5tYXgoMCwgMC4wNTVmcikgbWlubWF4KDAsIDAuOTQ1ZnIpO2dyaWQtY29sdW1uLWdhcDogMTBweDtncmlkLWF1dG8tZmxvdzogcm93IH0gLndwLWJsb2NrLXRvb2xzZXQtYmxvY2tzLWdyaWQudGItZ3JpZFtkYXRhLXRvb2xzZXQtYmxvY2tzLWdyaWQ9Ijk5Y2MzYTVhYjYwZGY3OTRhNTdiYjZiOGQyNWViNzJiIl0gPiAudGItZ3JpZC1jb2x1bW46bnRoLW9mLXR5cGUoMm4gKyAxKSB7IGdyaWQtY29sdW1uOiAxIH0gLndwLWJsb2NrLXRvb2xzZXQtYmxvY2tzLWdyaWQudGItZ3JpZFtkYXRhLXRvb2xzZXQtYmxvY2tzLWdyaWQ9Ijk5Y2MzYTVhYjYwZGY3OTRhNTdiYjZiOGQyNWViNzJiIl0gPiAudGItZ3JpZC1jb2x1bW46bnRoLW9mLXR5cGUoMm4gKyAyKSB7IGdyaWQtY29sdW1uOiAyIH0gLnRiLWdyaWQsLnRiLWdyaWQ+LmJsb2NrLWVkaXRvci1pbm5lci1ibG9ja3M+LmJsb2NrLWVkaXRvci1ibG9jay1saXN0X19sYXlvdXR7ZGlzcGxheTpncmlkO2dyaWQtcm93LWdhcDoyNXB4O2dyaWQtY29sdW1uLWdhcDoyNXB4fS50Yi1ncmlkLWl0ZW17YmFja2dyb3VuZDojZDM4YTAzO3BhZGRpbmc6MzBweH0udGItZ3JpZC1jb2x1bW57ZmxleC13cmFwOndyYXB9LnRiLWdyaWQtY29sdW1uPip7d2lkdGg6MTAwJX0udGItZ3JpZC1jb2x1bW4udGItZ3JpZC1hbGlnbi10b3B7d2lkdGg6MTAwJTtkaXNwbGF5OmZsZXg7YWxpZ24tY29udGVudDpmbGV4LXN0YXJ0fS50Yi1ncmlkLWNvbHVtbi50Yi1ncmlkLWFsaWduLWNlbnRlcnt3aWR0aDoxMDAlO2Rpc3BsYXk6ZmxleDthbGlnbi1jb250ZW50OmNlbnRlcn0udGItZ3JpZC1jb2x1bW4udGItZ3JpZC1hbGlnbi1ib3R0b217d2lkdGg6MTAwJTtkaXNwbGF5OmZsZXg7YWxpZ24tY29udGVudDpmbGV4LWVuZH0gLndwLWJsb2NrLXRvb2xzZXQtYmxvY2tzLWdyaWQudGItZ3JpZFtkYXRhLXRvb2xzZXQtYmxvY2tzLWdyaWQ9IjZkODg0ZTM3NTgyNTlhNmNhMmExM2I5YmZhODc3MmQ4Il0geyBtYXJnaW4tdG9wOiAyMHB4O21hcmdpbi1ib3R0b206IDIwcHg7Z3JpZC10ZW1wbGF0ZS1jb2x1bW5zOiBtaW5tYXgoMCwgMC4wNTVmcikgbWlubWF4KDAsIDAuOTQ1ZnIpO2dyaWQtY29sdW1uLWdhcDogMTBweDtncmlkLWF1dG8tZmxvdzogcm93IH0gLndwLWJsb2NrLXRvb2xzZXQtYmxvY2tzLWdyaWQudGItZ3JpZFtkYXRhLXRvb2xzZXQtYmxvY2tzLWdyaWQ9IjZkODg0ZTM3NTgyNTlhNmNhMmExM2I5YmZhODc3MmQ4Il0gPiAudGItZ3JpZC1jb2x1bW46bnRoLW9mLXR5cGUoMm4gKyAxKSB7IGdyaWQtY29sdW1uOiAxIH0gLndwLWJsb2NrLXRvb2xzZXQtYmxvY2tzLWdyaWQudGItZ3JpZFtkYXRhLXRvb2xzZXQtYmxvY2tzLWdyaWQ9IjZkODg0ZTM3NTgyNTlhNmNhMmExM2I5YmZhODc3MmQ4Il0gPiAudGItZ3JpZC1jb2x1bW46bnRoLW9mLXR5cGUoMm4gKyAyKSB7IGdyaWQtY29sdW1uOiAyIH0gLnRiLWNvbnRhaW5lciAudGItY29udGFpbmVyLWlubmVye3dpZHRoOjEwMCU7bWFyZ2luOjAgYXV0b30gLndwLWJsb2NrLXRvb2xzZXQtYmxvY2tzLWNvbnRhaW5lci50Yi1jb250YWluZXJbZGF0YS10b29sc2V0LWJsb2Nrcy1jb250YWluZXI9ImI4NDYwZGM5NDhlYzk2NzRmZWY0Y2UyMWQ0ZjcwZmIwIl0geyBiYWNrZ3JvdW5kOiB1cmwoJ2h0dHBzOi8vd3BtbC5vcmcvd3AtY29udGVudC91cGxvYWRzLzIwMjQvMDUvb3Rncy1pY28tb2sucG5nJykgbm8tcmVwZWF0O2JhY2tncm91bmQtc2l6ZTogMThweCAxOHB4O21pbi1oZWlnaHQ6IDE4cHg7IH0gLnRiLWdyaWQsLnRiLWdyaWQ+LmJsb2NrLWVkaXRvci1pbm5lci1ibG9ja3M+LmJsb2NrLWVkaXRvci1ibG9jay1saXN0X19sYXlvdXR7ZGlzcGxheTpncmlkO2dyaWQtcm93LWdhcDoyNXB4O2dyaWQtY29sdW1uLWdhcDoyNXB4fS50Yi1ncmlkLWl0ZW17YmFja2dyb3VuZDojZDM4YTAzO3BhZGRpbmc6MzBweH0udGItZ3JpZC1jb2x1bW57ZmxleC13cmFwOndyYXB9LnRiLWdyaWQtY29sdW1uPip7d2lkdGg6MTAwJX0udGItZ3JpZC1jb2x1bW4udGItZ3JpZC1hbGlnbi10b3B7d2lkdGg6MTAwJTtkaXNwbGF5OmZsZXg7YWxpZ24tY29udGVudDpmbGV4LXN0YXJ0fS50Yi1ncmlkLWNvbHVtbi50Yi1ncmlkLWFsaWduLWNlbnRlcnt3aWR0aDoxMDAlO2Rpc3BsYXk6ZmxleDthbGlnbi1jb250ZW50OmNlbnRlcn0udGItZ3JpZC1jb2x1bW4udGItZ3JpZC1hbGlnbi1ib3R0b217d2lkdGg6MTAwJTtkaXNwbGF5OmZsZXg7YWxpZ24tY29udGVudDpmbGV4LWVuZH0gLndwLWJsb2NrLXRvb2xzZXQtYmxvY2tzLWdyaWQudGItZ3JpZFtkYXRhLXRvb2xzZXQtYmxvY2tzLWdyaWQ9ImRiYzViMDIwOGE0NGYzZmI1ZDM0MDdlZGQ0MjM5MTgyIl0geyBncmlkLXRlbXBsYXRlLWNvbHVtbnM6IG1pbm1heCgwLCAwLjA1NWZyKSBtaW5tYXgoMCwgMC45NDVmcik7Z3JpZC1jb2x1bW4tZ2FwOiAxMHB4O2dyaWQtYXV0by1mbG93OiByb3cgfSAud3AtYmxvY2stdG9vbHNldC1ibG9ja3MtZ3JpZC50Yi1ncmlkW2RhdGEtdG9vbHNldC1ibG9ja3MtZ3JpZD0iZGJjNWIwMjA4YTQ0ZjNmYjVkMzQwN2VkZDQyMzkxODIiXSA+IC50Yi1ncmlkLWNvbHVtbjpudGgtb2YtdHlwZSgybiArIDEpIHsgZ3JpZC1jb2x1bW46IDEgfSAud3AtYmxvY2stdG9vbHNldC1ibG9ja3MtZ3JpZC50Yi1ncmlkW2RhdGEtdG9vbHNldC1ibG9ja3MtZ3JpZD0iZGJjNWIwMjA4YTQ0ZjNmYjVkMzQwN2VkZDQyMzkxODIiXSA+IC50Yi1ncmlkLWNvbHVtbjpudGgtb2YtdHlwZSgybiArIDIpIHsgZ3JpZC1jb2x1bW46IDIgfSAudGItaGVhZGluZ1tkYXRhLXRvb2xzZXQtYmxvY2tzLWhlYWRpbmc9ImFkZWYwZDQzOWRjMTg1ZDkwNTIyNDJlOTMwZGYxNDY3Il0gIHsgcGFkZGluZy10b3A6IDBweDtwYWRkaW5nLWJvdHRvbTogMHB4O21hcmdpbi10b3A6IDBweDttYXJnaW4tYm90dG9tOiAwcHg7IH0gIC50Yi1jb250YWluZXIgLnRiLWNvbnRhaW5lci1pbm5lcnt3aWR0aDoxMDAlO21hcmdpbjowIGF1dG99IC53cC1ibG9jay10b29sc2V0LWJsb2Nrcy1jb250YWluZXIudGItY29udGFpbmVyW2RhdGEtdG9vbHNldC1ibG9ja3MtY29udGFpbmVyPSIxMjljYmNkZmI1MzIzNDMzNDExZDI5MGQzMWU0MmI3MyJdIHsgYmFja2dyb3VuZDogdXJsKCdodHRwczovL3dwbWwub3JnL3dwLWNvbnRlbnQvdXBsb2Fkcy8yMDI0LzA1L290Z3MtaWNvLW9rLnBuZycpIG5vLXJlcGVhdDtiYWNrZ3JvdW5kLXNpemU6IDE4cHggMThweDttaW4taGVpZ2h0OiAyMHB4OyB9IC50Yi1oZWFkaW5nW2RhdGEtdG9vbHNldC1ibG9ja3MtaGVhZGluZz0iYWY4ZjBhMWI1NGMwYTE1YzU5ZTZiOWE0MDJmZjgwMzUiXSAgeyBwYWRkaW5nLXRvcDogMHB4O3BhZGRpbmctYm90dG9tOiAwcHg7bWFyZ2luLXRvcDogMHB4O21hcmdpbi1ib3R0b206IDMycHg7IH0gIC50Yi1ncmlkLC50Yi1ncmlkPi5ibG9jay1lZGl0b3ItaW5uZXItYmxvY2tzPi5ibG9jay1lZGl0b3ItYmxvY2stbGlzdF9fbGF5b3V0e2Rpc3BsYXk6Z3JpZDtncmlkLXJvdy1nYXA6MjVweDtncmlkLWNvbHVtbi1nYXA6MjVweH0udGItZ3JpZC1pdGVte2JhY2tncm91bmQ6I2QzOGEwMztwYWRkaW5nOjMwcHh9LnRiLWdyaWQtY29sdW1ue2ZsZXgtd3JhcDp3cmFwfS50Yi1ncmlkLWNvbHVtbj4qe3dpZHRoOjEwMCV9LnRiLWdyaWQtY29sdW1uLnRiLWdyaWQtYWxpZ24tdG9we3dpZHRoOjEwMCU7ZGlzcGxheTpmbGV4O2FsaWduLWNvbnRlbnQ6ZmxleC1zdGFydH0udGItZ3JpZC1jb2x1bW4udGItZ3JpZC1hbGlnbi1jZW50ZXJ7d2lkdGg6MTAwJTtkaXNwbGF5OmZsZXg7YWxpZ24tY29udGVudDpjZW50ZXJ9LnRiLWdyaWQtY29sdW1uLnRiLWdyaWQtYWxpZ24tYm90dG9te3dpZHRoOjEwMCU7ZGlzcGxheTpmbGV4O2FsaWduLWNvbnRlbnQ6ZmxleC1lbmR9IC53cC1ibG9jay10b29sc2V0LWJsb2Nrcy1ncmlkLnRiLWdyaWRbZGF0YS10b29sc2V0LWJsb2Nrcy1ncmlkPSJkNzBiYmIxNDViMDY5MzZjOTA4NWI1MGI2YmIyM2ZjNyJdIHsgbWFyZ2luLXRvcDogLTQ4cHg7bWFyZ2luLWJvdHRvbTogMzJweDtncmlkLXRlbXBsYXRlLWNvbHVtbnM6IG1pbm1heCgwLCAxZnIpO2dyaWQtYXV0by1mbG93OiByb3cgfSAud3AtYmxvY2stdG9vbHNldC1ibG9ja3MtZ3JpZC50Yi1ncmlkW2RhdGEtdG9vbHNldC1ibG9ja3MtZ3JpZD0iZDcwYmJiMTQ1YjA2OTM2YzkwODViNTBiNmJiMjNmYzciXSAgPiAudGItZ3JpZC1jb2x1bW46bnRoLW9mLXR5cGUoMW4rMSkgeyBncmlkLWNvbHVtbjogMSB9IC53cC1ibG9jay10b29sc2V0LWJsb2Nrcy1ncmlkLWNvbHVtbi50Yi1ncmlkLWNvbHVtbltkYXRhLXRvb2xzZXQtYmxvY2tzLWdyaWQtY29sdW1uPSIzMDM0ZmJlODg2YzExMDU0ZTk1YjQ2YjA5ZDNlNDExMiJdIHsgZGlzcGxheTogZmxleDsgfSAudGItaGVhZGluZ1tkYXRhLXRvb2xzZXQtYmxvY2tzLWhlYWRpbmc9IjcwYTU1MWJmZGMyYWUwODA1NjY2ODU2NmQ4ZDAzMDU1Il0gIHsgZm9udC1zaXplOiAxM3B4O2NvbG9yOiByZ2JhKCA1MSwgMTM1LCAxNTgsIDEgKTt0ZXh0LWFsaWduOiBjZW50ZXI7YmFja2dyb3VuZC1jb2xvcjogcmdiYSggMjM1LCAyNDMsIDI0NSwgMSApO2JvcmRlci1yYWRpdXM6IDUwcHg7cGFkZGluZzogNHB4IDE2cHggNHB4IDE2cHg7bWFyZ2luLXRvcDogMHB4OyB9ICAudGIteW91dHViZXttaW4td2lkdGg6MTAwcHh9LnRiLXlvdXR1YmU+ZGl2e3dpZHRoOjEwMCU7cG9zaXRpb246cmVsYXRpdmV9LnRiLXlvdXR1YmU+ZGl2PmlmcmFtZXtib3gtc2l6aW5nOmJvcmRlci1ib3g7d2lkdGg6MTAwJTtoZWlnaHQ6MTAwJTtwb3NpdGlvbjphYnNvbHV0ZTt0b3A6MDtsZWZ0OjB9IC50Yi15b3V0dWJlW2RhdGEtdG9vbHNldC1ibG9ja3MteW91dHViZT0iMjg1OGFhODdiYjFkZTVjN2MwMmFjMDgzM2RjYWUyYTIiXSB7IHdpZHRoOiAxMDAlOyB9IC50Yi15b3V0dWJlW2RhdGEtdG9vbHNldC1ibG9ja3MteW91dHViZT0iMjg1OGFhODdiYjFkZTVjN2MwMmFjMDgzM2RjYWUyYTIiXSA+IGRpdiB7IHBhZGRpbmctdG9wOiBjYWxjKDEwMCUvMTYqOSk7IH0gQG1lZGlhIG9ubHkgc2NyZWVuIGFuZCAobWF4LXdpZHRoOiA3ODFweCkgeyAudGItaW1hZ2V7cG9zaXRpb246cmVsYXRpdmU7dHJhbnNpdGlvbjp0cmFuc2Zvcm0gMC4yNXMgZWFzZX0ud3AtYmxvY2staW1hZ2UgLnRiLWltYWdlLmFsaWduY2VudGVye21hcmdpbi1sZWZ0OmF1dG87bWFyZ2luLXJpZ2h0OmF1dG99LnRiLWltYWdlIGltZ3ttYXgtd2lkdGg6MTAwJTtoZWlnaHQ6YXV0bzt3aWR0aDphdXRvO3RyYW5zaXRpb246dHJhbnNmb3JtIDAuMjVzIGVhc2V9LnRiLWltYWdlIC50Yi1pbWFnZS1jYXB0aW9uLWZpdC10by1pbWFnZXtkaXNwbGF5OnRhYmxlfS50Yi1pbWFnZSAudGItaW1hZ2UtY2FwdGlvbi1maXQtdG8taW1hZ2UgLnRiLWltYWdlLWNhcHRpb257ZGlzcGxheTp0YWJsZS1jYXB0aW9uO2NhcHRpb24tc2lkZTpib3R0b219LnRiLWltYWdle3Bvc2l0aW9uOnJlbGF0aXZlO3RyYW5zaXRpb246dHJhbnNmb3JtIDAuMjVzIGVhc2V9LndwLWJsb2NrLWltYWdlIC50Yi1pbWFnZS5hbGlnbmNlbnRlcnttYXJnaW4tbGVmdDphdXRvO21hcmdpbi1yaWdodDphdXRvfS50Yi1pbWFnZSBpbWd7bWF4LXdpZHRoOjEwMCU7aGVpZ2h0OmF1dG87d2lkdGg6YXV0bzt0cmFuc2l0aW9uOnRyYW5zZm9ybSAwLjI1cyBlYXNlfS50Yi1pbWFnZSAudGItaW1hZ2UtY2FwdGlvbi1maXQtdG8taW1hZ2V7ZGlzcGxheTp0YWJsZX0udGItaW1hZ2UgLnRiLWltYWdlLWNhcHRpb24tZml0LXRvLWltYWdlIC50Yi1pbWFnZS1jYXB0aW9ue2Rpc3BsYXk6dGFibGUtY2FwdGlvbjtjYXB0aW9uLXNpZGU6Ym90dG9tfS50Yi1ncmlkLC50Yi1ncmlkPi5ibG9jay1lZGl0b3ItaW5uZXItYmxvY2tzPi5ibG9jay1lZGl0b3ItYmxvY2stbGlzdF9fbGF5b3V0e2Rpc3BsYXk6Z3JpZDtncmlkLXJvdy1nYXA6MjVweDtncmlkLWNvbHVtbi1nYXA6MjVweH0udGItZ3JpZC1pdGVte2JhY2tncm91bmQ6I2QzOGEwMztwYWRkaW5nOjMwcHh9LnRiLWdyaWQtY29sdW1ue2ZsZXgtd3JhcDp3cmFwfS50Yi1ncmlkLWNvbHVtbj4qe3dpZHRoOjEwMCV9LnRiLWdyaWQtY29sdW1uLnRiLWdyaWQtYWxpZ24tdG9we3dpZHRoOjEwMCU7ZGlzcGxheTpmbGV4O2FsaWduLWNvbnRlbnQ6ZmxleC1zdGFydH0udGItZ3JpZC1jb2x1bW4udGItZ3JpZC1hbGlnbi1jZW50ZXJ7d2lkdGg6MTAwJTtkaXNwbGF5OmZsZXg7YWxpZ24tY29udGVudDpjZW50ZXJ9LnRiLWdyaWQtY29sdW1uLnRiLWdyaWQtYWxpZ24tYm90dG9te3dpZHRoOjEwMCU7ZGlzcGxheTpmbGV4O2FsaWduLWNvbnRlbnQ6ZmxleC1lbmR9IC53cC1ibG9jay10b29sc2V0LWJsb2Nrcy1ncmlkLnRiLWdyaWRbZGF0YS10b29sc2V0LWJsb2Nrcy1ncmlkPSI5MGFkNjY5OTIwOGJlMjhjMjI1NGE1MmJlYmUyMTA5NCJdIHsgZ3JpZC10ZW1wbGF0ZS1jb2x1bW5zOiBtaW5tYXgoMCwgMC4xMzMzMzMzMzMzMzMzM2ZyKSBtaW5tYXgoMCwgMC43MzMzMzMzMzMzMzMzM2ZyKSBtaW5tYXgoMCwgMC4xMzMzMzMzMzMzMzMzM2ZyKTtncmlkLWF1dG8tZmxvdzogcm93IH0gLndwLWJsb2NrLXRvb2xzZXQtYmxvY2tzLWdyaWQudGItZ3JpZFtkYXRhLXRvb2xzZXQtYmxvY2tzLWdyaWQ9IjkwYWQ2Njk5MjA4YmUyOGMyMjU0YTUyYmViZTIxMDk0Il0gPiAudGItZ3JpZC1jb2x1bW46bnRoLW9mLXR5cGUoM24gKyAxKSB7IGdyaWQtY29sdW1uOiAxIH0gLndwLWJsb2NrLXRvb2xzZXQtYmxvY2tzLWdyaWQudGItZ3JpZFtkYXRhLXRvb2xzZXQtYmxvY2tzLWdyaWQ9IjkwYWQ2Njk5MjA4YmUyOGMyMjU0YTUyYmViZTIxMDk0Il0gPiAudGItZ3JpZC1jb2x1bW46bnRoLW9mLXR5cGUoM24gKyAyKSB7IGdyaWQtY29sdW1uOiAyIH0gLndwLWJsb2NrLXRvb2xzZXQtYmxvY2tzLWdyaWQudGItZ3JpZFtkYXRhLXRvb2xzZXQtYmxvY2tzLWdyaWQ9IjkwYWQ2Njk5MjA4YmUyOGMyMjU0YTUyYmViZTIxMDk0Il0gPiAudGItZ3JpZC1jb2x1bW46bnRoLW9mLXR5cGUoM24gKyAzKSB7IGdyaWQtY29sdW1uOiAzIH0gLnRiLWJ1dHRvbntjb2xvcjojZjFmMWYxfS50Yi1idXR0b24tLWxlZnR7dGV4dC1hbGlnbjpsZWZ0fS50Yi1idXR0b24tLWNlbnRlcnt0ZXh0LWFsaWduOmNlbnRlcn0udGItYnV0dG9uLS1yaWdodHt0ZXh0LWFsaWduOnJpZ2h0fS50Yi1idXR0b25fX2xpbmt7Y29sb3I6aW5oZXJpdDtjdXJzb3I6cG9pbnRlcjtkaXNwbGF5OmlubGluZS1ibG9jaztsaW5lLWhlaWdodDoxMDAlO3RleHQtZGVjb3JhdGlvbjpub25lICFpbXBvcnRhbnQ7dGV4dC1hbGlnbjpjZW50ZXI7dHJhbnNpdGlvbjphbGwgMC4zcyBlYXNlfS50Yi1idXR0b25fX2xpbms6aG92ZXIsLnRiLWJ1dHRvbl9fbGluazpmb2N1cywudGItYnV0dG9uX19saW5rOnZpc2l0ZWR7Y29sb3I6aW5oZXJpdH0udGItYnV0dG9uX19saW5rOmhvdmVyIC50Yi1idXR0b25fX2NvbnRlbnQsLnRiLWJ1dHRvbl9fbGluazpmb2N1cyAudGItYnV0dG9uX19jb250ZW50LC50Yi1idXR0b25fX2xpbms6dmlzaXRlZCAudGItYnV0dG9uX19jb250ZW50e2ZvbnQtZmFtaWx5OmluaGVyaXQ7Zm9udC1zdHlsZTppbmhlcml0O2ZvbnQtd2VpZ2h0OmluaGVyaXQ7bGV0dGVyLXNwYWNpbmc6aW5oZXJpdDt0ZXh0LWRlY29yYXRpb246aW5oZXJpdDt0ZXh0LXNoYWRvdzppbmhlcml0O3RleHQtdHJhbnNmb3JtOmluaGVyaXR9LnRiLWJ1dHRvbl9fY29udGVudHt2ZXJ0aWNhbC1hbGlnbjptaWRkbGU7dHJhbnNpdGlvbjphbGwgMC4zcyBlYXNlfS50Yi1idXR0b25fX2ljb257dHJhbnNpdGlvbjphbGwgMC4zcyBlYXNlO2Rpc3BsYXk6aW5saW5lLWJsb2NrO3ZlcnRpY2FsLWFsaWduOm1pZGRsZTtmb250LXN0eWxlOm5vcm1hbCAhaW1wb3J0YW50fS50Yi1idXR0b25fX2ljb246OmJlZm9yZXtjb250ZW50OmF0dHIoZGF0YS1mb250LWNvZGUpO2ZvbnQtd2VpZ2h0Om5vcm1hbCAhaW1wb3J0YW50fS50Yi1idXR0b25fX2xpbmt7YmFja2dyb3VuZC1jb2xvcjojNDQ0O2JvcmRlci1yYWRpdXM6MC4zZW07Zm9udC1zaXplOjEuM2VtO21hcmdpbi1ib3R0b206MC43NmVtO3BhZGRpbmc6MC41NWVtIDEuNWVtIDAuNTVlbX0gLnRiLWJ1dHRvbltkYXRhLXRvb2xzZXQtYmxvY2tzLWJ1dHRvbj0iM2M0ZmE4ZmEzMDJjYjlmODMzODA5ZGNkODI1MjAzNTQiXSB7IHRleHQtYWxpZ246IGxlZnQ7IH0gLnRiLWdyaWQsLnRiLWdyaWQ+LmJsb2NrLWVkaXRvci1pbm5lci1ibG9ja3M+LmJsb2NrLWVkaXRvci1ibG9jay1saXN0X19sYXlvdXR7ZGlzcGxheTpncmlkO2dyaWQtcm93LWdhcDoyNXB4O2dyaWQtY29sdW1uLWdhcDoyNXB4fS50Yi1ncmlkLWl0ZW17YmFja2dyb3VuZDojZDM4YTAzO3BhZGRpbmc6MzBweH0udGItZ3JpZC1jb2x1bW57ZmxleC13cmFwOndyYXB9LnRiLWdyaWQtY29sdW1uPip7d2lkdGg6MTAwJX0udGItZ3JpZC1jb2x1bW4udGItZ3JpZC1hbGlnbi10b3B7d2lkdGg6MTAwJTtkaXNwbGF5OmZsZXg7YWxpZ24tY29udGVudDpmbGV4LXN0YXJ0fS50Yi1ncmlkLWNvbHVtbi50Yi1ncmlkLWFsaWduLWNlbnRlcnt3aWR0aDoxMDAlO2Rpc3BsYXk6ZmxleDthbGlnbi1jb250ZW50OmNlbnRlcn0udGItZ3JpZC1jb2x1bW4udGItZ3JpZC1hbGlnbi1ib3R0b217d2lkdGg6MTAwJTtkaXNwbGF5OmZsZXg7YWxpZ24tY29udGVudDpmbGV4LWVuZH0gLndwLWJsb2NrLXRvb2xzZXQtYmxvY2tzLWdyaWQudGItZ3JpZFtkYXRhLXRvb2xzZXQtYmxvY2tzLWdyaWQ9IjE3YmYxMTM5ZThmMjE5OGU4ODY4ZmFkNzVlNGU1ZjZmIl0geyBncmlkLXRlbXBsYXRlLWNvbHVtbnM6IG1pbm1heCgwLCAwLjEzMzMzMzMzMzMzMzMzZnIpIG1pbm1heCgwLCAwLjc3MzMzMzMzMzMzMzMzZnIpIG1pbm1heCgwLCAwLjA5MzMzMzMzMzMzMzMzM2ZyKTtncmlkLWF1dG8tZmxvdzogcm93IH0gLndwLWJsb2NrLXRvb2xzZXQtYmxvY2tzLWdyaWQudGItZ3JpZFtkYXRhLXRvb2xzZXQtYmxvY2tzLWdyaWQ9IjE3YmYxMTM5ZThmMjE5OGU4ODY4ZmFkNzVlNGU1ZjZmIl0gPiAudGItZ3JpZC1jb2x1bW46bnRoLW9mLXR5cGUoM24gKyAxKSB7IGdyaWQtY29sdW1uOiAxIH0gLndwLWJsb2NrLXRvb2xzZXQtYmxvY2tzLWdyaWQudGItZ3JpZFtkYXRhLXRvb2xzZXQtYmxvY2tzLWdyaWQ9IjE3YmYxMTM5ZThmMjE5OGU4ODY4ZmFkNzVlNGU1ZjZmIl0gPiAudGItZ3JpZC1jb2x1bW46bnRoLW9mLXR5cGUoM24gKyAyKSB7IGdyaWQtY29sdW1uOiAyIH0gLndwLWJsb2NrLXRvb2xzZXQtYmxvY2tzLWdyaWQudGItZ3JpZFtkYXRhLXRvb2xzZXQtYmxvY2tzLWdyaWQ9IjE3YmYxMTM5ZThmMjE5OGU4ODY4ZmFkNzVlNGU1ZjZmIl0gPiAudGItZ3JpZC1jb2x1bW46bnRoLW9mLXR5cGUoM24gKyAzKSB7IGdyaWQtY29sdW1uOiAzIH0gLndwLWJsb2NrLXRvb2xzZXQtYmxvY2tzLWdyaWQtY29sdW1uLnRiLWdyaWQtY29sdW1uW2RhdGEtdG9vbHNldC1ibG9ja3MtZ3JpZC1jb2x1bW49ImY1ODZmZjdiZmUxZDczMTdjNjMxNjJlYzdiNzAzOWVkIl0geyBkaXNwbGF5OiBmbGV4OyB9IC50Yi1idXR0b257Y29sb3I6I2YxZjFmMX0udGItYnV0dG9uLS1sZWZ0e3RleHQtYWxpZ246bGVmdH0udGItYnV0dG9uLS1jZW50ZXJ7dGV4dC1hbGlnbjpjZW50ZXJ9LnRiLWJ1dHRvbi0tcmlnaHR7dGV4dC1hbGlnbjpyaWdodH0udGItYnV0dG9uX19saW5re2NvbG9yOmluaGVyaXQ7Y3Vyc29yOnBvaW50ZXI7ZGlzcGxheTppbmxpbmUtYmxvY2s7bGluZS1oZWlnaHQ6MTAwJTt0ZXh0LWRlY29yYXRpb246bm9uZSAhaW1wb3J0YW50O3RleHQtYWxpZ246Y2VudGVyO3RyYW5zaXRpb246YWxsIDAuM3MgZWFzZX0udGItYnV0dG9uX19saW5rOmhvdmVyLC50Yi1idXR0b25fX2xpbms6Zm9jdXMsLnRiLWJ1dHRvbl9fbGluazp2aXNpdGVke2NvbG9yOmluaGVyaXR9LnRiLWJ1dHRvbl9fbGluazpob3ZlciAudGItYnV0dG9uX19jb250ZW50LC50Yi1idXR0b25fX2xpbms6Zm9jdXMgLnRiLWJ1dHRvbl9fY29udGVudCwudGItYnV0dG9uX19saW5rOnZpc2l0ZWQgLnRiLWJ1dHRvbl9fY29udGVudHtmb250LWZhbWlseTppbmhlcml0O2ZvbnQtc3R5bGU6aW5oZXJpdDtmb250LXdlaWdodDppbmhlcml0O2xldHRlci1zcGFjaW5nOmluaGVyaXQ7dGV4dC1kZWNvcmF0aW9uOmluaGVyaXQ7dGV4dC1zaGFkb3c6aW5oZXJpdDt0ZXh0LXRyYW5zZm9ybTppbmhlcml0fS50Yi1idXR0b25fX2NvbnRlbnR7dmVydGljYWwtYWxpZ246bWlkZGxlO3RyYW5zaXRpb246YWxsIDAuM3MgZWFzZX0udGItYnV0dG9uX19pY29ue3RyYW5zaXRpb246YWxsIDAuM3MgZWFzZTtkaXNwbGF5OmlubGluZS1ibG9jazt2ZXJ0aWNhbC1hbGlnbjptaWRkbGU7Zm9udC1zdHlsZTpub3JtYWwgIWltcG9ydGFudH0udGItYnV0dG9uX19pY29uOjpiZWZvcmV7Y29udGVudDphdHRyKGRhdGEtZm9udC1jb2RlKTtmb250LXdlaWdodDpub3JtYWwgIWltcG9ydGFudH0udGItYnV0dG9uX19saW5re2JhY2tncm91bmQtY29sb3I6IzQ0NDtib3JkZXItcmFkaXVzOjAuM2VtO2ZvbnQtc2l6ZToxLjNlbTttYXJnaW4tYm90dG9tOjAuNzZlbTtwYWRkaW5nOjAuNTVlbSAxLjVlbSAwLjU1ZW19IC50Yi1idXR0b25bZGF0YS10b29sc2V0LWJsb2Nrcy1idXR0b249Ijc4ZGU1YTNkYzViY2QyYmQ3NTAwN2Y5N2FiMjIyOTRiIl0geyB0ZXh0LWFsaWduOiBsZWZ0OyB9IC53cC1ibG9jay10b29sc2V0LWJsb2Nrcy1ncmlkLWNvbHVtbi50Yi1ncmlkLWNvbHVtbltkYXRhLXRvb2xzZXQtYmxvY2tzLWdyaWQtY29sdW1uPSI2YzUyOTEzM2VkODUzNDk2ZjY4MzJmZjYxZWM3NGU0MCJdIHsgZGlzcGxheTogZmxleDsgfSAudGItY29udGFpbmVyIC50Yi1jb250YWluZXItaW5uZXJ7d2lkdGg6MTAwJTttYXJnaW46MCBhdXRvfS50Yi1ncmlkLC50Yi1ncmlkPi5ibG9jay1lZGl0b3ItaW5uZXItYmxvY2tzPi5ibG9jay1lZGl0b3ItYmxvY2stbGlzdF9fbGF5b3V0e2Rpc3BsYXk6Z3JpZDtncmlkLXJvdy1nYXA6MjVweDtncmlkLWNvbHVtbi1nYXA6MjVweH0udGItZ3JpZC1pdGVte2JhY2tncm91bmQ6I2QzOGEwMztwYWRkaW5nOjMwcHh9LnRiLWdyaWQtY29sdW1ue2ZsZXgtd3JhcDp3cmFwfS50Yi1ncmlkLWNvbHVtbj4qe3dpZHRoOjEwMCV9LnRiLWdyaWQtY29sdW1uLnRiLWdyaWQtYWxpZ24tdG9we3dpZHRoOjEwMCU7ZGlzcGxheTpmbGV4O2FsaWduLWNvbnRlbnQ6ZmxleC1zdGFydH0udGItZ3JpZC1jb2x1bW4udGItZ3JpZC1hbGlnbi1jZW50ZXJ7d2lkdGg6MTAwJTtkaXNwbGF5OmZsZXg7YWxpZ24tY29udGVudDpjZW50ZXJ9LnRiLWdyaWQtY29sdW1uLnRiLWdyaWQtYWxpZ24tYm90dG9te3dpZHRoOjEwMCU7ZGlzcGxheTpmbGV4O2FsaWduLWNvbnRlbnQ6ZmxleC1lbmR9IC53cC1ibG9jay10b29sc2V0LWJsb2Nrcy1ncmlkLnRiLWdyaWRbZGF0YS10b29sc2V0LWJsb2Nrcy1ncmlkPSI3MTA0MGQ4ZTE3MGM0NWE0NGRkNTA0NzIxNTIwMGQ5YSJdIHsgZ3JpZC10ZW1wbGF0ZS1jb2x1bW5zOiBtaW5tYXgoMCwgMC41ZnIpIG1pbm1heCgwLCAwLjVmcik7Z3JpZC1hdXRvLWZsb3c6IHJvdyB9IC53cC1ibG9jay10b29sc2V0LWJsb2Nrcy1ncmlkLnRiLWdyaWRbZGF0YS10b29sc2V0LWJsb2Nrcy1ncmlkPSI3MTA0MGQ4ZTE3MGM0NWE0NGRkNTA0NzIxNTIwMGQ5YSJdID4gLnRiLWdyaWQtY29sdW1uOm50aC1vZi10eXBlKDJuICsgMSkgeyBncmlkLWNvbHVtbjogMSB9IC53cC1ibG9jay10b29sc2V0LWJsb2Nrcy1ncmlkLnRiLWdyaWRbZGF0YS10b29sc2V0LWJsb2Nrcy1ncmlkPSI3MTA0MGQ4ZTE3MGM0NWE0NGRkNTA0NzIxNTIwMGQ5YSJdID4gLnRiLWdyaWQtY29sdW1uOm50aC1vZi10eXBlKDJuICsgMikgeyBncmlkLWNvbHVtbjogMiB9IC53cC1ibG9jay10b29sc2V0LWJsb2Nrcy1ncmlkLWNvbHVtbi50Yi1ncmlkLWNvbHVtbltkYXRhLXRvb2xzZXQtYmxvY2tzLWdyaWQtY29sdW1uPSIyNWIzZWJkYzdjZTgyNGZmNjdjYTAyMGFjNjYxZTQ3NCJdIHsgZGlzcGxheTogZmxleDsgfSAudGItZ3JpZCwudGItZ3JpZD4uYmxvY2stZWRpdG9yLWlubmVyLWJsb2Nrcz4uYmxvY2stZWRpdG9yLWJsb2NrLWxpc3RfX2xheW91dHtkaXNwbGF5OmdyaWQ7Z3JpZC1yb3ctZ2FwOjI1cHg7Z3JpZC1jb2x1bW4tZ2FwOjI1cHh9LnRiLWdyaWQtaXRlbXtiYWNrZ3JvdW5kOiNkMzhhMDM7cGFkZGluZzozMHB4fS50Yi1ncmlkLWNvbHVtbntmbGV4LXdyYXA6d3JhcH0udGItZ3JpZC1jb2x1bW4+Knt3aWR0aDoxMDAlfS50Yi1ncmlkLWNvbHVtbi50Yi1ncmlkLWFsaWduLXRvcHt3aWR0aDoxMDAlO2Rpc3BsYXk6ZmxleDthbGlnbi1jb250ZW50OmZsZXgtc3RhcnR9LnRiLWdyaWQtY29sdW1uLnRiLWdyaWQtYWxpZ24tY2VudGVye3dpZHRoOjEwMCU7ZGlzcGxheTpmbGV4O2FsaWduLWNvbnRlbnQ6Y2VudGVyfS50Yi1ncmlkLWNvbHVtbi50Yi1ncmlkLWFsaWduLWJvdHRvbXt3aWR0aDoxMDAlO2Rpc3BsYXk6ZmxleDthbGlnbi1jb250ZW50OmZsZXgtZW5kfSAud3AtYmxvY2stdG9vbHNldC1ibG9ja3MtZ3JpZC50Yi1ncmlkW2RhdGEtdG9vbHNldC1ibG9ja3MtZ3JpZD0iZjQ3YWJlMWE2ZmZlMTU3OGZhNWU0MDM2MzI3NTNjMzMiXSB7IGdyaWQtdGVtcGxhdGUtY29sdW1uczogbWlubWF4KDAsIDAuMDRmcikgbWlubWF4KDAsIDAuOTZmcik7Z3JpZC1hdXRvLWZsb3c6IHJvdyB9IC53cC1ibG9jay10b29sc2V0LWJsb2Nrcy1ncmlkLnRiLWdyaWRbZGF0YS10b29sc2V0LWJsb2Nrcy1ncmlkPSJmNDdhYmUxYTZmZmUxNTc4ZmE1ZTQwMzYzMjc1M2MzMyJdID4gLnRiLWdyaWQtY29sdW1uOm50aC1vZi10eXBlKDJuICsgMSkgeyBncmlkLWNvbHVtbjogMSB9IC53cC1ibG9jay10b29sc2V0LWJsb2Nrcy1ncmlkLnRiLWdyaWRbZGF0YS10b29sc2V0LWJsb2Nrcy1ncmlkPSJmNDdhYmUxYTZmZmUxNTc4ZmE1ZTQwMzYzMjc1M2MzMyJdID4gLnRiLWdyaWQtY29sdW1uOm50aC1vZi10eXBlKDJuICsgMikgeyBncmlkLWNvbHVtbjogMiB9IC53cC1ibG9jay10b29sc2V0LWJsb2Nrcy1ncmlkLWNvbHVtbi50Yi1ncmlkLWNvbHVtbltkYXRhLXRvb2xzZXQtYmxvY2tzLWdyaWQtY29sdW1uPSI5ODU3NWZjOGRmNTk2ZmVmM2E5NzFjMWMxZTczZTA2MyJdIHsgZGlzcGxheTogZmxleDsgfSAudGItZ3JpZCwudGItZ3JpZD4uYmxvY2stZWRpdG9yLWlubmVyLWJsb2Nrcz4uYmxvY2stZWRpdG9yLWJsb2NrLWxpc3RfX2xheW91dHtkaXNwbGF5OmdyaWQ7Z3JpZC1yb3ctZ2FwOjI1cHg7Z3JpZC1jb2x1bW4tZ2FwOjI1cHh9LnRiLWdyaWQtaXRlbXtiYWNrZ3JvdW5kOiNkMzhhMDM7cGFkZGluZzozMHB4fS50Yi1ncmlkLWNvbHVtbntmbGV4LXdyYXA6d3JhcH0udGItZ3JpZC1jb2x1bW4+Knt3aWR0aDoxMDAlfS50Yi1ncmlkLWNvbHVtbi50Yi1ncmlkLWFsaWduLXRvcHt3aWR0aDoxMDAlO2Rpc3BsYXk6ZmxleDthbGlnbi1jb250ZW50OmZsZXgtc3RhcnR9LnRiLWdyaWQtY29sdW1uLnRiLWdyaWQtYWxpZ24tY2VudGVye3dpZHRoOjEwMCU7ZGlzcGxheTpmbGV4O2FsaWduLWNvbnRlbnQ6Y2VudGVyfS50Yi1ncmlkLWNvbHVtbi50Yi1ncmlkLWFsaWduLWJvdHRvbXt3aWR0aDoxMDAlO2Rpc3BsYXk6ZmxleDthbGlnbi1jb250ZW50OmZsZXgtZW5kfSAud3AtYmxvY2stdG9vbHNldC1ibG9ja3MtZ3JpZC50Yi1ncmlkW2RhdGEtdG9vbHNldC1ibG9ja3MtZ3JpZD0iOTljYzNhNWFiNjBkZjc5NGE1N2JiNmI4ZDI1ZWI3MmIiXSB7IGdyaWQtdGVtcGxhdGUtY29sdW1uczogbWlubWF4KDAsIDAuMDRmcikgbWlubWF4KDAsIDAuOTZmcik7Z3JpZC1hdXRvLWZsb3c6IHJvdyB9IC53cC1ibG9jay10b29sc2V0LWJsb2Nrcy1ncmlkLnRiLWdyaWRbZGF0YS10b29sc2V0LWJsb2Nrcy1ncmlkPSI5OWNjM2E1YWI2MGRmNzk0YTU3YmI2YjhkMjVlYjcyYiJdID4gLnRiLWdyaWQtY29sdW1uOm50aC1vZi10eXBlKDJuICsgMSkgeyBncmlkLWNvbHVtbjogMSB9IC53cC1ibG9jay10b29sc2V0LWJsb2Nrcy1ncmlkLnRiLWdyaWRbZGF0YS10b29sc2V0LWJsb2Nrcy1ncmlkPSI5OWNjM2E1YWI2MGRmNzk0YTU3YmI2YjhkMjVlYjcyYiJdID4gLnRiLWdyaWQtY29sdW1uOm50aC1vZi10eXBlKDJuICsgMikgeyBncmlkLWNvbHVtbjogMiB9IC50Yi1ncmlkLC50Yi1ncmlkPi5ibG9jay1lZGl0b3ItaW5uZXItYmxvY2tzPi5ibG9jay1lZGl0b3ItYmxvY2stbGlzdF9fbGF5b3V0e2Rpc3BsYXk6Z3JpZDtncmlkLXJvdy1nYXA6MjVweDtncmlkLWNvbHVtbi1nYXA6MjVweH0udGItZ3JpZC1pdGVte2JhY2tncm91bmQ6I2QzOGEwMztwYWRkaW5nOjMwcHh9LnRiLWdyaWQtY29sdW1ue2ZsZXgtd3JhcDp3cmFwfS50Yi1ncmlkLWNvbHVtbj4qe3dpZHRoOjEwMCV9LnRiLWdyaWQtY29sdW1uLnRiLWdyaWQtYWxpZ24tdG9we3dpZHRoOjEwMCU7ZGlzcGxheTpmbGV4O2FsaWduLWNvbnRlbnQ6ZmxleC1zdGFydH0udGItZ3JpZC1jb2x1bW4udGItZ3JpZC1hbGlnbi1jZW50ZXJ7d2lkdGg6MTAwJTtkaXNwbGF5OmZsZXg7YWxpZ24tY29udGVudDpjZW50ZXJ9LnRiLWdyaWQtY29sdW1uLnRiLWdyaWQtYWxpZ24tYm90dG9te3dpZHRoOjEwMCU7ZGlzcGxheTpmbGV4O2FsaWduLWNvbnRlbnQ6ZmxleC1lbmR9IC53cC1ibG9jay10b29sc2V0LWJsb2Nrcy1ncmlkLnRiLWdyaWRbZGF0YS10b29sc2V0LWJsb2Nrcy1ncmlkPSI2ZDg4NGUzNzU4MjU5YTZjYTJhMTNiOWJmYTg3NzJkOCJdIHsgZ3JpZC10ZW1wbGF0ZS1jb2x1bW5zOiBtaW5tYXgoMCwgMC4wNGZyKSBtaW5tYXgoMCwgMC45NmZyKTtncmlkLWF1dG8tZmxvdzogcm93IH0gLndwLWJsb2NrLXRvb2xzZXQtYmxvY2tzLWdyaWQudGItZ3JpZFtkYXRhLXRvb2xzZXQtYmxvY2tzLWdyaWQ9IjZkODg0ZTM3NTgyNTlhNmNhMmExM2I5YmZhODc3MmQ4Il0gPiAudGItZ3JpZC1jb2x1bW46bnRoLW9mLXR5cGUoMm4gKyAxKSB7IGdyaWQtY29sdW1uOiAxIH0gLndwLWJsb2NrLXRvb2xzZXQtYmxvY2tzLWdyaWQudGItZ3JpZFtkYXRhLXRvb2xzZXQtYmxvY2tzLWdyaWQ9IjZkODg0ZTM3NTgyNTlhNmNhMmExM2I5YmZhODc3MmQ4Il0gPiAudGItZ3JpZC1jb2x1bW46bnRoLW9mLXR5cGUoMm4gKyAyKSB7IGdyaWQtY29sdW1uOiAyIH0gLnRiLWNvbnRhaW5lciAudGItY29udGFpbmVyLWlubmVye3dpZHRoOjEwMCU7bWFyZ2luOjAgYXV0b30udGItZ3JpZCwudGItZ3JpZD4uYmxvY2stZWRpdG9yLWlubmVyLWJsb2Nrcz4uYmxvY2stZWRpdG9yLWJsb2NrLWxpc3RfX2xheW91dHtkaXNwbGF5OmdyaWQ7Z3JpZC1yb3ctZ2FwOjI1cHg7Z3JpZC1jb2x1bW4tZ2FwOjI1cHh9LnRiLWdyaWQtaXRlbXtiYWNrZ3JvdW5kOiNkMzhhMDM7cGFkZGluZzozMHB4fS50Yi1ncmlkLWNvbHVtbntmbGV4LXdyYXA6d3JhcH0udGItZ3JpZC1jb2x1bW4+Knt3aWR0aDoxMDAlfS50Yi1ncmlkLWNvbHVtbi50Yi1ncmlkLWFsaWduLXRvcHt3aWR0aDoxMDAlO2Rpc3BsYXk6ZmxleDthbGlnbi1jb250ZW50OmZsZXgtc3RhcnR9LnRiLWdyaWQtY29sdW1uLnRiLWdyaWQtYWxpZ24tY2VudGVye3dpZHRoOjEwMCU7ZGlzcGxheTpmbGV4O2FsaWduLWNvbnRlbnQ6Y2VudGVyfS50Yi1ncmlkLWNvbHVtbi50Yi1ncmlkLWFsaWduLWJvdHRvbXt3aWR0aDoxMDAlO2Rpc3BsYXk6ZmxleDthbGlnbi1jb250ZW50OmZsZXgtZW5kfSAud3AtYmxvY2stdG9vbHNldC1ibG9ja3MtZ3JpZC50Yi1ncmlkW2RhdGEtdG9vbHNldC1ibG9ja3MtZ3JpZD0iZGJjNWIwMjA4YTQ0ZjNmYjVkMzQwN2VkZDQyMzkxODIiXSB7IGdyaWQtdGVtcGxhdGUtY29sdW1uczogbWlubWF4KDAsIDAuMDRmcikgbWlubWF4KDAsIDAuOTZmcik7Z3JpZC1hdXRvLWZsb3c6IHJvdyB9IC53cC1ibG9jay10b29sc2V0LWJsb2Nrcy1ncmlkLnRiLWdyaWRbZGF0YS10b29sc2V0LWJsb2Nrcy1ncmlkPSJkYmM1YjAyMDhhNDRmM2ZiNWQzNDA3ZWRkNDIzOTE4MiJdID4gLnRiLWdyaWQtY29sdW1uOm50aC1vZi10eXBlKDJuICsgMSkgeyBncmlkLWNvbHVtbjogMSB9IC53cC1ibG9jay10b29sc2V0LWJsb2Nrcy1ncmlkLnRiLWdyaWRbZGF0YS10b29sc2V0LWJsb2Nrcy1ncmlkPSJkYmM1YjAyMDhhNDRmM2ZiNWQzNDA3ZWRkNDIzOTE4MiJdID4gLnRiLWdyaWQtY29sdW1uOm50aC1vZi10eXBlKDJuICsgMikgeyBncmlkLWNvbHVtbjogMiB9ICAudGItY29udGFpbmVyIC50Yi1jb250YWluZXItaW5uZXJ7d2lkdGg6MTAwJTttYXJnaW46MCBhdXRvfSAudGItZ3JpZCwudGItZ3JpZD4uYmxvY2stZWRpdG9yLWlubmVyLWJsb2Nrcz4uYmxvY2stZWRpdG9yLWJsb2NrLWxpc3RfX2xheW91dHtkaXNwbGF5OmdyaWQ7Z3JpZC1yb3ctZ2FwOjI1cHg7Z3JpZC1jb2x1bW4tZ2FwOjI1cHh9LnRiLWdyaWQtaXRlbXtiYWNrZ3JvdW5kOiNkMzhhMDM7cGFkZGluZzozMHB4fS50Yi1ncmlkLWNvbHVtbntmbGV4LXdyYXA6d3JhcH0udGItZ3JpZC1jb2x1bW4+Knt3aWR0aDoxMDAlfS50Yi1ncmlkLWNvbHVtbi50Yi1ncmlkLWFsaWduLXRvcHt3aWR0aDoxMDAlO2Rpc3BsYXk6ZmxleDthbGlnbi1jb250ZW50OmZsZXgtc3RhcnR9LnRiLWdyaWQtY29sdW1uLnRiLWdyaWQtYWxpZ24tY2VudGVye3dpZHRoOjEwMCU7ZGlzcGxheTpmbGV4O2FsaWduLWNvbnRlbnQ6Y2VudGVyfS50Yi1ncmlkLWNvbHVtbi50Yi1ncmlkLWFsaWduLWJvdHRvbXt3aWR0aDoxMDAlO2Rpc3BsYXk6ZmxleDthbGlnbi1jb250ZW50OmZsZXgtZW5kfSAud3AtYmxvY2stdG9vbHNldC1ibG9ja3MtZ3JpZC50Yi1ncmlkW2RhdGEtdG9vbHNldC1ibG9ja3MtZ3JpZD0iZDcwYmJiMTQ1YjA2OTM2YzkwODViNTBiNmJiMjNmYzciXSB7IGdyaWQtdGVtcGxhdGUtY29sdW1uczogbWlubWF4KDAsIDFmcik7Z3JpZC1hdXRvLWZsb3c6IHJvdyB9IC53cC1ibG9jay10b29sc2V0LWJsb2Nrcy1ncmlkLnRiLWdyaWRbZGF0YS10b29sc2V0LWJsb2Nrcy1ncmlkPSJkNzBiYmIxNDViMDY5MzZjOTA4NWI1MGI2YmIyM2ZjNyJdICA+IC50Yi1ncmlkLWNvbHVtbjpudGgtb2YtdHlwZSgxbisxKSB7IGdyaWQtY29sdW1uOiAxIH0gLndwLWJsb2NrLXRvb2xzZXQtYmxvY2tzLWdyaWQtY29sdW1uLnRiLWdyaWQtY29sdW1uW2RhdGEtdG9vbHNldC1ibG9ja3MtZ3JpZC1jb2x1bW49IjMwMzRmYmU4ODZjMTEwNTRlOTViNDZiMDlkM2U0MTEyIl0geyBkaXNwbGF5OiBmbGV4OyB9ICAudGIteW91dHViZXttaW4td2lkdGg6MTAwcHh9LnRiLXlvdXR1YmU+ZGl2e3dpZHRoOjEwMCU7cG9zaXRpb246cmVsYXRpdmV9LnRiLXlvdXR1YmU+ZGl2PmlmcmFtZXtib3gtc2l6aW5nOmJvcmRlci1ib3g7d2lkdGg6MTAwJTtoZWlnaHQ6MTAwJTtwb3NpdGlvbjphYnNvbHV0ZTt0b3A6MDtsZWZ0OjB9IH0gQG1lZGlhIG9ubHkgc2NyZWVuIGFuZCAobWF4LXdpZHRoOiA1OTlweCkgeyAudGItaW1hZ2V7cG9zaXRpb246cmVsYXRpdmU7dHJhbnNpdGlvbjp0cmFuc2Zvcm0gMC4yNXMgZWFzZX0ud3AtYmxvY2staW1hZ2UgLnRiLWltYWdlLmFsaWduY2VudGVye21hcmdpbi1sZWZ0OmF1dG87bWFyZ2luLXJpZ2h0OmF1dG99LnRiLWltYWdlIGltZ3ttYXgtd2lkdGg6MTAwJTtoZWlnaHQ6YXV0bzt3aWR0aDphdXRvO3RyYW5zaXRpb246dHJhbnNmb3JtIDAuMjVzIGVhc2V9LnRiLWltYWdlIC50Yi1pbWFnZS1jYXB0aW9uLWZpdC10by1pbWFnZXtkaXNwbGF5OnRhYmxlfS50Yi1pbWFnZSAudGItaW1hZ2UtY2FwdGlvbi1maXQtdG8taW1hZ2UgLnRiLWltYWdlLWNhcHRpb257ZGlzcGxheTp0YWJsZS1jYXB0aW9uO2NhcHRpb24tc2lkZTpib3R0b219LnRiLWltYWdle3Bvc2l0aW9uOnJlbGF0aXZlO3RyYW5zaXRpb246dHJhbnNmb3JtIDAuMjVzIGVhc2V9LndwLWJsb2NrLWltYWdlIC50Yi1pbWFnZS5hbGlnbmNlbnRlcnttYXJnaW4tbGVmdDphdXRvO21hcmdpbi1yaWdodDphdXRvfS50Yi1pbWFnZSBpbWd7bWF4LXdpZHRoOjEwMCU7aGVpZ2h0OmF1dG87d2lkdGg6YXV0bzt0cmFuc2l0aW9uOnRyYW5zZm9ybSAwLjI1cyBlYXNlfS50Yi1pbWFnZSAudGItaW1hZ2UtY2FwdGlvbi1maXQtdG8taW1hZ2V7ZGlzcGxheTp0YWJsZX0udGItaW1hZ2UgLnRiLWltYWdlLWNhcHRpb24tZml0LXRvLWltYWdlIC50Yi1pbWFnZS1jYXB0aW9ue2Rpc3BsYXk6dGFibGUtY2FwdGlvbjtjYXB0aW9uLXNpZGU6Ym90dG9tfS50Yi1ncmlkLC50Yi1ncmlkPi5ibG9jay1lZGl0b3ItaW5uZXItYmxvY2tzPi5ibG9jay1lZGl0b3ItYmxvY2stbGlzdF9fbGF5b3V0e2Rpc3BsYXk6Z3JpZDtncmlkLXJvdy1nYXA6MjVweDtncmlkLWNvbHVtbi1nYXA6MjVweH0udGItZ3JpZC1pdGVte2JhY2tncm91bmQ6I2QzOGEwMztwYWRkaW5nOjMwcHh9LnRiLWdyaWQtY29sdW1ue2ZsZXgtd3JhcDp3cmFwfS50Yi1ncmlkLWNvbHVtbj4qe3dpZHRoOjEwMCV9LnRiLWdyaWQtY29sdW1uLnRiLWdyaWQtYWxpZ24tdG9we3dpZHRoOjEwMCU7ZGlzcGxheTpmbGV4O2FsaWduLWNvbnRlbnQ6ZmxleC1zdGFydH0udGItZ3JpZC1jb2x1bW4udGItZ3JpZC1hbGlnbi1jZW50ZXJ7d2lkdGg6MTAwJTtkaXNwbGF5OmZsZXg7YWxpZ24tY29udGVudDpjZW50ZXJ9LnRiLWdyaWQtY29sdW1uLnRiLWdyaWQtYWxpZ24tYm90dG9te3dpZHRoOjEwMCU7ZGlzcGxheTpmbGV4O2FsaWduLWNvbnRlbnQ6ZmxleC1lbmR9IC53cC1ibG9jay10b29sc2V0LWJsb2Nrcy1ncmlkLnRiLWdyaWRbZGF0YS10b29sc2V0LWJsb2Nrcy1ncmlkPSI5MGFkNjY5OTIwOGJlMjhjMjI1NGE1MmJlYmUyMTA5NCJdIHsgZ3JpZC10ZW1wbGF0ZS1jb2x1bW5zOiBtaW5tYXgoMCwgMC4xNWZyKSBtaW5tYXgoMCwgMC44NWZyKTtncmlkLWF1dG8tZmxvdzogcm93IH0gLndwLWJsb2NrLXRvb2xzZXQtYmxvY2tzLWdyaWQudGItZ3JpZFtkYXRhLXRvb2xzZXQtYmxvY2tzLWdyaWQ9IjkwYWQ2Njk5MjA4YmUyOGMyMjU0YTUyYmViZTIxMDk0Il0gPiAudGItZ3JpZC1jb2x1bW46bnRoLW9mLXR5cGUoMm4gKyAxKSB7IGdyaWQtY29sdW1uOiAxIH0gLndwLWJsb2NrLXRvb2xzZXQtYmxvY2tzLWdyaWQudGItZ3JpZFtkYXRhLXRvb2xzZXQtYmxvY2tzLWdyaWQ9IjkwYWQ2Njk5MjA4YmUyOGMyMjU0YTUyYmViZTIxMDk0Il0gPiAudGItZ3JpZC1jb2x1bW46bnRoLW9mLXR5cGUoMm4gKyAyKSB7IGdyaWQtY29sdW1uOiAyIH0gLnRiLWJ1dHRvbntjb2xvcjojZjFmMWYxfS50Yi1idXR0b24tLWxlZnR7dGV4dC1hbGlnbjpsZWZ0fS50Yi1idXR0b24tLWNlbnRlcnt0ZXh0LWFsaWduOmNlbnRlcn0udGItYnV0dG9uLS1yaWdodHt0ZXh0LWFsaWduOnJpZ2h0fS50Yi1idXR0b25fX2xpbmt7Y29sb3I6aW5oZXJpdDtjdXJzb3I6cG9pbnRlcjtkaXNwbGF5OmlubGluZS1ibG9jaztsaW5lLWhlaWdodDoxMDAlO3RleHQtZGVjb3JhdGlvbjpub25lICFpbXBvcnRhbnQ7dGV4dC1hbGlnbjpjZW50ZXI7dHJhbnNpdGlvbjphbGwgMC4zcyBlYXNlfS50Yi1idXR0b25fX2xpbms6aG92ZXIsLnRiLWJ1dHRvbl9fbGluazpmb2N1cywudGItYnV0dG9uX19saW5rOnZpc2l0ZWR7Y29sb3I6aW5oZXJpdH0udGItYnV0dG9uX19saW5rOmhvdmVyIC50Yi1idXR0b25fX2NvbnRlbnQsLnRiLWJ1dHRvbl9fbGluazpmb2N1cyAudGItYnV0dG9uX19jb250ZW50LC50Yi1idXR0b25fX2xpbms6dmlzaXRlZCAudGItYnV0dG9uX19jb250ZW50e2ZvbnQtZmFtaWx5OmluaGVyaXQ7Zm9udC1zdHlsZTppbmhlcml0O2ZvbnQtd2VpZ2h0OmluaGVyaXQ7bGV0dGVyLXNwYWNpbmc6aW5oZXJpdDt0ZXh0LWRlY29yYXRpb246aW5oZXJpdDt0ZXh0LXNoYWRvdzppbmhlcml0O3RleHQtdHJhbnNmb3JtOmluaGVyaXR9LnRiLWJ1dHRvbl9fY29udGVudHt2ZXJ0aWNhbC1hbGlnbjptaWRkbGU7dHJhbnNpdGlvbjphbGwgMC4zcyBlYXNlfS50Yi1idXR0b25fX2ljb257dHJhbnNpdGlvbjphbGwgMC4zcyBlYXNlO2Rpc3BsYXk6aW5saW5lLWJsb2NrO3ZlcnRpY2FsLWFsaWduOm1pZGRsZTtmb250LXN0eWxlOm5vcm1hbCAhaW1wb3J0YW50fS50Yi1idXR0b25fX2ljb246OmJlZm9yZXtjb250ZW50OmF0dHIoZGF0YS1mb250LWNvZGUpO2ZvbnQtd2VpZ2h0Om5vcm1hbCAhaW1wb3J0YW50fS50Yi1idXR0b25fX2xpbmt7YmFja2dyb3VuZC1jb2xvcjojNDQ0O2JvcmRlci1yYWRpdXM6MC4zZW07Zm9udC1zaXplOjEuM2VtO21hcmdpbi1ib3R0b206MC43NmVtO3BhZGRpbmc6MC41NWVtIDEuNWVtIDAuNTVlbX0gLnRiLWJ1dHRvbltkYXRhLXRvb2xzZXQtYmxvY2tzLWJ1dHRvbj0iM2M0ZmE4ZmEzMDJjYjlmODMzODA5ZGNkODI1MjAzNTQiXSB7IHRleHQtYWxpZ246IGxlZnQ7IH0gLnRiLWZpZWxkcy1hbmQtdGV4dFtkYXRhLXRvb2xzZXQtYmxvY2tzLWZpZWxkcy1hbmQtdGV4dD0iY2Y1MzEwZmEwNGU0YTk5NWU1ZmE0YTRhNTdmYzlmYjMiXSB7IHBhZGRpbmctdG9wOiAycHg7cGFkZGluZy1ib3R0b206IDJweDsgfSAudGItZ3JpZCwudGItZ3JpZD4uYmxvY2stZWRpdG9yLWlubmVyLWJsb2Nrcz4uYmxvY2stZWRpdG9yLWJsb2NrLWxpc3RfX2xheW91dHtkaXNwbGF5OmdyaWQ7Z3JpZC1yb3ctZ2FwOjI1cHg7Z3JpZC1jb2x1bW4tZ2FwOjI1cHh9LnRiLWdyaWQtaXRlbXtiYWNrZ3JvdW5kOiNkMzhhMDM7cGFkZGluZzozMHB4fS50Yi1ncmlkLWNvbHVtbntmbGV4LXdyYXA6d3JhcH0udGItZ3JpZC1jb2x1bW4+Knt3aWR0aDoxMDAlfS50Yi1ncmlkLWNvbHVtbi50Yi1ncmlkLWFsaWduLXRvcHt3aWR0aDoxMDAlO2Rpc3BsYXk6ZmxleDthbGlnbi1jb250ZW50OmZsZXgtc3RhcnR9LnRiLWdyaWQtY29sdW1uLnRiLWdyaWQtYWxpZ24tY2VudGVye3dpZHRoOjEwMCU7ZGlzcGxheTpmbGV4O2FsaWduLWNvbnRlbnQ6Y2VudGVyfS50Yi1ncmlkLWNvbHVtbi50Yi1ncmlkLWFsaWduLWJvdHRvbXt3aWR0aDoxMDAlO2Rpc3BsYXk6ZmxleDthbGlnbi1jb250ZW50OmZsZXgtZW5kfSAud3AtYmxvY2stdG9vbHNldC1ibG9ja3MtZ3JpZC50Yi1ncmlkW2RhdGEtdG9vbHNldC1ibG9ja3MtZ3JpZD0iMTdiZjExMzllOGYyMTk4ZTg4NjhmYWQ3NWU0ZTVmNmYiXSB7IGdyaWQtdGVtcGxhdGUtY29sdW1uczogbWlubWF4KDAsIDAuMTVmcikgbWlubWF4KDAsIDAuODVmcik7Z3JpZC1hdXRvLWZsb3c6IHJvdyB9IC53cC1ibG9jay10b29sc2V0LWJsb2Nrcy1ncmlkLnRiLWdyaWRbZGF0YS10b29sc2V0LWJsb2Nrcy1ncmlkPSIxN2JmMTEzOWU4ZjIxOThlODg2OGZhZDc1ZTRlNWY2ZiJdID4gLnRiLWdyaWQtY29sdW1uOm50aC1vZi10eXBlKDJuICsgMSkgeyBncmlkLWNvbHVtbjogMSB9IC53cC1ibG9jay10b29sc2V0LWJsb2Nrcy1ncmlkLnRiLWdyaWRbZGF0YS10b29sc2V0LWJsb2Nrcy1ncmlkPSIxN2JmMTEzOWU4ZjIxOThlODg2OGZhZDc1ZTRlNWY2ZiJdID4gLnRiLWdyaWQtY29sdW1uOm50aC1vZi10eXBlKDJuICsgMikgeyBncmlkLWNvbHVtbjogMiB9IC53cC1ibG9jay10b29sc2V0LWJsb2Nrcy1ncmlkLWNvbHVtbi50Yi1ncmlkLWNvbHVtbltkYXRhLXRvb2xzZXQtYmxvY2tzLWdyaWQtY29sdW1uPSJmNTg2ZmY3YmZlMWQ3MzE3YzYzMTYyZWM3YjcwMzllZCJdIHsgZGlzcGxheTogZmxleDsgfSAudGItYnV0dG9ue2NvbG9yOiNmMWYxZjF9LnRiLWJ1dHRvbi0tbGVmdHt0ZXh0LWFsaWduOmxlZnR9LnRiLWJ1dHRvbi0tY2VudGVye3RleHQtYWxpZ246Y2VudGVyfS50Yi1idXR0b24tLXJpZ2h0e3RleHQtYWxpZ246cmlnaHR9LnRiLWJ1dHRvbl9fbGlua3tjb2xvcjppbmhlcml0O2N1cnNvcjpwb2ludGVyO2Rpc3BsYXk6aW5saW5lLWJsb2NrO2xpbmUtaGVpZ2h0OjEwMCU7dGV4dC1kZWNvcmF0aW9uOm5vbmUgIWltcG9ydGFudDt0ZXh0LWFsaWduOmNlbnRlcjt0cmFuc2l0aW9uOmFsbCAwLjNzIGVhc2V9LnRiLWJ1dHRvbl9fbGluazpob3ZlciwudGItYnV0dG9uX19saW5rOmZvY3VzLC50Yi1idXR0b25fX2xpbms6dmlzaXRlZHtjb2xvcjppbmhlcml0fS50Yi1idXR0b25fX2xpbms6aG92ZXIgLnRiLWJ1dHRvbl9fY29udGVudCwudGItYnV0dG9uX19saW5rOmZvY3VzIC50Yi1idXR0b25fX2NvbnRlbnQsLnRiLWJ1dHRvbl9fbGluazp2aXNpdGVkIC50Yi1idXR0b25fX2NvbnRlbnR7Zm9udC1mYW1pbHk6aW5oZXJpdDtmb250LXN0eWxlOmluaGVyaXQ7Zm9udC13ZWlnaHQ6aW5oZXJpdDtsZXR0ZXItc3BhY2luZzppbmhlcml0O3RleHQtZGVjb3JhdGlvbjppbmhlcml0O3RleHQtc2hhZG93OmluaGVyaXQ7dGV4dC10cmFuc2Zvcm06aW5oZXJpdH0udGItYnV0dG9uX19jb250ZW50e3ZlcnRpY2FsLWFsaWduOm1pZGRsZTt0cmFuc2l0aW9uOmFsbCAwLjNzIGVhc2V9LnRiLWJ1dHRvbl9faWNvbnt0cmFuc2l0aW9uOmFsbCAwLjNzIGVhc2U7ZGlzcGxheTppbmxpbmUtYmxvY2s7dmVydGljYWwtYWxpZ246bWlkZGxlO2ZvbnQtc3R5bGU6bm9ybWFsICFpbXBvcnRhbnR9LnRiLWJ1dHRvbl9faWNvbjo6YmVmb3Jle2NvbnRlbnQ6YXR0cihkYXRhLWZvbnQtY29kZSk7Zm9udC13ZWlnaHQ6bm9ybWFsICFpbXBvcnRhbnR9LnRiLWJ1dHRvbl9fbGlua3tiYWNrZ3JvdW5kLWNvbG9yOiM0NDQ7Ym9yZGVyLXJhZGl1czowLjNlbTtmb250LXNpemU6MS4zZW07bWFyZ2luLWJvdHRvbTowLjc2ZW07cGFkZGluZzowLjU1ZW0gMS41ZW0gMC41NWVtfSAudGItYnV0dG9uW2RhdGEtdG9vbHNldC1ibG9ja3MtYnV0dG9uPSI3OGRlNWEzZGM1YmNkMmJkNzUwMDdmOTdhYjIyMjk0YiJdIHsgdGV4dC1hbGlnbjogbGVmdDsgfSAud3AtYmxvY2stdG9vbHNldC1ibG9ja3MtZ3JpZC1jb2x1bW4udGItZ3JpZC1jb2x1bW5bZGF0YS10b29sc2V0LWJsb2Nrcy1ncmlkLWNvbHVtbj0iNmM1MjkxMzNlZDg1MzQ5NmY2ODMyZmY2MWVjNzRlNDAiXSB7IGRpc3BsYXk6IGZsZXg7IH0gLnRiLWZpZWxkcy1hbmQtdGV4dFtkYXRhLXRvb2xzZXQtYmxvY2tzLWZpZWxkcy1hbmQtdGV4dD0iYjllMjcxOGQ0ZTFlZWM5OTRiNDEzNWE4N2IzOTQzNzEiXSB7IHBhZGRpbmctdG9wOiA2cHg7cGFkZGluZy1ib3R0b206IDZweDsgfSAudGItY29udGFpbmVyIC50Yi1jb250YWluZXItaW5uZXJ7d2lkdGg6MTAwJTttYXJnaW46MCBhdXRvfS50Yi1ncmlkLC50Yi1ncmlkPi5ibG9jay1lZGl0b3ItaW5uZXItYmxvY2tzPi5ibG9jay1lZGl0b3ItYmxvY2stbGlzdF9fbGF5b3V0e2Rpc3BsYXk6Z3JpZDtncmlkLXJvdy1nYXA6MjVweDtncmlkLWNvbHVtbi1nYXA6MjVweH0udGItZ3JpZC1pdGVte2JhY2tncm91bmQ6I2QzOGEwMztwYWRkaW5nOjMwcHh9LnRiLWdyaWQtY29sdW1ue2ZsZXgtd3JhcDp3cmFwfS50Yi1ncmlkLWNvbHVtbj4qe3dpZHRoOjEwMCV9LnRiLWdyaWQtY29sdW1uLnRiLWdyaWQtYWxpZ24tdG9we3dpZHRoOjEwMCU7ZGlzcGxheTpmbGV4O2FsaWduLWNvbnRlbnQ6ZmxleC1zdGFydH0udGItZ3JpZC1jb2x1bW4udGItZ3JpZC1hbGlnbi1jZW50ZXJ7d2lkdGg6MTAwJTtkaXNwbGF5OmZsZXg7YWxpZ24tY29udGVudDpjZW50ZXJ9LnRiLWdyaWQtY29sdW1uLnRiLWdyaWQtYWxpZ24tYm90dG9te3dpZHRoOjEwMCU7ZGlzcGxheTpmbGV4O2FsaWduLWNvbnRlbnQ6ZmxleC1lbmR9IC53cC1ibG9jay10b29sc2V0LWJsb2Nrcy1ncmlkLnRiLWdyaWRbZGF0YS10b29sc2V0LWJsb2Nrcy1ncmlkPSI3MTA0MGQ4ZTE3MGM0NWE0NGRkNTA0NzIxNTIwMGQ5YSJdIHsgZ3JpZC10ZW1wbGF0ZS1jb2x1bW5zOiBtaW5tYXgoMCwgMWZyKTtncmlkLWF1dG8tZmxvdzogcm93IH0gLndwLWJsb2NrLXRvb2xzZXQtYmxvY2tzLWdyaWQudGItZ3JpZFtkYXRhLXRvb2xzZXQtYmxvY2tzLWdyaWQ9IjcxMDQwZDhlMTcwYzQ1YTQ0ZGQ1MDQ3MjE1MjAwZDlhIl0gID4gLnRiLWdyaWQtY29sdW1uOm50aC1vZi10eXBlKDFuKzEpIHsgZ3JpZC1jb2x1bW46IDEgfSAud3AtYmxvY2stdG9vbHNldC1ibG9ja3MtZ3JpZC1jb2x1bW4udGItZ3JpZC1jb2x1bW5bZGF0YS10b29sc2V0LWJsb2Nrcy1ncmlkLWNvbHVtbj0iMjViM2ViZGM3Y2U4MjRmZjY3Y2EwMjBhYzY2MWU0NzQiXSB7IHBhZGRpbmctbGVmdDogMHB4O2Rpc3BsYXk6IGZsZXg7IH0gLnRiLWdyaWQsLnRiLWdyaWQ+LmJsb2NrLWVkaXRvci1pbm5lci1ibG9ja3M+LmJsb2NrLWVkaXRvci1ibG9jay1saXN0X19sYXlvdXR7ZGlzcGxheTpncmlkO2dyaWQtcm93LWdhcDoyNXB4O2dyaWQtY29sdW1uLWdhcDoyNXB4fS50Yi1ncmlkLWl0ZW17YmFja2dyb3VuZDojZDM4YTAzO3BhZGRpbmc6MzBweH0udGItZ3JpZC1jb2x1bW57ZmxleC13cmFwOndyYXB9LnRiLWdyaWQtY29sdW1uPip7d2lkdGg6MTAwJX0udGItZ3JpZC1jb2x1bW4udGItZ3JpZC1hbGlnbi10b3B7d2lkdGg6MTAwJTtkaXNwbGF5OmZsZXg7YWxpZ24tY29udGVudDpmbGV4LXN0YXJ0fS50Yi1ncmlkLWNvbHVtbi50Yi1ncmlkLWFsaWduLWNlbnRlcnt3aWR0aDoxMDAlO2Rpc3BsYXk6ZmxleDthbGlnbi1jb250ZW50OmNlbnRlcn0udGItZ3JpZC1jb2x1bW4udGItZ3JpZC1hbGlnbi1ib3R0b217d2lkdGg6MTAwJTtkaXNwbGF5OmZsZXg7YWxpZ24tY29udGVudDpmbGV4LWVuZH0gLndwLWJsb2NrLXRvb2xzZXQtYmxvY2tzLWdyaWQudGItZ3JpZFtkYXRhLXRvb2xzZXQtYmxvY2tzLWdyaWQ9ImY0N2FiZTFhNmZmZTE1NzhmYTVlNDAzNjMyNzUzYzMzIl0geyBncmlkLXRlbXBsYXRlLWNvbHVtbnM6IG1pbm1heCgwLCAwLjA2ZnIpIG1pbm1heCgwLCAwLjk0ZnIpO2dyaWQtYXV0by1mbG93OiByb3cgfSAud3AtYmxvY2stdG9vbHNldC1ibG9ja3MtZ3JpZC50Yi1ncmlkW2RhdGEtdG9vbHNldC1ibG9ja3MtZ3JpZD0iZjQ3YWJlMWE2ZmZlMTU3OGZhNWU0MDM2MzI3NTNjMzMiXSA+IC50Yi1ncmlkLWNvbHVtbjpudGgtb2YtdHlwZSgybiArIDEpIHsgZ3JpZC1jb2x1bW46IDEgfSAud3AtYmxvY2stdG9vbHNldC1ibG9ja3MtZ3JpZC50Yi1ncmlkW2RhdGEtdG9vbHNldC1ibG9ja3MtZ3JpZD0iZjQ3YWJlMWE2ZmZlMTU3OGZhNWU0MDM2MzI3NTNjMzMiXSA+IC50Yi1ncmlkLWNvbHVtbjpudGgtb2YtdHlwZSgybiArIDIpIHsgZ3JpZC1jb2x1bW46IDIgfSAud3AtYmxvY2stdG9vbHNldC1ibG9ja3MtZ3JpZC1jb2x1bW4udGItZ3JpZC1jb2x1bW5bZGF0YS10b29sc2V0LWJsb2Nrcy1ncmlkLWNvbHVtbj0iOTg1NzVmYzhkZjU5NmZlZjNhOTcxYzFjMWU3M2UwNjMiXSB7IHBhZGRpbmctcmlnaHQ6IDBweDtwYWRkaW5nLWJvdHRvbTogMjBweDtib3JkZXItcmlnaHQ6IDBweCBzb2xpZCByZ2JhKCAwLCAwLCAwLCAxICk7Ym9yZGVyLWJvdHRvbTogMXB4IHNvbGlkIHJnYmEoIDUxLCAxMzUsIDE1OCwgMC4yICk7ZGlzcGxheTogZmxleDsgfSAudGItZ3JpZCwudGItZ3JpZD4uYmxvY2stZWRpdG9yLWlubmVyLWJsb2Nrcz4uYmxvY2stZWRpdG9yLWJsb2NrLWxpc3RfX2xheW91dHtkaXNwbGF5OmdyaWQ7Z3JpZC1yb3ctZ2FwOjI1cHg7Z3JpZC1jb2x1bW4tZ2FwOjI1cHh9LnRiLWdyaWQtaXRlbXtiYWNrZ3JvdW5kOiNkMzhhMDM7cGFkZGluZzozMHB4fS50Yi1ncmlkLWNvbHVtbntmbGV4LXdyYXA6d3JhcH0udGItZ3JpZC1jb2x1bW4+Knt3aWR0aDoxMDAlfS50Yi1ncmlkLWNvbHVtbi50Yi1ncmlkLWFsaWduLXRvcHt3aWR0aDoxMDAlO2Rpc3BsYXk6ZmxleDthbGlnbi1jb250ZW50OmZsZXgtc3RhcnR9LnRiLWdyaWQtY29sdW1uLnRiLWdyaWQtYWxpZ24tY2VudGVye3dpZHRoOjEwMCU7ZGlzcGxheTpmbGV4O2FsaWduLWNvbnRlbnQ6Y2VudGVyfS50Yi1ncmlkLWNvbHVtbi50Yi1ncmlkLWFsaWduLWJvdHRvbXt3aWR0aDoxMDAlO2Rpc3BsYXk6ZmxleDthbGlnbi1jb250ZW50OmZsZXgtZW5kfSAud3AtYmxvY2stdG9vbHNldC1ibG9ja3MtZ3JpZC50Yi1ncmlkW2RhdGEtdG9vbHNldC1ibG9ja3MtZ3JpZD0iOTljYzNhNWFiNjBkZjc5NGE1N2JiNmI4ZDI1ZWI3MmIiXSB7IGdyaWQtdGVtcGxhdGUtY29sdW1uczogbWlubWF4KDAsIDAuMDZmcikgbWlubWF4KDAsIDAuOTRmcik7Z3JpZC1hdXRvLWZsb3c6IHJvdyB9IC53cC1ibG9jay10b29sc2V0LWJsb2Nrcy1ncmlkLnRiLWdyaWRbZGF0YS10b29sc2V0LWJsb2Nrcy1ncmlkPSI5OWNjM2E1YWI2MGRmNzk0YTU3YmI2YjhkMjVlYjcyYiJdID4gLnRiLWdyaWQtY29sdW1uOm50aC1vZi10eXBlKDJuICsgMSkgeyBncmlkLWNvbHVtbjogMSB9IC53cC1ibG9jay10b29sc2V0LWJsb2Nrcy1ncmlkLnRiLWdyaWRbZGF0YS10b29sc2V0LWJsb2Nrcy1ncmlkPSI5OWNjM2E1YWI2MGRmNzk0YTU3YmI2YjhkMjVlYjcyYiJdID4gLnRiLWdyaWQtY29sdW1uOm50aC1vZi10eXBlKDJuICsgMikgeyBncmlkLWNvbHVtbjogMiB9IC50Yi1ncmlkLC50Yi1ncmlkPi5ibG9jay1lZGl0b3ItaW5uZXItYmxvY2tzPi5ibG9jay1lZGl0b3ItYmxvY2stbGlzdF9fbGF5b3V0e2Rpc3BsYXk6Z3JpZDtncmlkLXJvdy1nYXA6MjVweDtncmlkLWNvbHVtbi1nYXA6MjVweH0udGItZ3JpZC1pdGVte2JhY2tncm91bmQ6I2QzOGEwMztwYWRkaW5nOjMwcHh9LnRiLWdyaWQtY29sdW1ue2ZsZXgtd3JhcDp3cmFwfS50Yi1ncmlkLWNvbHVtbj4qe3dpZHRoOjEwMCV9LnRiLWdyaWQtY29sdW1uLnRiLWdyaWQtYWxpZ24tdG9we3dpZHRoOjEwMCU7ZGlzcGxheTpmbGV4O2FsaWduLWNvbnRlbnQ6ZmxleC1zdGFydH0udGItZ3JpZC1jb2x1bW4udGItZ3JpZC1hbGlnbi1jZW50ZXJ7d2lkdGg6MTAwJTtkaXNwbGF5OmZsZXg7YWxpZ24tY29udGVudDpjZW50ZXJ9LnRiLWdyaWQtY29sdW1uLnRiLWdyaWQtYWxpZ24tYm90dG9te3dpZHRoOjEwMCU7ZGlzcGxheTpmbGV4O2FsaWduLWNvbnRlbnQ6ZmxleC1lbmR9IC53cC1ibG9jay10b29sc2V0LWJsb2Nrcy1ncmlkLnRiLWdyaWRbZGF0YS10b29sc2V0LWJsb2Nrcy1ncmlkPSI2ZDg4NGUzNzU4MjU5YTZjYTJhMTNiOWJmYTg3NzJkOCJdIHsgZ3JpZC10ZW1wbGF0ZS1jb2x1bW5zOiBtaW5tYXgoMCwgMC4wNmZyKSBtaW5tYXgoMCwgMC45NGZyKTtncmlkLWF1dG8tZmxvdzogcm93IH0gLndwLWJsb2NrLXRvb2xzZXQtYmxvY2tzLWdyaWQudGItZ3JpZFtkYXRhLXRvb2xzZXQtYmxvY2tzLWdyaWQ9IjZkODg0ZTM3NTgyNTlhNmNhMmExM2I5YmZhODc3MmQ4Il0gPiAudGItZ3JpZC1jb2x1bW46bnRoLW9mLXR5cGUoMm4gKyAxKSB7IGdyaWQtY29sdW1uOiAxIH0gLndwLWJsb2NrLXRvb2xzZXQtYmxvY2tzLWdyaWQudGItZ3JpZFtkYXRhLXRvb2xzZXQtYmxvY2tzLWdyaWQ9IjZkODg0ZTM3NTgyNTlhNmNhMmExM2I5YmZhODc3MmQ4Il0gPiAudGItZ3JpZC1jb2x1bW46bnRoLW9mLXR5cGUoMm4gKyAyKSB7IGdyaWQtY29sdW1uOiAyIH0gLnRiLWNvbnRhaW5lciAudGItY29udGFpbmVyLWlubmVye3dpZHRoOjEwMCU7bWFyZ2luOjAgYXV0b30udGItZ3JpZCwudGItZ3JpZD4uYmxvY2stZWRpdG9yLWlubmVyLWJsb2Nrcz4uYmxvY2stZWRpdG9yLWJsb2NrLWxpc3RfX2xheW91dHtkaXNwbGF5OmdyaWQ7Z3JpZC1yb3ctZ2FwOjI1cHg7Z3JpZC1jb2x1bW4tZ2FwOjI1cHh9LnRiLWdyaWQtaXRlbXtiYWNrZ3JvdW5kOiNkMzhhMDM7cGFkZGluZzozMHB4fS50Yi1ncmlkLWNvbHVtbntmbGV4LXdyYXA6d3JhcH0udGItZ3JpZC1jb2x1bW4+Knt3aWR0aDoxMDAlfS50Yi1ncmlkLWNvbHVtbi50Yi1ncmlkLWFsaWduLXRvcHt3aWR0aDoxMDAlO2Rpc3BsYXk6ZmxleDthbGlnbi1jb250ZW50OmZsZXgtc3RhcnR9LnRiLWdyaWQtY29sdW1uLnRiLWdyaWQtYWxpZ24tY2VudGVye3dpZHRoOjEwMCU7ZGlzcGxheTpmbGV4O2FsaWduLWNvbnRlbnQ6Y2VudGVyfS50Yi1ncmlkLWNvbHVtbi50Yi1ncmlkLWFsaWduLWJvdHRvbXt3aWR0aDoxMDAlO2Rpc3BsYXk6ZmxleDthbGlnbi1jb250ZW50OmZsZXgtZW5kfSAud3AtYmxvY2stdG9vbHNldC1ibG9ja3MtZ3JpZC50Yi1ncmlkW2RhdGEtdG9vbHNldC1ibG9ja3MtZ3JpZD0iZGJjNWIwMjA4YTQ0ZjNmYjVkMzQwN2VkZDQyMzkxODIiXSB7IGdyaWQtdGVtcGxhdGUtY29sdW1uczogbWlubWF4KDAsIDAuMDZmcikgbWlubWF4KDAsIDAuOTRmcik7Z3JpZC1hdXRvLWZsb3c6IHJvdyB9IC53cC1ibG9jay10b29sc2V0LWJsb2Nrcy1ncmlkLnRiLWdyaWRbZGF0YS10b29sc2V0LWJsb2Nrcy1ncmlkPSJkYmM1YjAyMDhhNDRmM2ZiNWQzNDA3ZWRkNDIzOTE4MiJdID4gLnRiLWdyaWQtY29sdW1uOm50aC1vZi10eXBlKDJuICsgMSkgeyBncmlkLWNvbHVtbjogMSB9IC53cC1ibG9jay10b29sc2V0LWJsb2Nrcy1ncmlkLnRiLWdyaWRbZGF0YS10b29sc2V0LWJsb2Nrcy1ncmlkPSJkYmM1YjAyMDhhNDRmM2ZiNWQzNDA3ZWRkNDIzOTE4MiJdID4gLnRiLWdyaWQtY29sdW1uOm50aC1vZi10eXBlKDJuICsgMikgeyBncmlkLWNvbHVtbjogMiB9ICAudGItY29udGFpbmVyIC50Yi1jb250YWluZXItaW5uZXJ7d2lkdGg6MTAwJTttYXJnaW46MCBhdXRvfSAudGItZ3JpZCwudGItZ3JpZD4uYmxvY2stZWRpdG9yLWlubmVyLWJsb2Nrcz4uYmxvY2stZWRpdG9yLWJsb2NrLWxpc3RfX2xheW91dHtkaXNwbGF5OmdyaWQ7Z3JpZC1yb3ctZ2FwOjI1cHg7Z3JpZC1jb2x1bW4tZ2FwOjI1cHh9LnRiLWdyaWQtaXRlbXtiYWNrZ3JvdW5kOiNkMzhhMDM7cGFkZGluZzozMHB4fS50Yi1ncmlkLWNvbHVtbntmbGV4LXdyYXA6d3JhcH0udGItZ3JpZC1jb2x1bW4+Knt3aWR0aDoxMDAlfS50Yi1ncmlkLWNvbHVtbi50Yi1ncmlkLWFsaWduLXRvcHt3aWR0aDoxMDAlO2Rpc3BsYXk6ZmxleDthbGlnbi1jb250ZW50OmZsZXgtc3RhcnR9LnRiLWdyaWQtY29sdW1uLnRiLWdyaWQtYWxpZ24tY2VudGVye3dpZHRoOjEwMCU7ZGlzcGxheTpmbGV4O2FsaWduLWNvbnRlbnQ6Y2VudGVyfS50Yi1ncmlkLWNvbHVtbi50Yi1ncmlkLWFsaWduLWJvdHRvbXt3aWR0aDoxMDAlO2Rpc3BsYXk6ZmxleDthbGlnbi1jb250ZW50OmZsZXgtZW5kfSAud3AtYmxvY2stdG9vbHNldC1ibG9ja3MtZ3JpZC50Yi1ncmlkW2RhdGEtdG9vbHNldC1ibG9ja3MtZ3JpZD0iZDcwYmJiMTQ1YjA2OTM2YzkwODViNTBiNmJiMjNmYzciXSB7IGdyaWQtdGVtcGxhdGUtY29sdW1uczogbWlubWF4KDAsIDFmcik7Z3JpZC1hdXRvLWZsb3c6IHJvdyB9IC53cC1ibG9jay10b29sc2V0LWJsb2Nrcy1ncmlkLnRiLWdyaWRbZGF0YS10b29sc2V0LWJsb2Nrcy1ncmlkPSJkNzBiYmIxNDViMDY5MzZjOTA4NWI1MGI2YmIyM2ZjNyJdICA+IC50Yi1ncmlkLWNvbHVtbjpudGgtb2YtdHlwZSgxbisxKSB7IGdyaWQtY29sdW1uOiAxIH0gLndwLWJsb2NrLXRvb2xzZXQtYmxvY2tzLWdyaWQtY29sdW1uLnRiLWdyaWQtY29sdW1uW2RhdGEtdG9vbHNldC1ibG9ja3MtZ3JpZC1jb2x1bW49IjMwMzRmYmU4ODZjMTEwNTRlOTViNDZiMDlkM2U0MTEyIl0geyBkaXNwbGF5OiBmbGV4OyB9ICAudGIteW91dHViZXttaW4td2lkdGg6MTAwcHh9LnRiLXlvdXR1YmU+ZGl2e3dpZHRoOjEwMCU7cG9zaXRpb246cmVsYXRpdmV9LnRiLXlvdXR1YmU+ZGl2PmlmcmFtZXtib3gtc2l6aW5nOmJvcmRlci1ib3g7d2lkdGg6MTAwJTtoZWlnaHQ6MTAwJTtwb3NpdGlvbjphYnNvbHV0ZTt0b3A6MDtsZWZ0OjB9IH0g
Learn how to add language columns to spreadsheets for importing multilingual content into a new site, allowing WPML Export and Import to assign language details and connect translations.
When You Need To Manually Prepare XML or CSV Files
If you use supported plugins for migrating content between WordPress sites , WPML Export and Import will automatically add language details to your files.
However, there are times when you might need to create the CSV files yourself, for example:
You maintain multilingual content in spreadsheets and you want to import the content directly from the spreadsheet
Your export plugin isn’t yet supported by WPML Export and Import, so the CSV or XML file your export plugin generates doesn’t automatically include the language information
In these cases, you’ll need to manually add the language information to your spreadsheets. You’ll learn how to prepare the file below, but you can also watch our step-by-step video for a visual explanation.
Required Plugins
Install and activate the following plugins on the site you’re importing to:
Your preferred import plugin
WPML
WPML String Translation
WPML Export and Import
WooCommerce Multilingual and Multicurrency (only if you are importing WooCommerce products)
1. Create Spreadsheets with Language Columns
Depending on your import tool, you may need to prepare one or two spreadsheets.
For WP All Import Pro and similar import plugins, create two spreadsheets:
One for taxonomies (e.g., categories, tags, product categories).
Another for posts (including pages, products, and other post types).
For the native WooCommerce CSV Importer , you only need one spreadsheet, with product categories included within the rows that detail the products themselves.
Each spreadsheet should include the usual content details along with three crucial language columns for WPML:
_wpml_import_translation_group : Use this column for a unique value that associates the default language content with its translations. For e-commerce sites, use the product’s SKU. If there’s no SKU, use a Translation ID (trid ).This is an ID number you create, which should be the same for each piece of content and its translations._wpml_import_language_code: Indicate the language code for each item, for example en for English, es for Spanish). Refer to ISO standards for custom languages (e.g., “es-MX” for Mexican Spanish)._wpml_import_source_language_code : Use this column to specify the original language code of the content. This field is only necessary for translations and you can leave it empty for content in the source language.
Here’s a summary of the information your spreadsheet(s) should contain:
Remember that IDs play a very important role in your spreadsheet:
If you’re adding new content to your site, ID columns help import plugins understand relationships between items. They identify parent-child relationships.
If you’re updating content that already exists on the site, you need to use the exact IDs that your posts or products currently have. This ensures accurate updates and avoids duplication or errors. For content with parent-child relationships, import parent items and their translations first, then use these IDs in the ‘Parent ID’ column of your spreadsheet.
2. Import the Multilingual Data
Once you save your spreadsheets as a CSV or XML file, go to your new site and set up WPML with the languages you plan to import. Then:
Import the taxonomies first (if applicable)
By importing categories, tags, or any other taxonomies first, you lay the foundation for organizing your content on the new site.
Each import plugin has its own interface and steps, and your import plugin will likely require you to match or “map” the column names for categories from your CSV to fields. This is a critical step for enabling WPML Export and Import to update language information correctly.
For example, if you’re using WP All Import Pro :
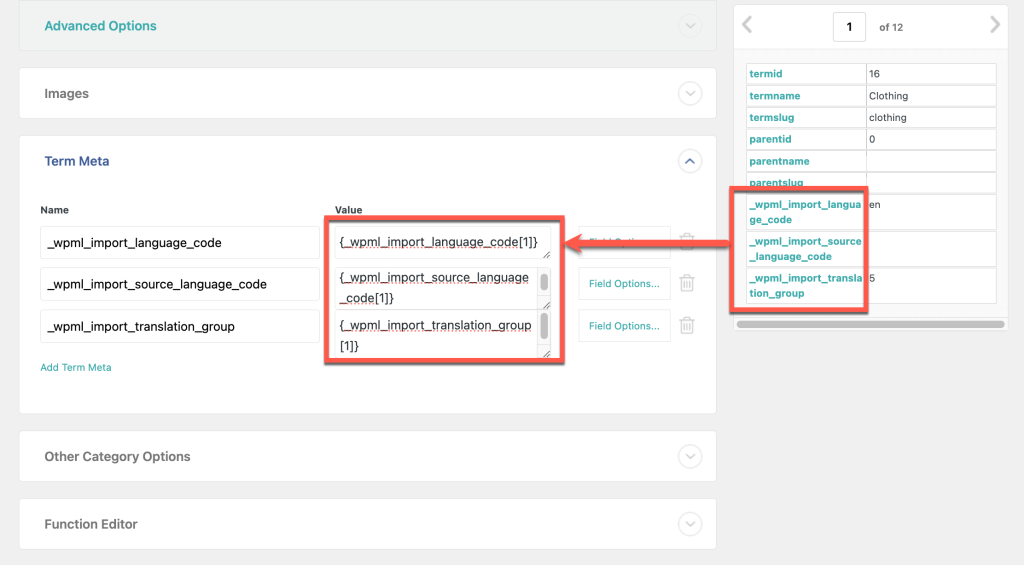
Expand the Term Meta section in Step 3.
Add three term meta fields and drag the language columns to the Value fields. Use the column names from your spreadsheet, without brackets, for the Name fields.
Mapping the language columns in the Term Meta section
Steps may vary with other plugins, but it’s very important to map these fields correctly.
Next, import your post types (posts, pages, products, and any other content types)
Once again, you will need to match or “map” the column names for product data from your CSV to fields.
If you’re using WP All Import Pro :
In Step 3 of the WP All Import wizard, scroll down to the Custom Fields section.
Add three custom fields and drag & drop the language columns from the right sidebar to the Value fields. For the Name fields, use the column names without the brackets. Again, this step might look different if you use another importing plugin, but you must map this information for the import to work.
Mapping language fields to custom fields in WP All Import Pro
Until you run WPML Export and Import, all your imported content will be grouped under one language. If you’re using a supported import plugin , WPML Export and Import will temporarily set imported content to Draft status to prevent mixed languages on the front-end. For unsupported plugins, you need to set the publishing status yourself.
Learn more about managing the visibility of imported content .
3. Run WPML Export and Import
With your multilingual content imported, go to WPML → Export and Import and click Run WPML Import. It may take a few minutes for WPML Export and Import to go through the steps of adding the language information and connecting translations.
After WPML Export and Import completes its update process on your imported content, review your posts, pages, products, and taxonomies.
Do this check on both the backend and front-end of your site. Make sure that each item of content correctly appears under the correct language and that the translations are properly linked. If you find any taxonomy translation missing or not properly connected to the default language term, you’ll need to manually connect the taxonomy translations .


