With WP All Import, WPML, and the WPML All Import add-on, you can import content in multiple languages. This includes posts, pages, WooCommerce products, taxonomies, media, and other custom fields and post types.
This page shows you how to use WP All Import with WPML to import content in multiple languages. To learn how to import content in one language and then translate it, see the page about using WP All Import with WPML.
When importing content in a default language and one or more secondary languages, you need to follow a specific workflow. Please follow the exact order of this tutorial.
Getting Started
Start by installing and activating the following plugins:
- WP All Import plugin
- WPML core plugin
- WPML All Import add-on (available from your WPML Downloads page)
If you want to import WooCommerce products, you will also need:
- Import WooCommerce Products add-on (comes with the WP All Import Pro packages)
- WooCommerce Multilingual & Multicurrency (available from your WPML Downloads page)
Video – Importing Posts from CSV Files in Multiple Languages
Watch the following video tutorial on how to import posts in multiple languages using CSV files using WPML and WP All Import Pro.
You can also download the example CSV files used in this video.
Step 1: Prepare Your Multilingual Content for Importing
Before you can import your multilingual content, you need to:
Create the CSV Files for Default and Secondary Languages
Start by creating a new spreadsheet and saving it as either a CSV file or XML file. Give it a meaningful filename, as this will help identify the file from a list later in the process.
Then, follow the steps below:
- Create one spreadsheet containing your default language post titles and content.
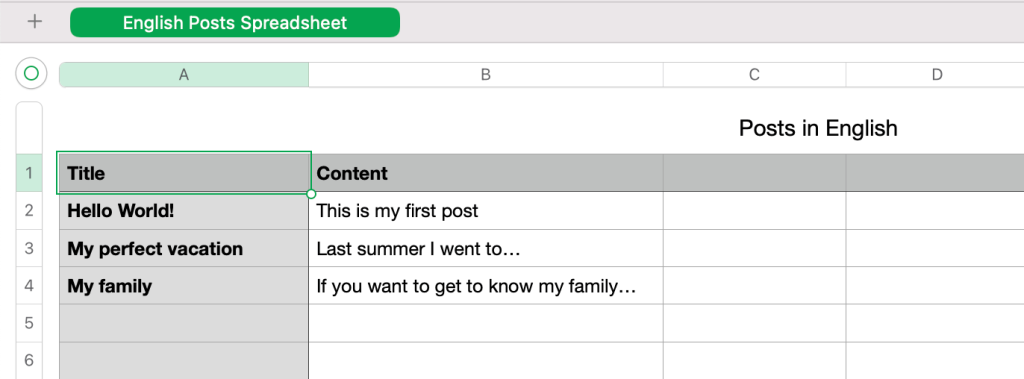
- Prepare separate CSV files for each additional language you want to import.

Next, you need to give WP All Import a way to connect the default language posts to the translations. You can do this by assigning a unique identifier for each post.
Add a Unique Identifier to Your Spreadsheets
Adding a unique identifier to your spreadsheet is a required step. To connect the default language content and translations, you need to use an ID number. You cannot use other custom fields, such as SKU.
Now, you need to create a Unique Identifier column in each of your spreadsheets. This is needed to link imported posts with their translations. The ID number needs to be the same for the default language post and its translation.
- Assign an ID number to each of your posts in your default language.

- Use the same ID number for the same posts in your secondary language files. By looking at this ID, you can tell which post is the translation of another.

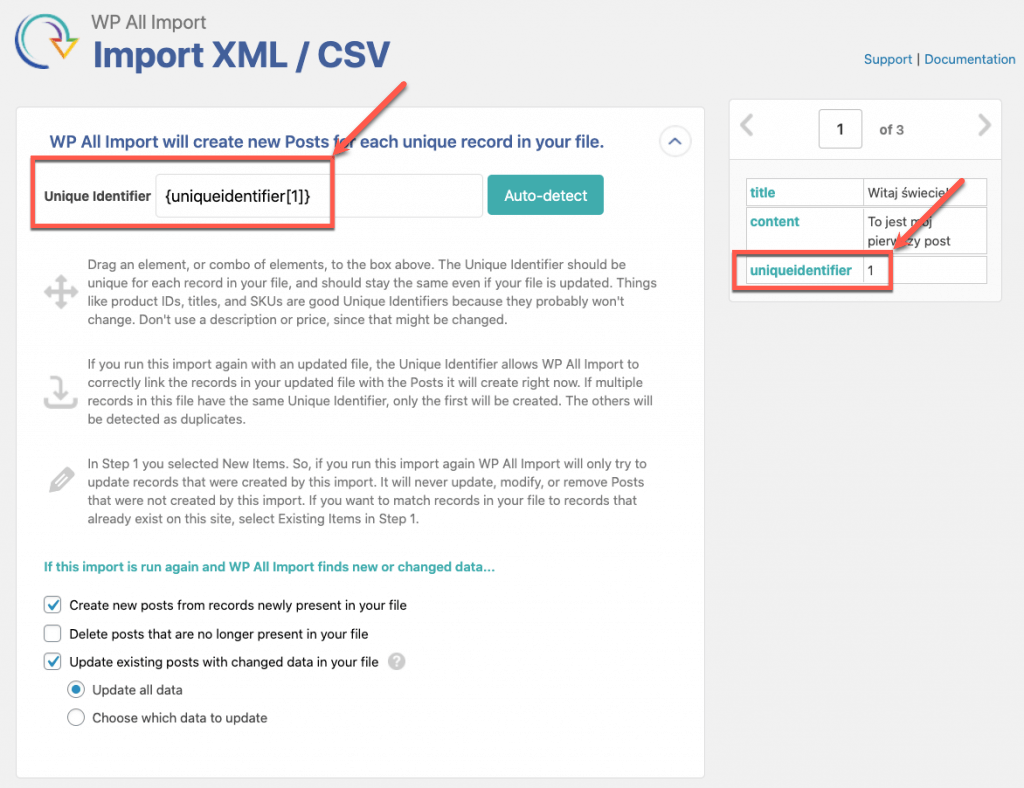
As an example, the screenshots above show you that “Hello World!” has a Polish translation of “Witaj świecie!”. We know this because they share the same unique identifier.
Step 2: Create Your Taxonomies in WordPress
If you are importing translated posts with taxonomies (categories, tags, or custom taxonomies), you must create the exact same taxonomies in your WordPress site before importing the post files. You can do this in two ways:
- Option 1: Create the terms manually and translate them
- Option 2: Import the multilingual terms using WP All Import
We cover both options in detail below.
Option 1: Create the Terms Manually and Translate Them
Start by creating the taxonomies on your site in the default language. Then, use WPML to translate your terms.
Make sure the terms you create in both your default and secondary languages match the terms your posts use in your CSV files.
Category terms translated in WPML → Taxonomy Translation
Secondary language CSV file with translated Category terms
If you have a lot of terms to translate, you can check out our guide on translating all taxonomy terms at once.
Option 2: Import the Multilingual Terms using WP All Import
Please note that you can only import taxonomies directly with WP All Import Pro.
If you don’t want to create the terms and translate them, you can import the terms using WP All Import Pro. However, you must import the taxonomy terms first, then import the posts.
This is because WP Import needs to be able to set the correct taxonomy for the posts you import. For this to happen, the taxonomy terms and translations must exist on your site before you import the posts. They also need to match the terms assigned to the posts in your CSV file.
If your taxonomy terms have the exact same name in the default and secondary languages, the import of the translated terms will not work right.
Before importing terms with the same name in multiple languages, we recommend renaming the translated terms. After the import, you can change the translated term name back to the same name as the default language term if needed.Or, you can add a language code, like -es to the end of the taxonomy term in your secondary language. Then, choose the Set slug manually option and manually map the slug to the corresponding column in your spreadsheet.
To do this:
- Prepare new CSV files to import the taxonomies and their translations. Make sure to add the unique identifier column to all CSV files to link each taxonomy term with its translation.
Default language CSV file with Category terms
Secondary language CSV file with Category terms
- Import the CSV file with the taxonomies in your site’s default language. You can follow the WP All Import guide to importing taxonomies.
- Import the secondary language CSV file. In Step 3, expand the WPML All Import metabox and choose the correct secondary language. Then, expand the Automatic Record Matching to Translate section and select the file that you used to import the default language posts. Make sure the Unique Identifier is the same as the one set during the default language import.
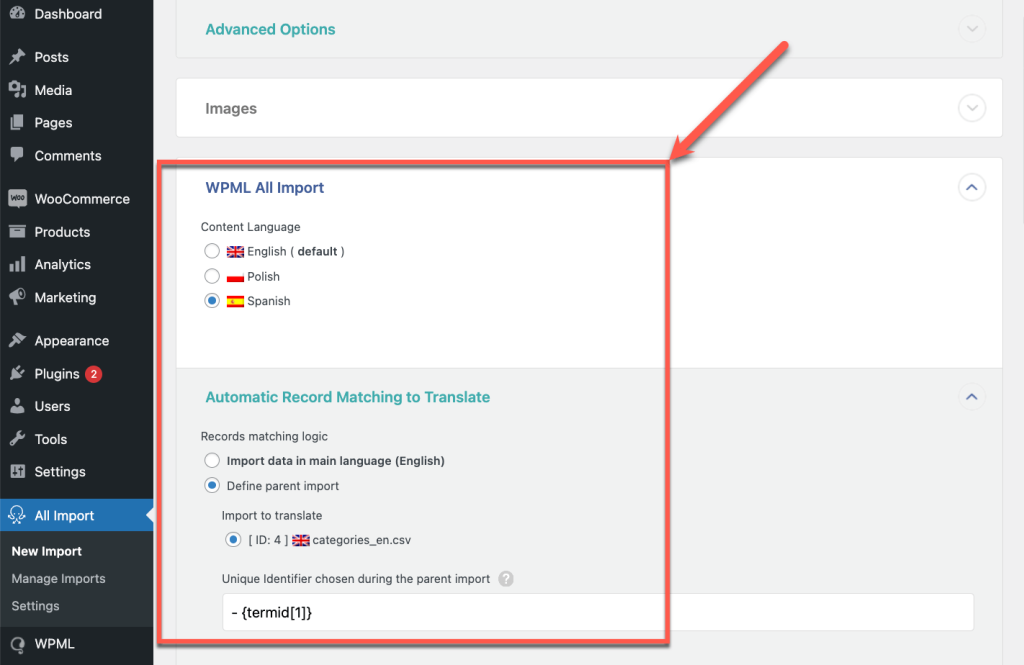
- In Step 4, disable the option to increase the speed of the import process. Then, confirm and run your import.
How to Connect Term Translations to Default Language Terms
If you import your taxonomies in a different way than described in the two options above, your secondary language taxonomy terms will not be connected as translations of the default language terms.
In this case, you will need to edit each of your translated taxonomy terms to match them with the default language taxonomy term.
To do this, go to Posts → Categories (or whichever taxonomy type you are correcting):
- Switch to your secondary language using the language switcher at the top of the page.
- Edit the taxonomy term you need to fix.
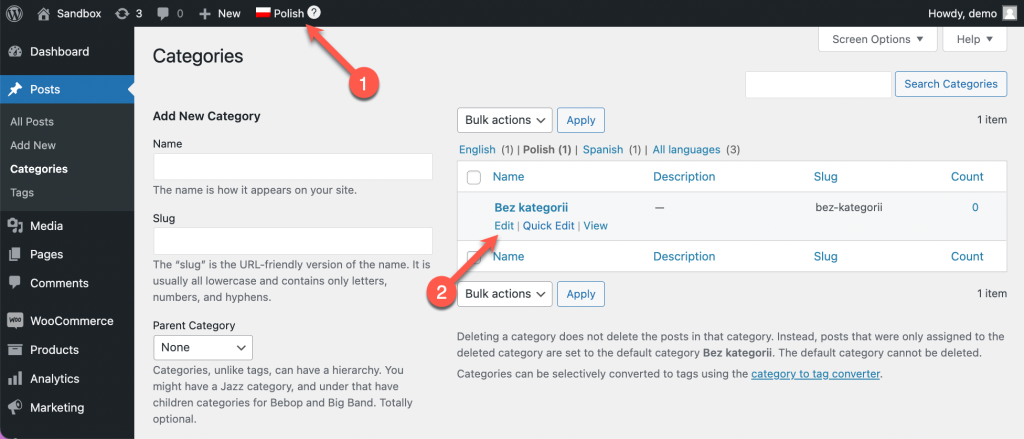
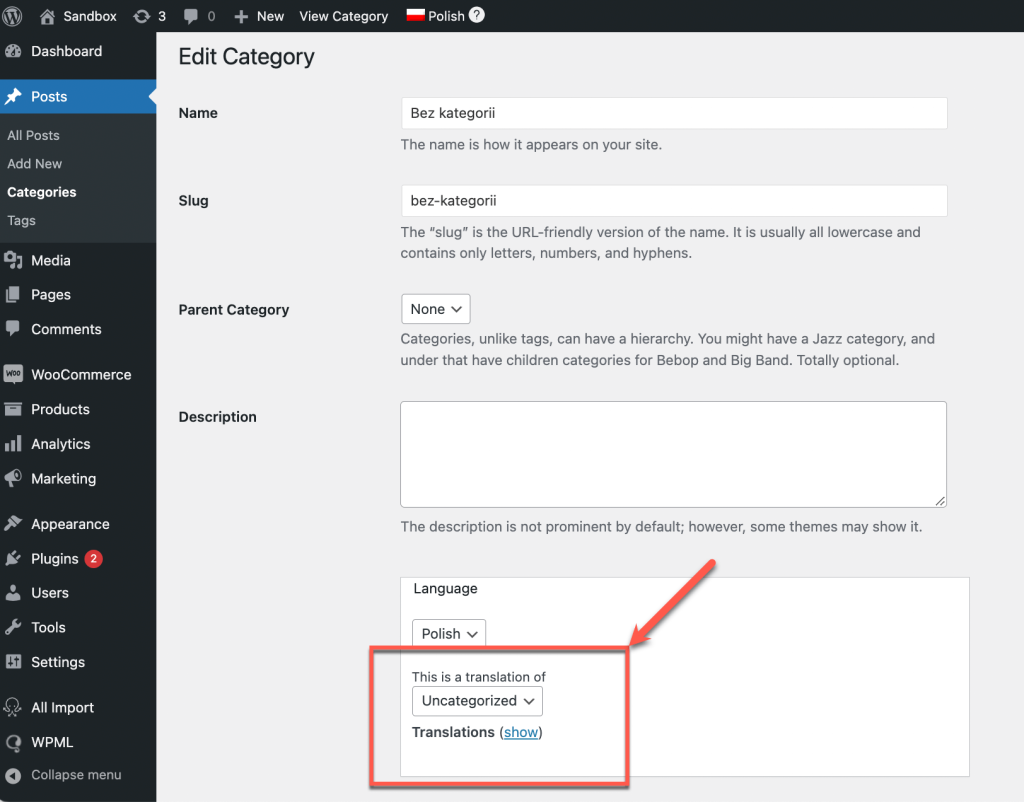
- At the bottom of the page, choose which default language taxonomy term the current term is a translation of.
Step 3: Import Multilingual Posts or Pages
Once your taxonomies and their translations are in place, you are ready to import your post CSV files. You will need to:
- First, upload your default language files.
- Then, disable the import speed optimization option and run your default language import.
- Lastly, upload and import your secondary language files.
We will summarize the steps below. For more detailed documentation, please see WP All Import’s article on how to import files.
Import the Default Language File
To import your default language file:
- Go to All Import → New Import, and click Upload a file to upload your default language CSV file.
- When your upload is complete, choose to import data from the file into New Items. Then, use the drop-down menu to select the type of element you are importing.
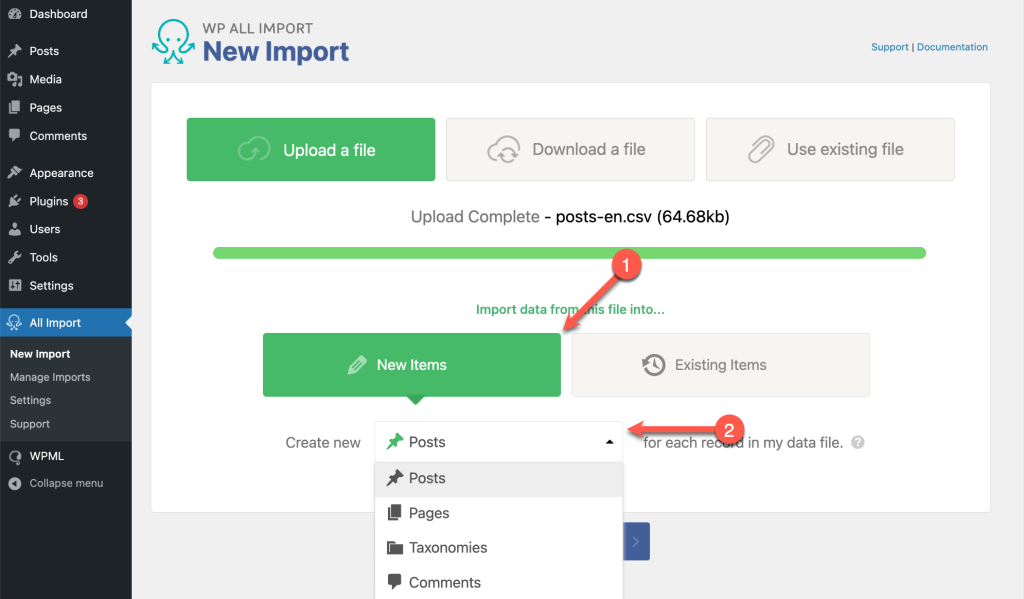
- Continue to Step 2 to review each row in your CSV file. If everything looks correct, click Continue to Step 3.
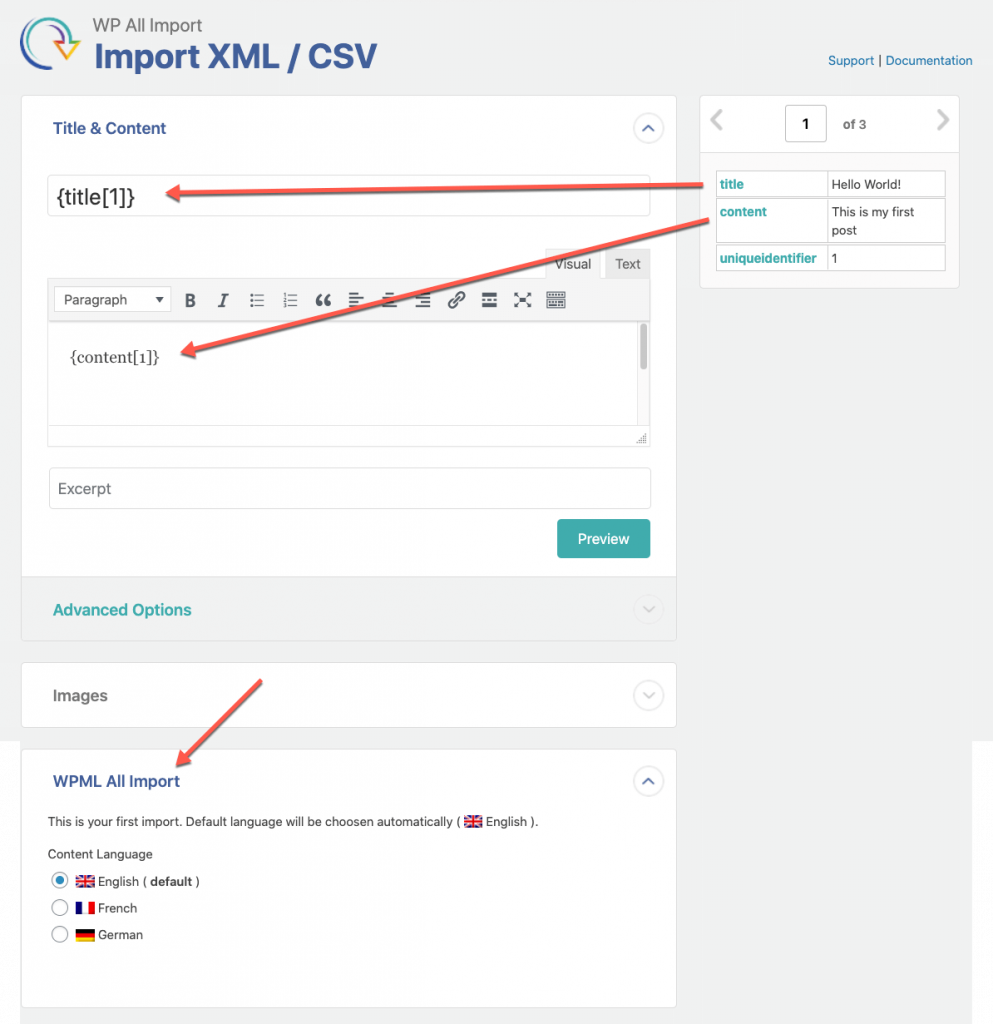
- Map your column titles from the right sidebar to the correct fields by dragging and dropping them. Then, scroll down and expand the WPML All Import metabox and choose your default language. When you’re done, click Continue to Step 4.
- Map the unique identifier to the correct element in your CSV or XML file.
Now, stay in Step 4 to disable the option to increase the speed of the import process.
Disable the WP All Import Speed Optimization Option
The WP All Import plugin provides an option to increase the speed of the import process. This option can interfere with the actions of other plugins, including WPML. For example, post translations may not be assigned to the corresponding language.
Before running the import, you need to disable this option.
To do this, expand the Configure Advanced Settings tab in step 4 of the WP All Import wizard:
- Uncheck the box next to Increase speed by disabling do_action calls in wp_insert_post during import.
- Click on the Save Import Configuration button.
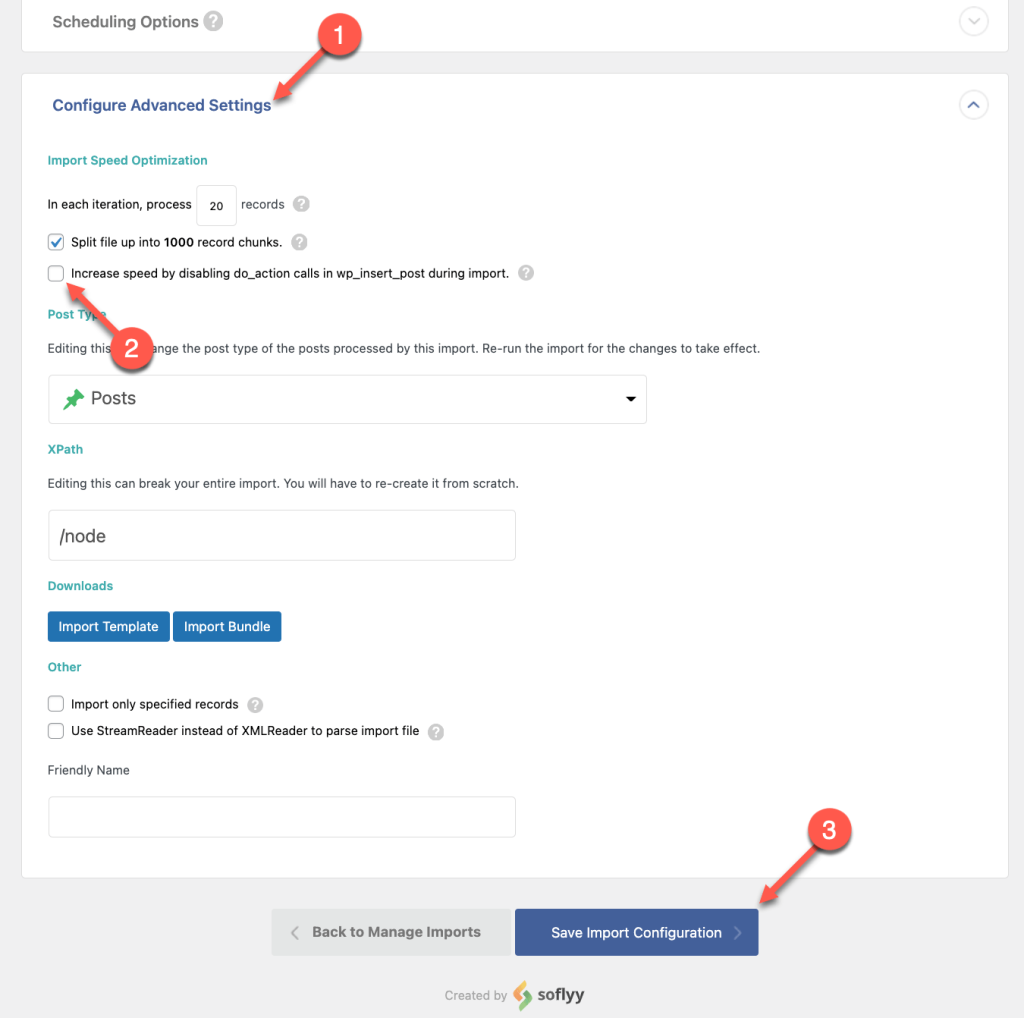
- Confirm and run the import process.
Import the Secondary Language File
When importing content in a third language, the content imported in the second language is overwritten with content from the default language. To avoid this, you need to temporarily deactivate the WPML String Translation plugin. Once the import is complete, you can reactivate it.
We are working on a fix for this issue.
To import your secondary language file, start by repeating the first two steps of importing your default language file.
In Step 3, drag and drop your column titles from the right sidebar to the correct fields. Then, remain in step 3 to connect the secondary and default language files:
- Expand the WPML All Import metabox and choose the correct secondary language.
- Expand the Automatic Record Matching to Translate section and select the Define parent import option. Choose the file that you used to import the default language posts.
- Drag the field that you are using as the unique identifier to the Unique Identifier field. Make sure that it is the same as the one you chose during the default language import.
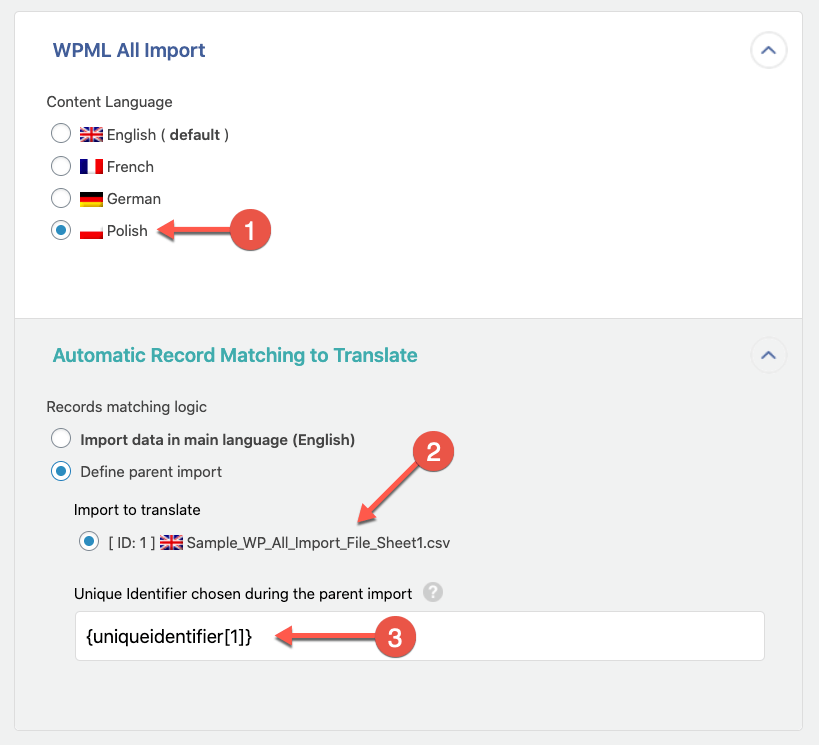
- In Step 4, set the same Unique Identifier as in the previous step.
Now, expand the Configure Advanced Settings tab and confirm the option to increase the import speed is disabled.
Then, you can click Confirm & Run Import. The import will create posts in secondary languages and connect them as the translations of the default language.
Importing WooCommerce Products
Please note that the WPML All Import add-on does not support the importing of custom attributes in WooCommerce. You can only import WooCommerce products with global attributes.
The WooCommerce Product Import add-on is required for importing simple and variable WooCommerce products. Once you have purchased a WP All Import Pro package, you can find the link to download the add-on on your WP All Import downloads page.Make sure that you also have the WooCommerce Multilingual & Multicurrency add-on installed and activated on your site.
Import Simple or Variable Products
If you need to import WooCommerce variable products, see the page about importing variable products in multiple languages with WP All Import and WPML.
You can import WooCommerce simple products in multiple languages by following the process described above for creating taxonomies and importing posts. Be sure to create all your product taxonomy terms and translations before importing your CSV files.
Don’t forget to add the unique identifier column.
You can then import your translations the same way as you would import secondary language posts.
Remember to pay close attention to all the steps!
Import Products with Manually Set Prices for Other Currencies
To import products with manually set prices for other currencies, you need to set the relevant fields in the WooCommerce Add-On section for the default language import. This includes the regular price and sale price.
You can find this section in Step 3 of the import process.
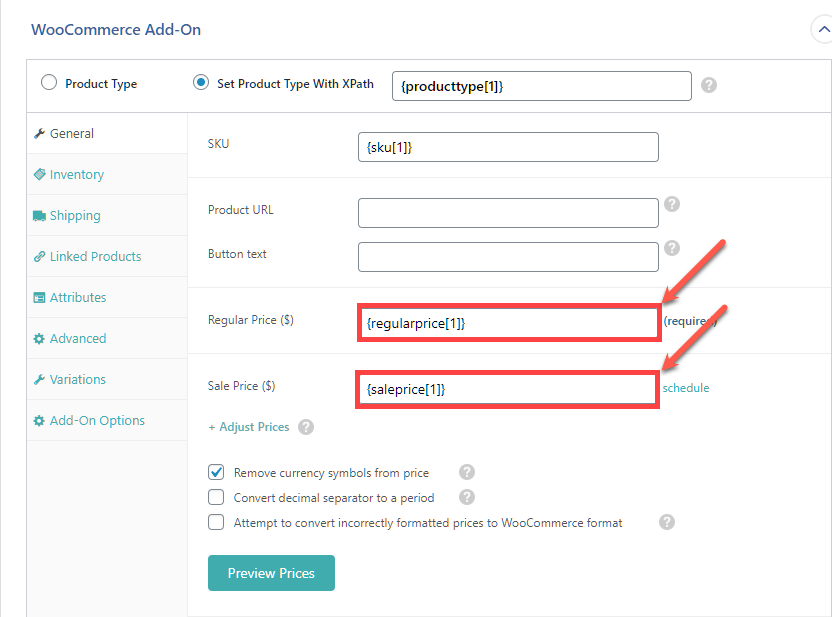
You also need to expand the Custom Fields section in the default language import to manually insert the relevant custom fields. This is necessary in order for the prices to show correctly on the product pages in secondary languages.
In our example, we have manually set prices for products in euros. So, we have added the following custom fields:
_regular_price_EUR_sale_price_EUR_price_EUR_sale_price_dates_to_EUR_sale_price_dates_from_EUR_wcml_schedule_EUR_wcml_custom_prices_status

Depending on the currency you have set prices for, you need to change the suffix of several of the custom fields to match the currency code. To get the currency code:
- Go to WooCommerce → WooCommerce Multilingual & Multicurrency.
- Go to the Multicurrency tab and click on the Add currency button.
- Select the currency to get its code.
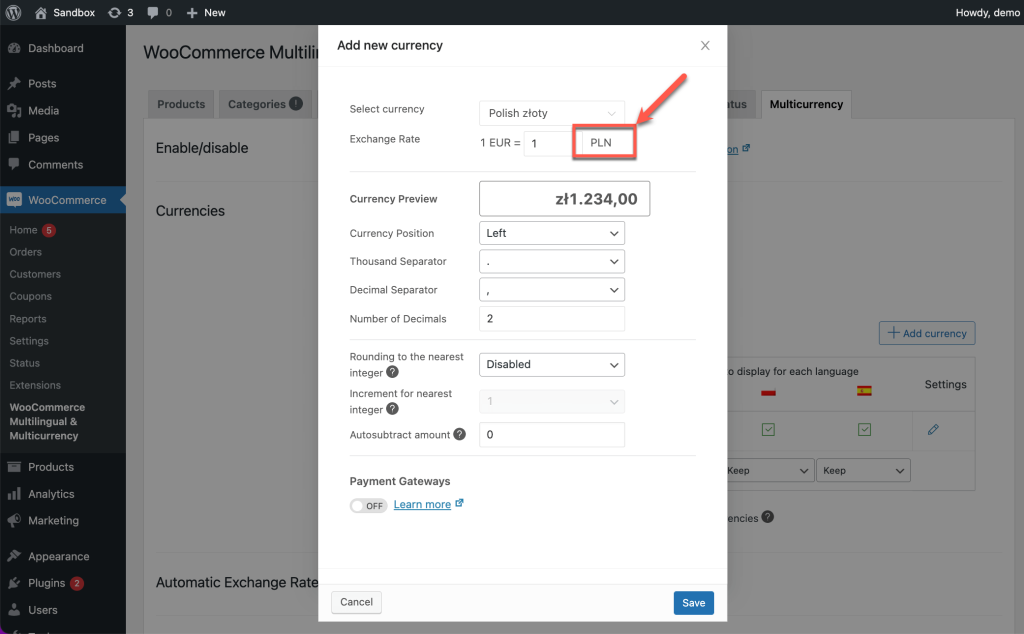
If you are importing products in more than one language and they all have manually set prices for all other currencies, make sure to add custom fields associated with all the currency suffixes.
Updating the Imported Translations
Once you import content in multiple languages, you can only update the translations manually. This requires you to turn off the Advanced Translation Editor and edit the translations using the native WordPress editor.
If you try to edit these translations in the Advanced Translation Editor, you will see blank cells. This is because the Advanced Translation Editor relies on translation memory. It can’t “see” translations that were imported or manually created.
Adding Translations When the Default Language Content Already Exists on the Site
Because WP All Import relies on the unique identifier to connect translated posts with their corresponding default language post, you cannot upload the secondary language file to add translations to pre-existing default language content. If you do this, WP All Import will not know which posts the translations belong to.
To add translations when default language content already exists on the site:
- Export your default language content using WP All Export.
- Edit the newly created CSV to add a column for the unique identifier.
- Delete the original content from the site.
- Import the default language CSV file with the unique identifier column. Make sure to import it as New items.
Once the default language file has been imported, you can continue with your secondary language file as previously explained.
Alternative Import & Export Plugins
WPML is compatible with various other import & export plugins. Visit our Top WordPress Import and Export Plugins guide to learn more about our recommended solutions.
